HL-7050
FAQs & Troubleshooting |
What is 'Secure Printing' and how do I use it? (for Macintosh users)
The secure print capability of your Brother printer enables you to send documents directly to the printer, those documents will only be printed as and when you enter your personal PIN number into the printer. Added functionality is gained by adding optional Hard Disc or Compact Flash memory to the printer.
The PIN number is a 4-digit number which you can specify when you submit the print job from your PC.
Printers without optional HDD/Compact Flash memory
Documents remain in the printer memory (referred to as a RAMDISK) until either one of the two happens:
- The printer is switched off
- The secure document is printed. For security reasons, as soon as you enter your PIN number and print the document, it is deleted from the printer memory.
Before you use the secure print option using your printers memory, you must format the RAMDISK of the printer.
Click here to learn how to format the printer RAMDISK.
Printers with an optional HDD/Compact Flash memory
Documents remain in the printer memory (referred to as a RAMDISK) until either one of the two happens:
- The printer is switched off
- The secure document is printed. For security reasons, as soon as you enter your PIN number and print the document, it is deleted from the printer memory.
Before you use the secure print option using the optional HDD or Compact Flash memory, you must format the HDD or Compact Flash memory. Click here to learn how to format the HDD or Compact Flash memory.
How to use the secure print option:
Step 1: Send your document data to the printer.
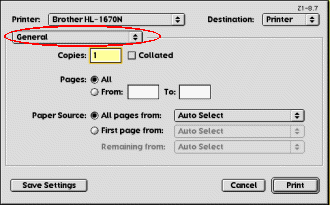
- From a Macintosh applications such as ClarisWorks, click the "File" menu, and then select the "Print" option. You will see a dialogue similar to the one below:

- Click the "General" drop down box.
-
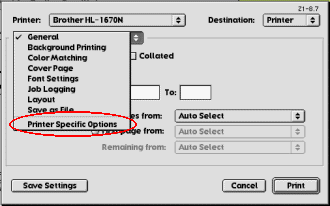
You will see a drop down list with the following options. From the drop down list select 'Printer Specific Options'.

If you have a printer that is using an optional HD-6G/EX or Compact Flash memory module you will see two 'Printer Specific Options'. In this case, select 'Printer Specific Options 1'.
-
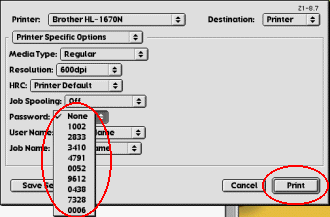
To activate the "Secure Print" option you must select the 'password' option. Do this by choosing one of the predefined passwords available from the drop down list as shown below.

- Click the "Print" button and the print job will be sent to the printer; however as the document is a "Secure Document", it will not be printed until you enter your PIN number on the printer front panel. Please proceed with the steps below.
Step 2: Print the document.
To print the document, follow the steps below:
- Press the "Reprint" button on the printer LCD.
- The LCD color will change to orange and you will see the message "SECURE FILE".
- Press the "Set" button.
- You will see your username on the LCD panel (please note that if there is more than one user of the printer you may have to press the + and - arrow keys until you see your username information).
- Press the SET button to select the username.
- You will then see a list of secure documents that the user has submitted. If there is more than one document use the "+" or "-" arrow keys to scroll through the jobs.
- Press the SET button to select the job you wish to print.
- The LCD panel will display "PASS NO.=0000". At this point you must enter the password (or PIN) number that you specified. To enter the number use the + or - arrow keys in conjunction with the SET button. For example, if the PIN number is "1234" press the + KEY until the first digit changes to "1", then press the SET button, then enter the next digit "2" by pressing the + button two times and press the SET button. Continue working this way until all four digits are specified.
- If the password is entered correctly you will see "COPIES = 1", use the + or - keys to specify the number of copies you wish to print and then press the SET button.
- The LCD color will change to green and the job will be printed.
- Please note that for security reasons, the document will be deleted from the printer RAMDISK when it is successfully printed.
