MFC-7450
常見問題&故障排除 |
Scan a document into ScanSoft™ PaperPort™ 11SE
To scan your document into ScanSoft™ PaperPort™ 11SE follow the steps below:
-
Place your document on the flatbed scanner glass or the ADF(Automatic Document Feeder) (only for machines which have the ADF).
-
Start the ScanSoft™ PaperPort™ 11SE software that was installed during the MFL-Pro Suite installation to scan a document.
-
Click File, then Scan or Get Photo. You can also click the Scan or Get Photo button.The Scan or Get Photo panel appears on the left side of the screen.
-
Click Select button.
-
Choose TW-Brother [model name] / Brother [model name] or TW-Brother [model name] LAN / Brother [model name] LAN from the Available Scanners list.
-
Check the Display scanner dialog box on the Scan or Get Photo panel.
-
Click Scan.
The Scanner Setup dialog box appears.
-
Adjust the following settings, if needed, in the Scanner Setup dialog box:
(1) Scan(Image Type) (2) Resolution (3) Scan Type (4) Brightness (5) Contrast (6) Document Size 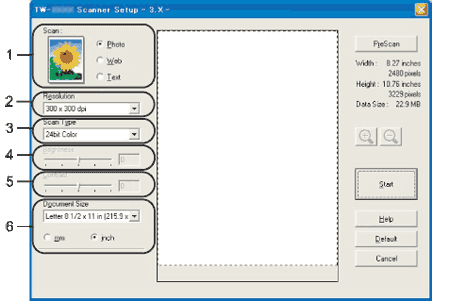
-
Click Start.
When scanning is finished, click Cancel to return to the PaperPort™ 11SE window.
After you select a document size, you can adjust the scanning area further by clicking the left mouse button and dragging it. This is required when you want to crop an image when scanning.
內容意見回饋
請於下方回饋您的意見以幫助我們提升服務的品質
