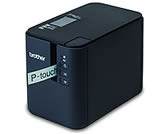
PT-P950NW
FAQs & Troubleshooting |
Using the Device Settings (for Windows)
To use the Device Settings, please follow the steps below:
-
Open the Printer Setting Tool.
Refer to the FAQ: "Using the Printer Setting Tool (for Windows)".
-
Select Device Settings.
The Device Settings window appears.
-
Specify or change the settings.
See below for detailed information.
Settings Dialog Box
Menu Bar
Basic Tab
Label Settings Tab
Panel Settings Tab (PT-P950NW Only)
Management Tabs (PT-P950NW Only)
Applying Setting Changes to Multiple Printers
-
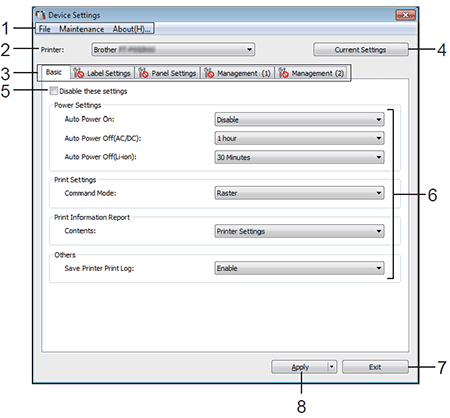
Menu Bar
Select a command contained in each menu from the list. -
Printer
Specifies the printer whose device settings are to be configured.
If only one printer is connected, it is unnecessary to make a selection since only that printer will appear. -
Settings Tabs
Contains settings that may be specified or changed.If
 appears in the tab, the settings in that tab cannot be specified or changed. In addition, the settings in the tab will not be applied to the printer even if [Apply] is clicked. The settings in the tab will also not be saved or exported when the [Save in Command File] or [Export] command is executed.
 -
Current Settings
Retrieves the settings from the currently connected printer and displays them in the dialog box. Settings will also be retrieved for parameters on tabs with .
. -
Disable these settings
When this check box is selected, appears in the tab, and the settings can no longer be specified or changed.
Settings in a tab where appears will not be applied to the printer even if [Apply] is clicked. In addition, the settings in the tab will not be saved or exported when the [Save in Command File] or [Export] command is executed.
 -
Parameters
Displays the current settings. -
Exit
Exits [Device Settings], and returns to the main window of the Printer Setting Tool. -
Apply
Applies the settings to the printer.
To save the specified settings in a command file, select [Save in Command File] from the drop-down list.
-
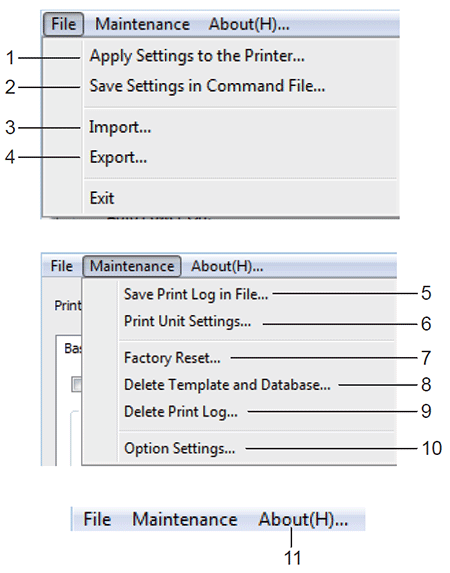
Apply Settings to the Printer
Applies the settings to the printer.
Performs the same operation as when [Apply] is clicked. -
Save Settings in Command File
Saves the specified settings in a command file. Performs the same operation as when [Save in Command File] is selected from the [Apply] drop-down list. -
Import
Imports the exported file. -
Export
Saves the current settings in a file. -
Save Print Log in File
Saves the print log in a file in the CSV format. -
Print Unit Settings
Prints a report containing firmware version and device setting information.
You can also print this report using the (Feed&Cut) button for more than 10 seconds.
When you print this report, use 24mm (0.94') or 36 mm (1.4') tape.
-
Factory Reset
Resets all printer settings to factory settings. -
Delete Template and Database
Deletes the templates and databases stored in the printer. -
Delete Print Log
Deletes the print log stored in the printer. -
Option Settings
If the [Do not display an error message if the current settings cannot be retrieved at startup] check box is selected, a message will not be displayed next time. -
About
Displays the version information.
-
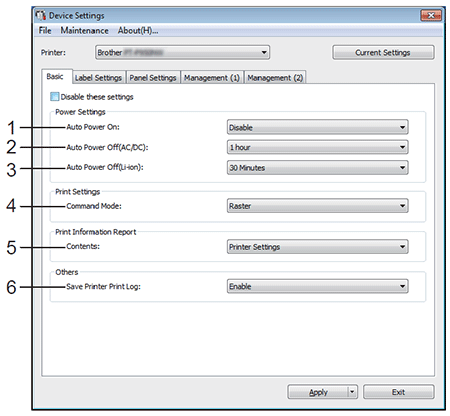
Auto Power On
Specifies whether or not the printer turns on automatically when the power supply cord is plugged into an electrical socket.
Available settings: [Disable], [Enable] -
Auto Power Off ( AC/DC )
Specifies the period of time that passes before the printer turns off automatically when connected to an electrical socket.
Available settings: [None], 10/20/30/40/50 Minutes, 1/2/4/8/12 hours -
Auto Power Off ( Li-ion )
Specifies the amount of time that passes before the printer turns off automatically when powered by the rechargeable Li-ion battery.
Available settings: [None], 10/20/30/40/50 Minutes, 1 hour -
Command Mode
Specifies the printer's command format.
Available settings: [Raster], [ESC/P], [P-touch Template] -
Contents
Specifies the printer information that will be printed.
Available settings: [All], [Usage Log], [Printer Settings], [Printer Transfer Data] -
Save Printer Print Log
Select whether or not to save the printer's print log. If [Disable] is selected, [Maintenance] - [Save Print Log in File] cannot be selected.
Available settings: [Enable], [Disable]
-
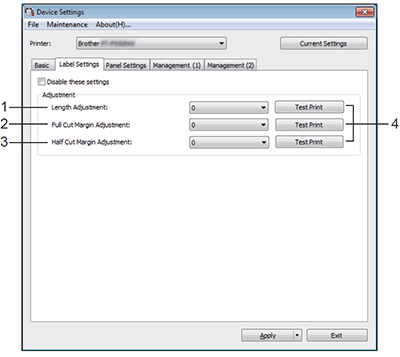
Length Adjustment
Adjusts the length of the printed label to correspond to the length of the label displayed on the computer.
Available settings: -4 to +4 (1 increments) -
Full Cut Margin Adjustment
Adjusts the margin length when fully cutting labels.
Available settings: -2 to +2 (1 increments) -
Half Cut Margin Adjustment
Adjusts the margin length when half-cutting labels.
Available settings: -2 to +2 (1 increments) -
Test Print
Prints a test label to check the results of each adjustment.
Panel Settings Tab ( PT-P950NW Only )
Specify the settings when the touch panel display (optional) is used.
-
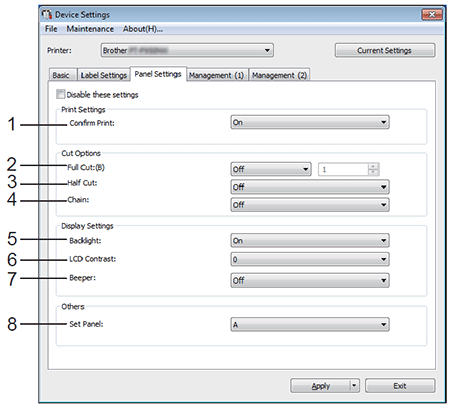
Confirm Print
Select whether a message appears before printing so that the number of copies can be confirmed.
Available settings: [On], [Off] -
Full Cut
Select whether to cut the labels automatically and how many labels to print before cutting them.
Available settings: [On], [Off] ( A number between 1 and 99 can be specified. ) -
Half Cut
Select whether to use half cuts.
Available settings: [On], [Off] -
Chain
Select whether to use chain printing.
Available settings: [On], [Off] -
Backlight
Select whether the LCD display backlight is turned on.
Available settings: [On], [Off] -
LCD Contrast
Select whether the LCD display backlight is turned on.
Available settings: -2 – +2 -
Beeper
Select whether the printer beeps when a touch panel key is pressed.
Available settings: [On], [Off] -
Set Panel
Select the touch panel you want.
Available settings: [A], [B]
Management Tabs ( PT-P950NW Only )
Specify the settings when the touch panel display (optional) is used.
To display these tabs, you must have administrator privileges for the computer or the printer.
You can confirm the administrator privileges for the printer in the [Printer properties] - [Security] tab.
Management (1)
Management (2)
-
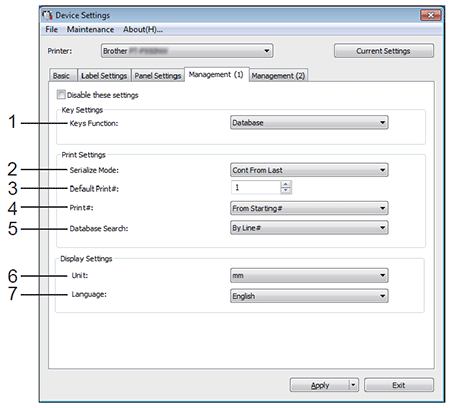
Keys Function
Select the type of data assigned to keys in the one-touch panel.
To assign templates, select [Template] .
To assign databases linked to a single template, select [Database].
Available settings: [Template], [Database] -
Serialise Mode
Select whether to serialise from the last number printed.
Available settings: [Cont From Last], [From Starting#] -
Default Print#
Specify the default number of copies that appears when printing.
Available settings: 1–999 -
Print#
Select whether the number of copies set from the touch panel display (TDU), remains set after the copies are printed.
This TDU setting is applied until the printer is turned off.
Available settings: [From Starting#], [Cont from Last] -
Database Search
When using a template with a linked database, select whether to search for database records by their line number or by their data.
Available settings: [By Line#], [By Data] -
Unit
Select the measurement units for displayed settings.
Available settings: [mm], [inch] -
Language
Select the language of the touch panel display.
Available settings: [Dansk], [Deutsch], [English], [Español], [Français], [Italiano], [Nederlands], [Norsk], [Português], [Suomi], [Svenska], [ ], [
], [  ]
]The possible display languages differ depending on the printer model you are using. If the selected language cannot be used for the touch panel display, the display language will not be changed.
Make sure that the touch panel display can display the selected language. -
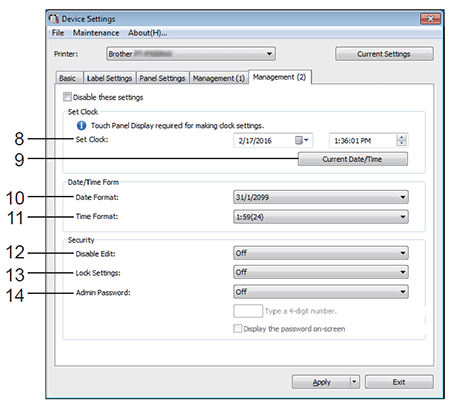
Set Clock
Set the date and time for the touch panel display.
To specify the time settings, you must attach the touch panel display. -
Current Date/Time
Click to retrieve the current date and time from the computer and display them. -
Date Format
Select the date format for the clock. -
Time Format
Select the time format for the clock. -
Disable Edit
Select whether label layouts can be edited.
Available settings: [On], [Off] -
Lock Settings
Select whether settings selected by pressing [ ] (settings key) on the touch panel display can be changed.
Available settings: [On], [Off] -
Admin Password
Set a password for accessing basic settings specified by pressing [ ] (admin key) on the touch panel display. Set a 4-digit password. If the [Display the password on-screen] check box is selected, specified passwords appear in computer windows.
Applying Setting Changes to Multiple Printers
- After applying settings to the first printer, disconnect the printer from the computer, and then connect the second printer to the computer.
- Select the newly connected printer from the [Printer] drop-down list.
-
Click [Apply].
The same settings that were applied to the first printer are applied to the second printer. -
Repeat steps 1 - 3 for all printers whose settings you want to change.
To save the current settings in a file, click [File] - [Export] .
The same settings can be applied to another printer by clicking [File] - [Import], and then selecting the exported settings file.
