MFC-8870DW
FAQs & Troubleshooting |
What are the settings in the Scanner window used for on an Apple Mac?
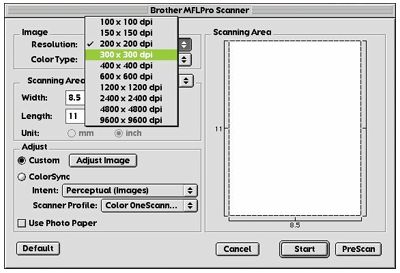
Choose the scanning resolution from the Resolution pop-up menu. Higher resolutions take more memory and transfer time, but can achieve a finer scanned image. (Each model has different resolutions. Please see the specifications for your unit.)
Colour Type:
- Black & White - Set the image Type to Black & White for text or line art. For photographic images,
- Grey (Error diffusion) is used for documents that contain photographic images or graphics. (Error Diffusion is a method for creating simulated grey images by placing black dots in a specific matrix instead of true grey dots.)
- True Grey is also used for documents containing photographic images or graphics. This mode is more exact because it uses up to 256 shades of grey. It requires more memory and longer transfer times.
- Colours - Set the colour type to either 8-bit, which scans up to 8-bit or 24-bit colour, which scans up to 16.8 million colours. You have a choice of faster scanning with or using the Brother Colour Matching Technology with 24-bit colour. Although using 24-bit colour creates an image with the most accurate colours, the image file will be approximately nine times larger than a file created with 8-bit.
Scanning Area:
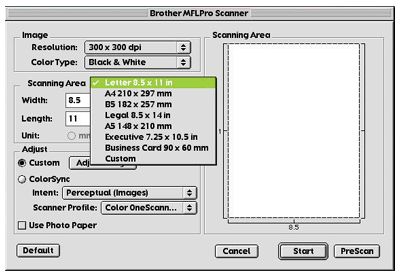
- Letter (8.5 x 11 inches)
- A4 (210 x 297 mm)
- Legal (8.5 x 14 inches)
- A5 (148 x 210 mm)
- B5 (182 x 257 mm)
- Executive (7.25 x 10.5 inches)
- Business Card (90 x 60 mm)
- Custom (User adjustable from 0.35 x 0.35 inches to 8.5 x 14 inches)
After you choose a custom size, you can adjust the scanning area.
Click and hold the mouse button as you drag the mouse to crop the image.
Business Card Size:
To scan business cards, select the Business Card size setting (90 x 60 mm) and place the business card at the top center of a carrier sheet. When scanning photographs or other images for use in a word processor or other graphics application, it is a good idea to try different settings for the contrast,mode and resolution to determine which settings look best. Width: Enter the width of the custom size. Length: Enter the length of the custom size.
Brightness and Contrast:
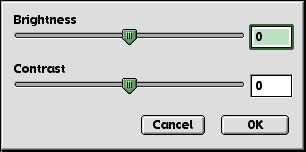
- Adjust the brightness settings to obtain the best image. The Brother TWAIN Scanner driver offers 100 brightness settings (-50 to 50). The default value is 0, representing an average setting. You can set the brightness level by dragging the slidebar to the right to lighten the image or to the left to darken the image. You can also type a value in the box to change the brightness manually. Click OK. If the scanned image is too light, set a lower brightness value and scan the document again. If the image is too dark, set a higher brightness value and scan the document again.
- The contrast setting is adjustable only when you have selected one of the grey scale settings, but it is not available when Black & White is selected as the Grey Scale. Increasing the contrast level (by dragging the slidebar to the right) emphasizes dark and light areas of the Image, while decreasing the contrast level (by dragging the slidebar to the left) reveals more detail in grey areas. Instead of using the slidebar, you can also manually type a value in the box to set the contrast. Click OK.
Colour Matching:
- Perceptual Matching - All the colours of a given gamut are scaled proportionally to fit within another gamut. This intent pretty much maintains the balance between the colours in the image. This intent is the best choice for realistic images, such as scanned photographs.
- Saturation Matching - The relative saturation of colours is maintained from gamut to gamut. So basically the colours are shifted to the edge of the gamut to get the most saturated colour possible. Rendering the image using this intent gives the strongest colours and is the best choice for bar graphs and pie charts, in which the actual colour displayed is less important than its vividness.
- Relative Colourimetric Matching - The colours that fall within the gamuts of both devices are left unchanged. Some colours in both images will be exactly the same, a useful outcome when colours must match quantitatively. What that means is that if the colour is inside the gamut, it will stay the same colour. However, if the colour is outside the gamut, it will be mapped to the edge of the gamut. This intent is best suited for logos or spot colours where colour must match.
- Absolute Colourimetric Matching - A close appearance match may be achieved over most of the tonal range, but if the minimum density of the idealized image is different from that of the output image, the areas of the image that are left blank will be different. Colours that fall within the gamuts of both devices are left unchanged.
Related Models
DCP-110C, DCP-115C, DCP-117C, DCP-120C, DCP-310CN, DCP-315CN, DCP-340CW, DCP-4020C, DCP-7010, DCP-7010L, DCP-7025, DCP-8020, DCP-8025D, DCP-8040, DCP-8045D, DCP-8060, DCP-8065DN, MFC-210C, MFC-215C, MFC-3220C, MFC-3240C, MFC-3320CN, MFC-3340CN, MFC-3420C, MFC-3820CN, MFC-410CN, MFC-425CN, MFC-4820C, MFC-5440CN, MFC-580, MFC-5840CN, MFC-590, MFC-620CN, MFC-640CW, MFC-7225N, MFC-7420, MFC-7820N, MFC-820CW, MFC-8220, MFC-8420, MFC-8440, MFC-8460N, MFC-8820D, MFC-8840D, MFC-8840DN, MFC-8860DN, MFC-8870DW, MFC-890, MFC-9030, MFC-9070, MFC-9160, MFC-9180, MFC-9420CN, MFC-9660, MFC-9760, MFC-9880