HL-3070CW
FAQs & Troubleshooting |
Change the length of time the machine will wait until it goes into Sleep Mode
When the sleep mode is set to on and the printer does not receive data for a certain period of time, it enters sleep mode and acts as though it were turned off. During that time, the back light is off and the LCD shows "Sleep", but the printer can still receive data and start printing if it receives a print file or document or pressing the Go button. If the printer does not start printing when receiving data, press the Go button to print it.
You can change the sleep mode setting from the control panel of the printer or the printer driver.
One configured, the setting will be saved in the printer. You do not have to setup every time.
From the control panel of the printer:
- Make sure that the front cover is closed and the power cord is plugged in.
- Turn on the printer and wait until the printer is in the Ready state.
- Press any of the Menu buttons (+, -, OK or Back) to take the printer off line.
- Press + or - to choose "General Setup". Press OK.
- Press + or - to choose "Ecology". Press OK.
- Press + or - to choose "Sleep Time". Press OK.
- Choose the time that you are going to make the printer enter sleep mode. E.g. 1, 2, 3, 4, 5...
-
Press OK or Go.
The printer will enter sleep mode when the time you have set passes without receiving data after the last job is printed.
From the printer driver:
The instructions vary depending on your Operating System (OS). Choose your OS.
The screens may vary depending on your application and operating system (OS).
[Printer driver]
-
Select the print command in your application.
-
Select your model, and then click the printing properties or preferences button.
The printer driver window appears.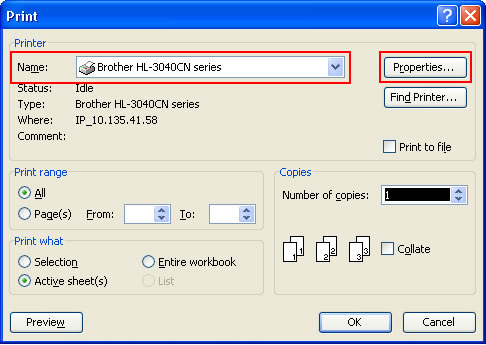
-
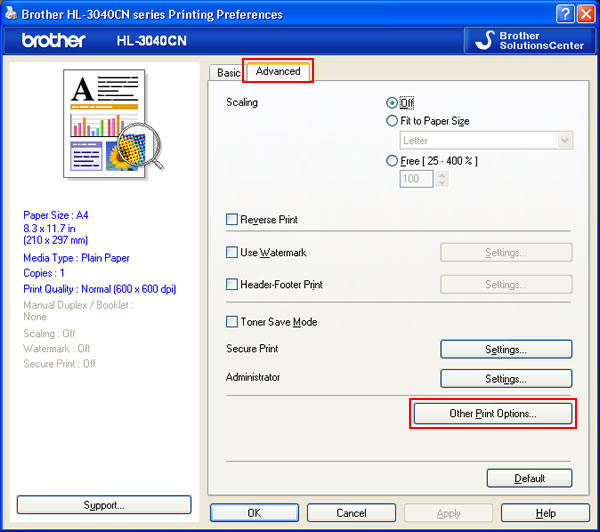
Open the Advanced tab and click Other Print Options.
-
Choose "Sleep Time" in Printer Function and then choose the desired setting you are going to set in Sleep time.
The settings are as follows:
Auto [Intelligent Sleep Mode]:
This setting automatically adjusts to the most suitable timeout setting depending on the frequency of the printer use.
Printer Default:
This setting makes the printer enter sleep mode when the specific time set at the factory passes without receiving data after the printer prints the last job. This can be changed from the printer driver or the control panel of the printer. This is the default setting.
Manual:
This setting makes the printer enter sleep mode when the time that you have set passes without receiving data after the printer prints the last job. Type the time in the box or press the Up or Down Arrow button to set the time. If you want to customise the sleep time, choose this setting and set it.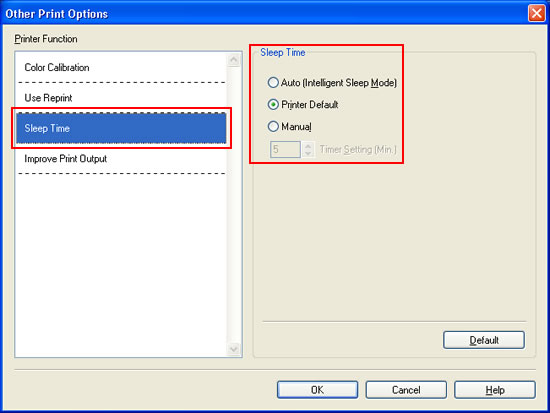
-
Click OK to close the Other Print Options window.
-
Click OK again to close the Printing Preferences window.
-
Click Print.
The printer will enter sleep mode when the time you have set passes without receiving data after the last job is printed.
[BR-Script printer driver]
-
Select the print command in your application.
-
Select your model, and then click the printing properties or preferences button.
The printer driver window appears.
-
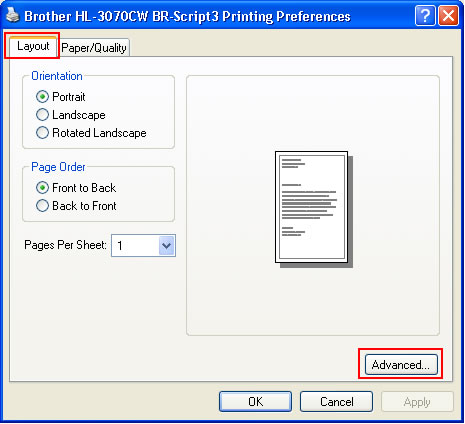
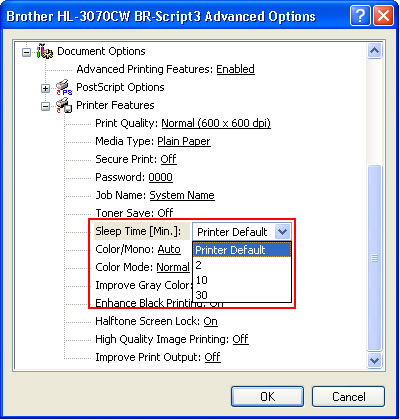
Open the Layout tab and then click Advanced.
-
Choose the time you are going to set in Sleep Time of Printer Features.
-
Click OK to close the Advanced Options window.
-
Click OK again to close the Printing Preferences window.
-
Click Print.
The printer will enter sleep mode when the time you have set passes without receiving data after the last job is printed.
[Printer driver]
-
Open the Print dialogue. (Click here to see details of how to open the Print dialogue.)
-
[Mac OS X 10.3.9 or 10.4.x users]
-
Choose the "Print Settings" option from the pop-up menu under Presets.
-
Click Advanced and then click the Right Arrow button next to Sleep Time to open the setting.
-
Choose the setting you are going to set in Sleep Time.
The settings are as follows:Printer Default:
This setting makes the printer enter sleep mode when the specific time set at the factory passes without receiving data after the printer prints the last job. This can be changed from the printer driver or the control panel of the printer. This is the default setting.
Manual:
This setting makes the printer enter sleep mode when the time that you have set passes without receiving data after the printer prints the last job. Type the time in the box or press the Up or Down Arrow button to set the time. If you want to customise the sleep time, choose this setting and set it.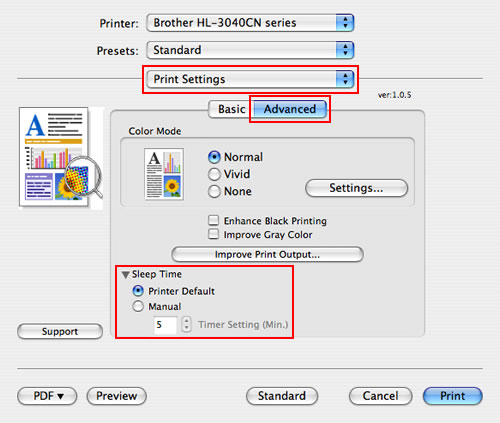
[Mac OS X 10.5.x or later users]-
Choose the "Print Settings" option from the print options pop-up menu.
-
Click Advanced and then click the Right Arrow button next to Sleep Time to open the setting.
-
Choose the setting you are going to set in Sleep Time.
The settings are as follows:
Printer Default:
This setting makes the printer enter sleep mode when the specific time set at the factory passes without receiving data after the printer prints the last job. This can be changed from the printer driver or the control panel of the printer. This is the default setting.
Manual:
This setting makes the printer enter sleep mode when the time that you have set passes without receiving data after the printer prints the last job. Type the time in the box or press the Up or Down Arrow button to set the time. If you want to customise the sleep time, choose this setting and set it.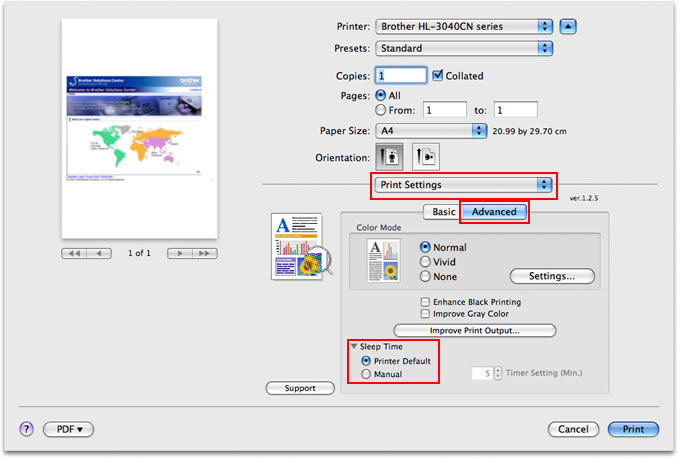
-
Choose the "Print Settings" option from the pop-up menu under Presets.
-
Click Print.
The printer will enter sleep mode when the time you have set passes without receiving data after the last job is printed.
[BR-Script printer driver]
-
Open the Print dialogue. (Click here to see the details of how to open the Print dialogue.)
-
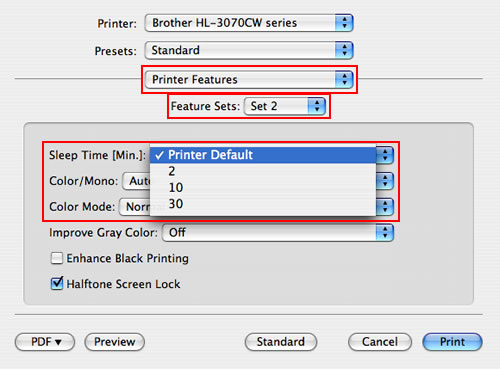
[Mac OS X 10.3.9 or 10.4.x users]
-
Choose the "Printer Features" option from the pop-up menu under Presets.
-
Choose "Set 2" in Feature Sets.
-
Choose the time you are going to set in Sleep Time.
[Mac OS X 10.5.x or later users]-
Choose the "Printer Features" option from the print options pop-up menu.
-
Choose "General 1" in Feature Sets.
-
Choose the time you are going to set in Sleep Time.

-
Choose the "Printer Features" option from the pop-up menu under Presets.
-
Click Print.
The printer will enter sleep mode when the time you have set passes without receiving data after the last job is printed.
