HL-2250DN
FAQs & Troubleshooting |
MANUAL FEED
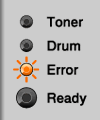
When the MANUAL FEED message appears, the following LED indications is shown on the control panel. The Error LED is on.
The MANUAL FEED message appears when the manual feed slot is chosen as the default paper source in the printer driver.
Please follow one of the steps below to clear the Error LED indication.
- If you want to print from the manual feed slot, go to CASE A: Print from the Manual Feed Slot.
-
If you do not want to print from the manual feed slot, go to CASE B: Print from the Paper Tray (Tray 1).
CASE A: Print from the Manual Feed Slot.
-
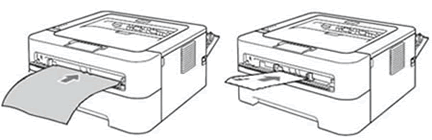
Lift up the support flap to prevent paper from sliding off the face-down output tray, or remove each page as soon as it comes out of the machine.
-
Do one of the following:
- If your machine doesn't have the manual feed slot cover, go to STEP 3.
-
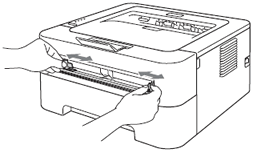
If your machine has the manual feed slot cover, open the manual feed slot cover.

-
Using both hands, slide the manual feed paper guides to the width of the paper that you are going to use.
-
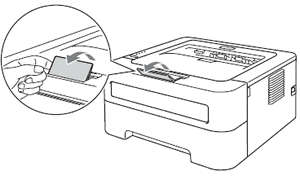
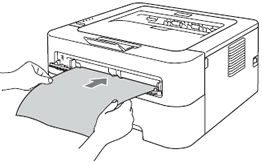
Using both hands, put one piece of paper in the manual feed slot until the front edge of the paper touches the paper feed roller.
-
Once the machine has grasped the paper, let go. The side to be printed should be face up. The machine will hold the paper in place until the print data is sent to the machine.
Before sending the print data to your machine, please do one of the following:
For printing on labels:
Open the back cover (face-up output tray).
For printing on envelopes:
Open the back cover (face-up output tray), and pull down the two green levers inside the back cover. Click here for the details. -
The document will be printed out. If the error message still continues, go to STEP 7.
-
The size of the paper you put in the manual feed slot might be different from the size chosen in the printer driver. Check the paper size.
If you want to print on labels or envelopes from the manual feed slot, click here to see the details of how to print on labels and envelopes.
Make sure you use paper that meets Brother's recommended paper specifications. Click here to see the details of the recommended paper. Click here to see the details of the kinds of paper you can use.
-
Load the same size paper that you chose in the current driver setting. The document will be printed out. If you want to change the paper source, go to STEP 2 in CASE B.
CASE B: Print from the Paper Tray (Tray 1).
-
Cancel the Print Job.
- Press the Go button for about 4 seconds until all the LEDs light up and then release it.
-
Press the Go button again. The Ready and Error LEDs will flash as the job is being cancelled.
-
Make sure the paper is not set in the manual feed slot.
If paper is set in the manual feed slot, the document will be printed from the manual feed slot even though you chose another paper source in the printer driver.
-
Do one of the following:
- If you want to change the tray temporarily for the next print only, go to OPTION 1.
- If you want to change the default paper source (tray) for all print jobs, go to OPTION 2.
OPTION 1: Changing the tray setting temporarily for the next print only
For Windows Users/ For Macintosh users
For Windows Users:
NOTE: The steps and screens may differ depending on the operating system being used.-
Open the Print menu from the application you are using.
(The steps to select the Print menu vary depending on the application you are using.) - Click on Properties.
-
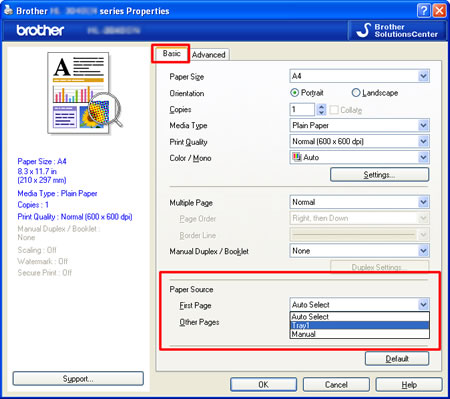
Click the Basic tab and choose Tray1 from the drop-down list for the Paper Source.
-
Click OK to send the print data to the machine.
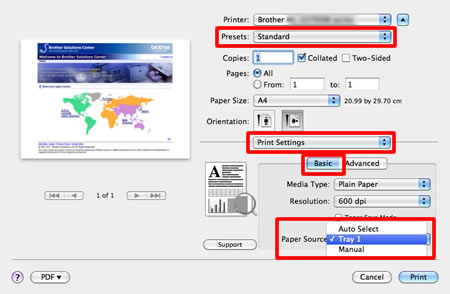
For Macintosh users:
NOTE: The steps and screens may differ depending on the operating system being used.- Open the Print dialog. (Click here to see the details of how to open Print dialog.)
- Choose Standard or Default Settings for Presets.
- Choose Print Settings from the print options pop-up menu.
-
Click Basic and choose Tray1 for Paper Source. Click Print.
OPTION 2: Changing the default tray for every print
For Windows Users/ For Macintosh users
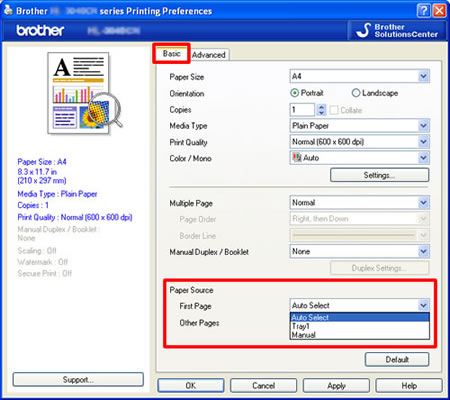
For Windows Users:
NOTE: The steps and screens may differ depending on the operating system being used.
-
Open the Printing Preferences.
Click here to see the details of how to open the Printing Preferences. -
Click the Basic tab and choose Auto Select or Tray1 from the drop-down list for the Paper Source. The Auto Select setting will automatically pull paper from any paper source (tray or manual feed slot) with a defined paper size that matches your document. If you want to use Tray1 as the default paper source, choose Tray1.
-
Click Apply to save your setting. Then, click OK.
For Macintosh users:
NOTE: The steps and screens may differ depending on the operating system being used.- Open the Print dialog. (Click here to see the details of how to open Print dialog.)
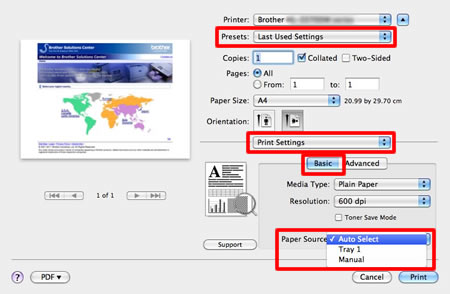
- Choose Last Used Settings for Presets.
- Choose Print Settings from the print options pop-up menu.
-
Click Basic and choose Auto Select or Tray1 for Paper Source. Click Print.
The Auto Select setting will automatically pull paper from any paper source (tray or manual feed slot) that has a defined paper size that matches your document. If you want to use Tray1 as the default paper source, choose Tray1.