HL-1430
FAQs & Troubleshooting |
How can I install the necessary driver on a Windows2000 system using the USB interface?
There are several different methods of installing a Brother printer using the USB cable on Windows 98/Me systems.
-
[Recommended method】Use the installer on the CD-ROM supplied with the printer.
-
Download the 'Full Download Package' from the Brother solutions web site.
-
Let Windows 2000 plug and play the printer.
-
Download the specific driver only (PCL or BR-Script Driver)
Using the installer from the CD-ROM (clicking the 'Initial' Setup icon) - Recommend Method.
This is the recommended installation method when installing a Brother printer into a Windows 2000 environment using the USB interface.
- Insert the CD-ROM that was supplied with the printer.
- Select the appropriate language.
- Click the 'Initial Setup' icon and then select the 'Connect the Interface cable & install the driver utility' option.
Please note you can also select the 'Install Software' icon (see below); however, if you select that icon, the driver installer will not automatically select the USB interface.
- Select the 'USB Interface' option.
- You will then see a warning message telling you that you disconnect the USB interface cable from the printer before you proceed with the installation. Disconnect the USB cable, or ensure that the printer is not switched on before you proceed. Click the 'Install' button to proceed.
- The installer will now start, click the 'Next' button at the 'Welcome to the Brother Printer Driver installer' screen.
- Follow any on-screen instructions.
- Files will then be copied to the PC, after which you will see a message asking you to connect the printer to the PC and to click the 'OK' button. At this point ensure that the printer is connected to the PC and also ensure that it is switched on.
- Click the 'OK' button and your Windows 2000 system will automatically detect the printer and install the necessary drivers. Please note the comment about making the (Copy 2) driver the default.
- When the drivers have installed, there will be two Brother printer icons on your PC: One driver will be configured to print to the LPT1 (also known as the parallel port) and another driver (the Copy 2 driver) configured to print the the USB interface.
- Make the 'Copy 2' driver the default driver by right clicking it and selecting the 'Set as Default Printer' option. You can also delete the first printer by highlighting it and by pressing the Delete key on your keyboard.
- Click the 'End' button in the 'Install the driver/utility' screen.
The printer is now ready to print.
Using the installer from the CD-ROM (clicking the 'Install Software' icon)
- Before proceeding, ensure that the printer is now switched on or that the USB cable between the PC and printer is disconnected.
- Insert the CD-ROM that was supplied with the printer.
- Select the appropriate language.
- Click the 'Install Software' icon.
- Click the 'Install' button located next to the text 'Printer Driver'.
- The installer will now start, click the 'Next' button at the 'Welcome to the Brother Printer Driver installer' screen.
- Follow any on-screen instructions.
- On the 'Select Components' screen select the 'Standard Installation' option and click 'Next' .
- Select the 'Local Printer with USB cable' option and click 'Next'.
- Files will then be copied to the PC hard disc driver, after which you will see a message asking you to connect the printer to the PC and to click the 'OK' button. At this point ensure that the printer is connected to the PC and also ensure that it is switched on.
- Click the 'OK' button and your Windows 2000 system will automatically detect the printer and install the necessary drivers. Please note the comment about making the (Copy 2) driver the default.
- When the drivers have installed, there will be two Brother printer icons on your PC: One driver will be configured to print to the LPT1 (also known as the parallel port) and another driver (the Copy 2 driver) configured to print the the USB interface.
- Make the 'Copy 2' driver the default driver by right clicking it and selecting the 'Set as Default Printer' option. You can also delete the first printer by highlighting it and by pressing the Delete key on your keyboard.
The printer is now ready to print.
Using the 'Full download Package' from the Brother Solutions Web site
The full download package available from the Brother Solutions Web Site contains the Brother Printer Driver Installer software which guides you step-by-step through the printer driver installation. When you have extracted it to your PC HDD, follow the steps below:
- Run .exe file that you downloaded from the Internet. This will create a series of folders and files onto your PC HDD. When the folders and files have been created go to the 'Disk 1' folder and run the SETUP.EXE program.
- The installer will now start, click the 'Next' button at the 'Welcome to the Brother Printer Driver installer' screen.
- Follow any on-screen instructions.
- On the 'Select Components' screen select the 'Standard Installation' option and click 'Next'.
- Select the 'Local Printer with USB cable' option and click 'Next'.
- Files will then be copied to the PC hard disc driver, after which you will see a message asking you to connect the printer to the PC and to click the 'OK' button. At this point ensure that the printer is connected to the PC and also ensure that it is switched on.
- Click the 'OK' button and your Windows 2000 system will automatically detect the printer and install the necessary drivers. Please note the comment about making the (Copy 2) driver the default.
- When the drivers have installed, there will be two Brother printer icons on your PC: One driver will be configured to print to the LPT1 (also known as the parallel port) and another driver (the Copy 2 driver) configured to print the the USB interface.
- Make the 'Copy 2' driver the default driver by right clicking it and selecting the 'Set as Default Printer' option. You can also delete the first printer by highlighting it and by pressing the Delete key on your keyboard.
Using the Plug and Play capability of Windows 2000
When you connect a Brother printer to a Windows 2000 system, Windows 2000 automatically detects the device and attempts to install the appropriate software automatically. Follow these steps if you wish to use the Plug and Print capability of Windows 2000.
- Connect the Brother printer to a Windows 2000 PC.
- Switch the printer on.
- Windows 2000 will automatically detect the printer and after a short delay you will see the Found New Hardware Wizard screen.
- Click the 'Next' button to continue.
- You will then see the following screen:
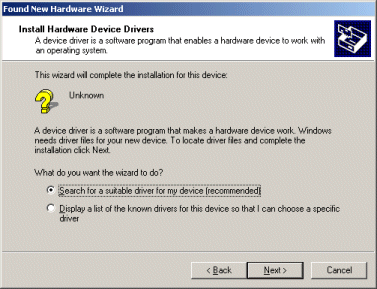
- Click the 'Next' button to display the following screen:
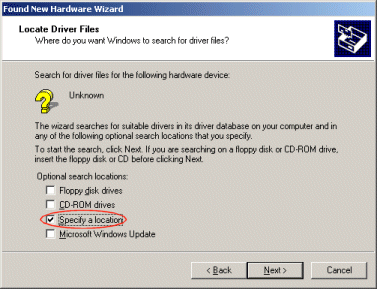
- Click the 'Specify a location' option and then click the 'Next' button.
- Specify the location of the driver file. If you have installed a Brother printer driver CD-ROM into your machine, the path for a English language driver would be:
x:\driver\PCL\WIN2K\ENGLISH\
*'x' shows where the CD-ROM drive is.
You can also specify Brother's BR-Script (Postscript language emulation drivers) however you may be asked to insert your Windows 2000 CD-ROM during the BR-Script printer driver installation.
If you downloaded the PCL or BR-Script drivers from the Brother solutions web site, once the files are extracted and saved to your HDD, simply specify the location of the files as they were extracted to your HDD.
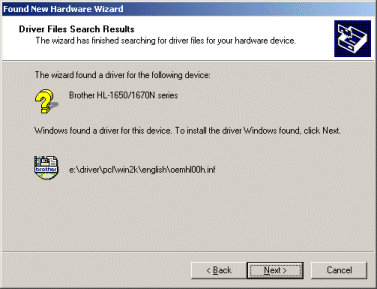
- When you specify the correct folder you will see a screen similar to the one below:
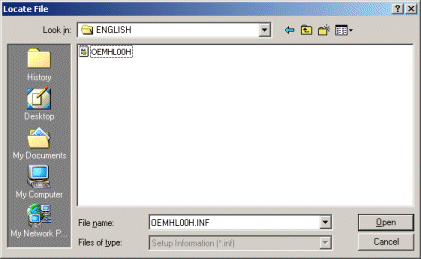
- Click the 'Open' button. And then click the 'OK' button on the 'Found New Hardware Wizard' screen. You will then see a screen similar to the one below.
- Click the 'Next' button. You may or may not see a warning message about a Digital Certificate. If you receive this warning message, click the 'Yes' button to continue with the installation. The driver files will be copied to your PC. At the end of the New Hardware Wizard, click the 'Finish' button to complete the installation.
The printer is now ready to print.
Download the specific driver only (PCL or BR-Script Driver)
It is possible to download the specific PCL or BR-Script (Brother's Postscript language emulation) drivers from the Brother Solutions Web site. If you download only the driver files the installation method is the same as the Using the Plug and Play capability of Windows 2000 as outlined above.