DCP-L2500D
FAQs & Troubleshooting |
Turn the Toner Save Mode on or off.
You can change the Toner Save mode setting using the control panel or the printer driver as follows.
The default setting is OFF.
We do not recommend Toner Save Mode for printing photo or greyscale images.
Method 1: Using the control panel
- Press Menu.
- Press the Up or Down arrow key to display the General Setup option, and then press OK.
- Press the Up or Down arrow key to display the Ecology option, and then press OK.
- Press the Up or Down arrow key to display the Toner Save option, and then press OK.
- Press the Up or Down arrow key to display the On or Off option, and then press OK.
- Press Stop/Exit.
Method 2: Using the printer driver
For Windows users:
NOTE: The screens may differ depending on the operating system being used.
[Printer driver]
-
Open Preferences... (Printing Preferences...). (Click here to see details of how to open Printing Preferences.)
-
Open the Advanced tab.
-
Check the Toner Save Mode check box on or off.
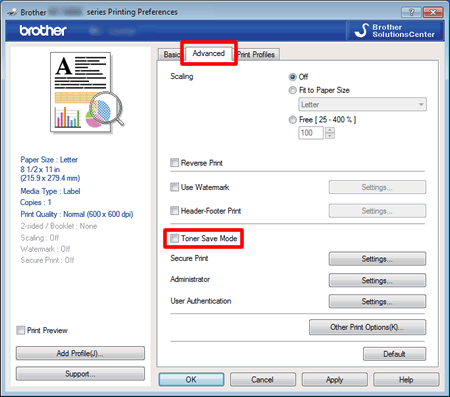
- Click OK.
[BR-Script printer driver]
-
Open Preferences... (Printing Preferences...). (Click here to see details of how to open Printing Preferences.)
-
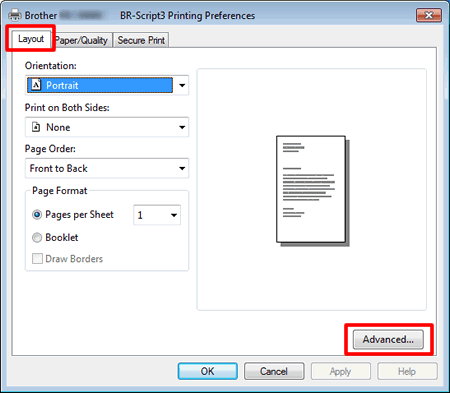
Open the Layout tab and then click Advanced.
-
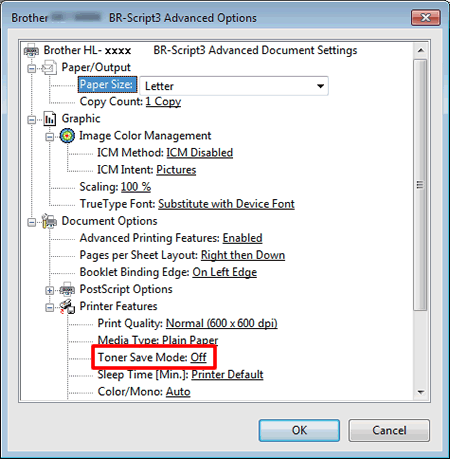
Choose Off or On for the Toner Save Mode option in Printer Features.
-
Click OK.
For Macintosh users:
NOTE: The screens may differ depending on the operating system being used.(For the models with network functions)
This setting is available until macOS 10.15.
[Printer driver]
(macOS 13 or later)
- Select the print command in your application.
- Scroll and click the Printer Options triangle mark from the print options menu.
- Click Print Settings.
- Click the Advanced triangle mark and then select Toner Save Mode from the list box.
- Check the Toner Save Mode check box on or off.
- Click OK.
- Click Print.
(macOS 12 or earlier)
- Select the print command in your application.
- Select Print Settings from the print options pop-up menu.
- Click the Advanced triangle mark and then select Toner Save Mode from the list box.
- Check the Toner Save Mode check box on or off.
- Click Print.
[BR-Script printer driver]
-
Open the Print dialogue. (Click here to see details of how to open the Print dialogue.)
-
[macOS 10.15 or earlier users]
-
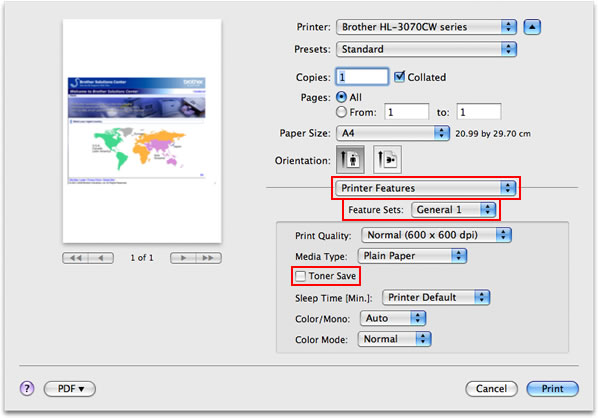
Choose Printer Features from the print options pop-up menu.
-
Choose General 1 in Feature Sets.
-
Check the Toner Save or Toner Save Mode check box on or off.
-
Choose Printer Features from the print options pop-up menu.
-
If you want to print with this setting only one time, click Print.
If you want to print with this setting every time, go on to STEP 4.
-
Choose Save As... or Save Current Settings as Preset... in Presets.
-
Type the name of this setting in the newly opened dialogue. E.g. TonerSaveMode
-
Click OK. Your customised setting will be saved and shown as the choice in Presets.
- Choose your customised setting created in STEP 4 - 6 and then click Print. The document will be printed out.
Content Feedback
To help us improve our support, please provide your feedback below.
