ADS-2600W
FAQs & Troubleshooting |
Configure the Brother machine for a wireless network using automatic wireless mode (Wi-Fi Protected Setup or AOSS™)
If you have a WLAN access point/router supporting WPS (Wi-Fi Protected Setup) or AOSS™ (AirStation One-Touch Secure System), you can easily connect your Brother machine to your wireless network as below.
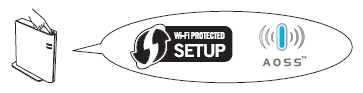
To use WPS or AOSS™, your WLAN access point/router must support WPS or AOSS™. Confirm your WLAN access point/router has the WPS or AOSS™ symbol as shown below. For more details, refer to the instructions provided with your access point/router.

STEP I: Configure the wireless settings:
-
Place the Brother machine within range of your WPS or AOSS™ access point/router.
The range may differ depending on your environment. Refer to the instructions provided with your access point/router.
-
On your Brother machine, press
 (Settings).
 - Swipe up or down, or press the Up or Down arrow and then press Network.
- Swipe up or down, or press the Up or Down arrow and then press WLAN.
- Swipe up or down, or press the Up or Down arrow and then press WPS/AOSS.
- When Enable WLAN? is displayed, press Yes to accept. This will start the wireless setup wizard. To cancel, press No.
-
When the LCD displays Start WPS or AOSS , hold down the WPS or AOSS™ button on your wireless access point/router for a few seconds.
The length holding down the button may differ depending on the WLAN access point/router. For information on how to confirm if the WLAN access point/router is ready for use, refer to the instructions provided with your access point/router.
- Press OK and your machine will now automatically detect which mode (WPS or AOSS™) your wireless access point/router uses and try to connect to your wireless network.
-
A connection result message appears until OK is pressed on the LCD.
- If your Brother machine is connected successfully, the LCD displays Connected. Go to STEP II.
- If the connection failed, the LCD displays an error code. Make a note of the error code and click here for more details on the error code.
STEP II: Installing the driver for network:
Continue to the following steps to install the scanner driver for network connection. Even if you have scanned with USB connection, you need to install the scanner driver for network connection.
NOTE: The screens may differ depending on the operating system being used and your Brother machine.
-
Make sure that your computer is ON and you are logged on with Administrator rights.
If there are any programs running, close them.
-
Put the installation DVD-ROM into your DVD-ROM drive.
For Windows users:
If you do not have the DVD-ROM, go to the Downloads section of this website and download the Full Driver & Software Package. The installation instructions are available on the download page.
For Macintosh users:
If you do not have the DVD-ROM, go to the Downloads section of this website and download the Scanner Driver. The installation instructions are available on the download page.For Windows users:
-
The installation screen will appear automatically. If prompted, select your model and language.
NOTE: If the installation screen does not appear automatically, click here to see how to open the installation screen. -
The DVD-ROM main menu will appear. Click Install MFL-Pro Suite, and click Yes if you accept the licence agreement.

When the User Account Control screen appears, click Allow or Yes.
- Follow the on-screen instructions to complete setup.
For Macintosh users:
-
Double-click Start Here OSX icon to install.

- Follow the on-screen instructions to complete setup.
-
The installation screen will appear automatically. If prompted, select your model and language.