ADS-2600W
FAQs & Troubleshooting |
How do I setup my ADS scanner to Scan to Network, without getting “Sending Error” or “Submit Error” message?
Follow the steps below to solve the issue:
The below screens may differ depending on your Brother machine.
STEP1 : Check the settings in Web Based Management
-
Press the TOOL
 icon on your Brother machine's display (hereinafter called LCD).
Select Network => WLAN => TCP/IP, and check the IP Address of the machine.
Open the web browser and type the IP address of your machine into the web browser (for example : http://[your machine's IP address]).
Press the Enter key on your keyboard to open Web Based Management.
-
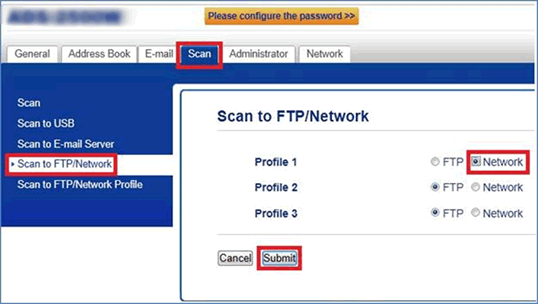
Click the Scan tab, Scan to FTP/Network, select Network under Profile 1 in Web Based Management.
Click Submit.
-
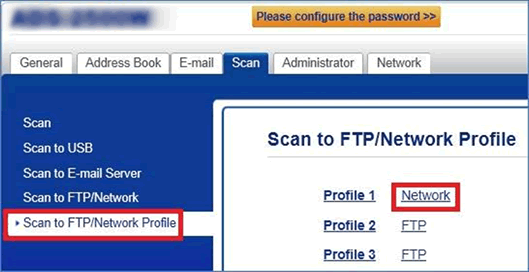
Click Scan to FTP/Network Profile and then click the Network link.
-
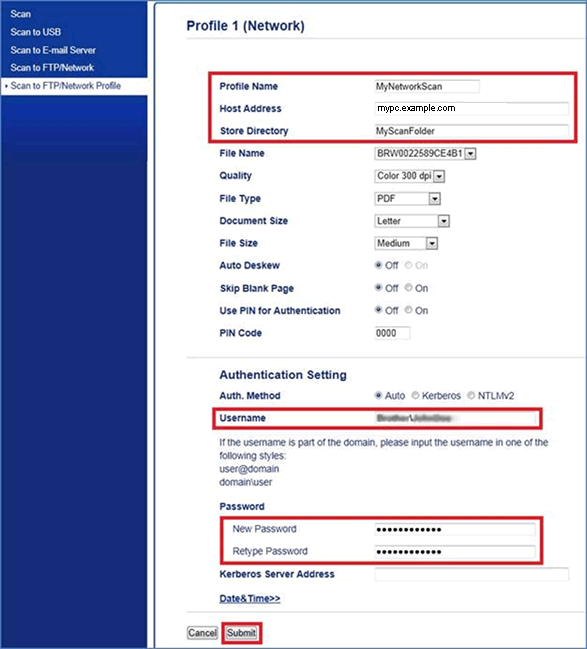
Fill in the Profile Name, Host Address, Store Directory, Username, Password, and click Submit.
A message will display on screen. Click Submit.
If you are receiving an error message Submit Error, check the following and try again:-
Profile Name, Host Address, Username, Password are required fields.
Some of the information that you entered in the required fields, except for Profile Name and Store Directory, are not correct.
-
Profile Name is up to 15 characters.
-
Host Address is the domain name of your network server (for example: mypc.example.com) (up to 64 characters) or the IP address of your Network server.
-
Store Directory is the folder where you want to store your scan documents (up to 60 characters).
-
Username is a logon name that you have access to your network folder (up to 96 characters). If you are on a domain network, you need to enter the domain name first, and then your user name (Such as Domain\User).
- Password is up to 32 characters.
-
Profile Name, Host Address, Username, Password are required fields.
STEP2 : Using Scan to Network
-
Go to the your Brother machine and insert your document into the Automatic Document Feeder (ADF).
-
Swipe left or right, or press left or right to display Scan 1 (for ADS-2500W/2600W) or Network (for ADS-1500W/1600W).
Press to Network.
-
Swipe up or down, or press Up or Down to choose one of Network server profiles listed that you have set up (such as “MyNetworkScan" in the Profile Name field on the above screen).
-
Press Start to scan to Network. The LCD will show Connecting. When the connection to the Network is successful,
the machine starts the scanning process.
If you receive Server Time Out, do the following:-
Check your wireless access point/router is turned on.
-
Check your server is turned on.
-
Power off your Brother machine by unplugging the power cord from the the wall jack (socket) and reconnect it. Repeat Step1-b.
-
Check you have writing permission for the destination folder.
-
Go back to Step1-c to check the Store Directory folder.
Confirm that you entered it correctly with no spelling errors.
Press Options button only if you want to make any changes to the current settings for 2-sided Scan, Scan Type, Resolution, File Type, Document Size, File Size (only for ADS-2500W), Auto Deskew, Skip Blank Page and User Name.
-
Check your wireless access point/router is turned on.
Content Feedback
To help us improve our support, please provide your feedback below.