TD-4750TNWBR
FAQs & Troubleshooting |
How to load the Ribbon
Movie: How to load the Ribbon
*The video clip is being streamed from YouTube.
-
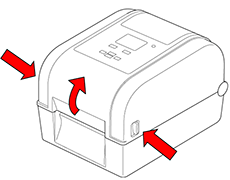
Press the tabs on both sides of the printer, and then lift the Roll Compartment Cover.
-
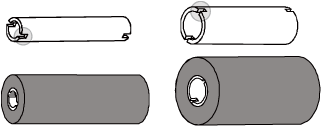
Use one of the following paper cores:
-
For 25.4 mm (1") and 12.7 mm (0.5") paper cores with notches, you do not need to install the ribbon spindles.
-
For 25.4 mm (1") paper core without notches, insert the ribbon spindles into the paper core and ribbon.

Follow these directions when installing the ribbon spindle.

-
For 25.4 mm (1") and 12.7 mm (0.5") paper cores with notches, you do not need to install the ribbon spindles.
-
Insert the right side of the Ribbon Rewind Spindle (marked "R") into the Ribbon Rewind Hub. Then, insert the left side of the Ribbon Rewind Spindle into the hole on the left side of the Ribbon Rewind Hub. (a.)
Insert the right side of the Ribbon Supply Spindle (marked "R") into the Ribbon Supply Hub. Then, insert the left side of the Ribbon Supply Spindle into the hole on the left side of the Ribbon Supply Hub. (b.)
-
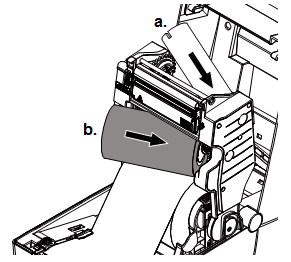
Thread the ribbon through the Print Head and adhere the leader of the ribbon onto the Ribbon Rewind Paper Core.
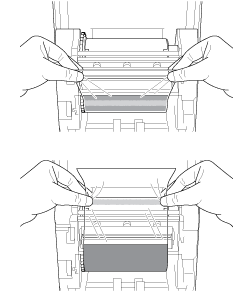
Do not dispose of the Ribbon Rewind Paper Core when replacing the ribbon roll. This part is necessary for the ribbon roll replacement.
-
Using the Ribbon Rewind Gear, rotate the Ribbon Rewind Hub until the ribbon plastic leader is thoroughly wound and the black section of the ribbon covers the Print Head.
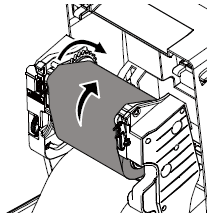
- Gently press down on both sides of the Roll Compartment Cover to close it.
Content Feedback
To help us improve our support, please provide your feedback below.
