QL-820NWB/ 820NWBc
FAQs & Troubleshooting |
2-colour printing is not possible.
- For 2-colour printing, make sure that the Black/Red on White DK roll is installed.
- If you use the Black/Red on White DK roll for monochrome printing, you need to activate the [2-colour Mode] / [2-colour [Black/Red]] settings in each application. For details, refer to the following.
For details about 2-colour printing settings, see the instructions below.
> Configuring using P-touch Editor for Windows
> Configuring using P-touch Editor 5.2 or later for Mac
> Configuring using P-touch Editor 5.1 for Mac
> Configuring using Other Applications for Windows
> Configuring using Other Applications for Mac
Configuring using P-touch Editor for Windows
Express mode
-
Select
 [Paper], then the 2-colour mode appears.
![Express mode [Paper] Express mode [Paper]](/g/b/img/faqend/faqp00100320_000/gb/en/2225994/express1.gif)
-
Select [Black/Red] for [2-colour mode], then [Two-colour media was selected. Switching to "Print Colour Display".] appears.
Click [OK].
![Express mode [Black/Red] Express mode [Black/Red]](/g/b/img/faqend/faqp00100320_000/gb/en/2225942/express2.gif)
-
Select [Text] to edit the colour of the text.
Select [Frame] to edit the colour of the frame.
![Express [Text/Frame] Express [Text/Frame]](/g/b/img/faqend/faqp00100320_000/gb/en/2225948/express3.gif)

-
Use
 [Sets Text Colour for Selected Text] to edit the colour of the text.
 -
Use
 [Changes the fill colour] to edit the colour to fill an enclosed area with.
 -
Use
 [Changes the colour of the line] to edit the colour of the line.
 -
Use
 [Changes the background colour of the object] to edit the background colour of the object.
-
Use
Professional mode
-
Click
 to expand the [Paper] tab.
![Professional [Paper] Professional [Paper]](/g/b/img/faqend/faqp00100320_000/gb/en/2225951/pro1.gif)
-
Click
 [Monochrome] and select [Black/Red].
![Professional [Monochrome] Professional [Monochrome]](/g/b/img/faqend/faqp00100320_000/gb/en/2225953/pro2.gif)
-
[Two-colour media was selected. Switching to "Print Colour Display"] appears. Click [OK].
![Professional [Black/Red] Professional [Black/Red]](/g/b/img/faqend/faqp00100320_000/gb/en/2225955/pro3.gif)
-
Click [View] and select [Property Palette] - [Colour]. The Colour Editing Tool appears.
![Professional [View] Professional [View]](/g/b/img/faqend/faqp00100320_000/gb/en/2225956/pro4.gif)

-
Use
 [Sets Text Colour for Selected Text] to edit the colour of the text.
 -
Use
 [Changes the fill colour] to edit the colour to fill an enclosed area with.
 -
Use
 [Changes the colour of the line] to edit the colour of the line.
 -
Use
 [Changes the background colour of the object] to edit the background colour of the object.
-
Use
- The brightness, contrast and threshold (range of red) can be adjusted through the driver Settings.
- The Black/Red Print density can be adjusted through the Printer Setting Tool.
- You cannot select High Resolution mode when using 2-colour printing.
To check whether the dedicated DK roll for 2-colour printing is installed in the printer, click ![]() [Detect Size and Colours]. When the dedicated DK roll for 2-colour printing is installed in the printer, [2-colour mode] is turned to [Black/Red] automatically. If an error message appears, the DK roll for monochrome printing is installed. Replace it with the dedicated DK roll for 2-colour printing.
[Detect Size and Colours]. When the dedicated DK roll for 2-colour printing is installed in the printer, [2-colour mode] is turned to [Black/Red] automatically. If an error message appears, the DK roll for monochrome printing is installed. Replace it with the dedicated DK roll for 2-colour printing.
Configuring using P-touch Editor 5.2 or later for Mac
-
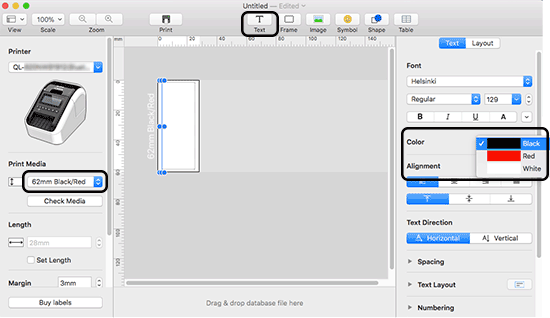
Select [××mm Black/Red] for [Print Media].
Click [Text] to edit the text and select [Colour] to change the colour of the text.


-
Use
 [Frame] to edit the colour of the frame.
 -
Use
 [Symbol] to edit the colour of the symbol.
 -
Use
 [Shape] to edit the colour of the drawing.
 -
Use
 [Table] to edit the colour of the table.
-
Use
- The brightness, contrast and threshold (range of red) can be adjusted through the driver setting.
- The Black/Red Print density can be adjusted through the Printer Setting Tool.
Configuring using P-touch Editor 5.1 for Mac
Standard mode
-
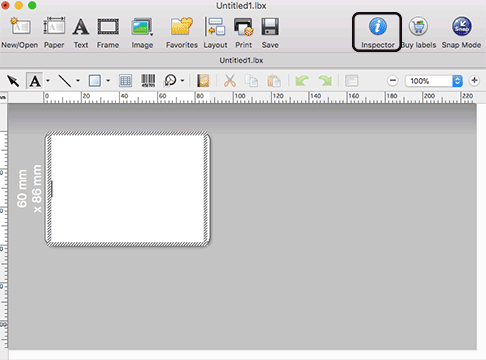
Press
 [Inspector] to open the inspector window.

-
Click
 [Paper] in the inspector window and select [ON] for [Two-Colour Mode].
Make sure [BK-RD] is selected for [Print Colours].
![Standard mode [Paper] Standard mode [Paper]](/g/b/img/faqend/faqp00100320_000/gb/en/1932649/standard1.gif)
-
Select
 [Text] to edit the text.
Select [Colour] to edit the colour of the text.
![Standard mode [Text] Standard mode [Text]](/g/b/img/faqend/faqp00100320_000/gb/en/1932677/standard2.gif)
-
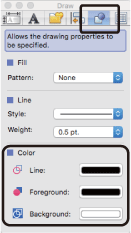
Click
 , then the edit tools below appear.

-
Use
 [Line] to edit the colour of the line.
 -
Use
 [Foreground] to edit the colour to fill an enclosed area with.
 -
Use
 [Background] to edit the background colour of the object.
-
Use
- The brightness, contrast and threshold (range of red) can be adjusted through the driver setting.
- The Black/Red Print density can be adjusted through the Printer Setting Tool.
Configuring using Other Applications for Windows
-
Open the Devices and Printers window, select your printer and right-click it.
Click [Printer Properties]. - Select the [General] tab, then click the [Preferences...] button.
- Select [Black/Red] from the [Paper Type] section.
Configuring using Other Applications for Mac
- Click [File], and then select [Print]. The print screen appears.
-
Click the [Show Details] button. The other print screen appears.
Click the [Notes] pull down to select [Advanced]. - Select [2-Colour(Black/Red)] from the [Colour] section.
