PT-D800W
FAQs & Troubleshooting |
Important points you need to confirm before configuring your printer for a wireless network.
Please check the following points before you connect your printer to your wireless network.
- The printer is powered by either the supplied AC adapter or Li-ion battery.
- Configuring the printer for a wireless network using WPS (Wi-Fi Protected Setup). (Recommended)
- Configuring the printer manually for a wireless network.
- Function settings of your WLAN access point
-
IP address allocation
The printer is powered by either the supplied AC adapter or Li-ion battery.
If the printer is powered by alkaline or Ni-MH batteries, you cannot connect to a wireless network. To connect to a wireless network, use the supplied AC adapter or Li-ion battery.
Configuring the printer for a wireless network using WPS (Wi-Fi Protected Setup) (Recommended)
If your WLAN access point/router supports WPS, you can easily connect your printer to your wireless network without a computer. To confirm if your WLAN access point/router support WPS, please check if the WLAN access point/router has the WPS symbol as shown below.

Configuring the printer manually for a wireless network
Before configuring wireless settings, you will need to know your Network name: (SSID, ESSID) and Network Key.
Do one of the following to find the Network Name (SSID, ESSID) and Network Key:
-
See the side of your WLAN access point/router.
NOTE: The illustration shown below may differ depending on the product being used.

- See the documentation provided with your WLAN access point/router.
- The initial Network Name could be the manufacturer's name or the model name.
- If you still cannot find the security information, please consult the manufacturer of your WLAN access point/router, your system administrator or internet provider.
WPA-PSK/WPA2-PSK is one of the network authentication methods which use a Pre-Shared Key (PSK) that is 8 or more characters in length, up to a maximum of 63 characters.
Function settings of your WLAN access point
Depending on the WLAN access point being used, some functions of WLAN access point/router may cause interference to wireless communication between your computer and the printer. See the instructions supplied with your WLAN access point/router and confirm your function settings. If the following functions are enabled, please change the setting.
-
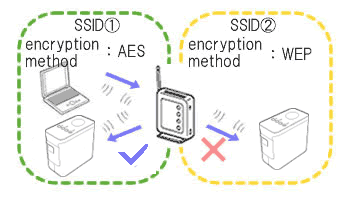
Multiple SSID
This function allows you to configure multiple SSIDs with one WLAN access point/router. Each SSID can use different authentication and encryption methods so that you can connect wireless devices to the wireless network at different security levels at the same time. However, if you want to connect all wireless devices to a specific wireless network, these devices have to use the same SSID. In many cases, devices using different SSIDs cannot communicate with each other, and cannot send or receive data through the same wireless network. Configure your wireless computer and printer with the same SSID as used for your WLAN access point/router.
NOTE: The illustration shown below may differ depending on the product being used and the encryption methods are one example.

-
Privacy Separator
Privacy Separator isolates all wireless devices connected to your WLAN access point/router, and prevents the wireless devices from being able to connect and send data to other devices in your wireless network.
When Privacy Separator is on, wireless devices such as your computer and your printer will not be able to communicate with each other. To connect your printer to the other devices, please change the setting of your WLAN access point/router and disable Privacy Separator.

-
MAC address filtering
MAC address filtering is a function that allows only specific MAC address configured in the WLAN access point/ router to connect. If you are using MAC address filtering on the WLAN access point/router, you need to configure the MAC address of your printer.
You can find your printer's MAC Address by checking the Communication settings in the Printer Setting Tool or by printing the Printer Configuration. Click here to see the details of how to find your printer's network settings.
-
Assigning Static IP addresses
Before you assign the IP address manually using Static mode, please read the following.
The IP address which you wish to assign to your printer.- Must be chosen from outside the range of the IP address that might be assigned as a dynamic address by DHCP server.
- Must be different from the one that has been already assigned to another device in your network.
-
Must be on the same network as your computer and the WLAN access point/router.
If the IP address assigned to your computer is 192.168.1.xx, assign any number which has not assigned to other devices to where xx is (e.g. 192.168.1.10). The first three series of numbers (192.168.1 as shown in the example) must be the same.
-
Assigning IP address automatically
If your WLAN access point/router does not support a DHCP server function, the IP address cannot be automatically configured. For more information, see the documentation supplied with your WLAN access point/router.
