QL-1050
 |
FAQs & Troubleshooting |
How do I print the inserted image maintaining its original size?
To return the size of image to the original size,
-
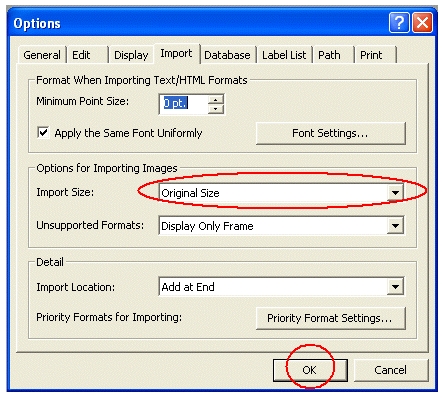
Click on the "Tools" menu, and then click on "Options" to open the Options dialogue box.
-
Click the "Import" tab to open the "Import" page.
-
Under the "Options for Importing Images", select "Original Size" from the Import size list, and then click the OK button.

-
In the Layout window, select the inserted image.
-
Hold down the Ctrl key and press the F5 key.
The size of the imported image will return to the original size.
To confirm the image size, click on the down arrow next to the document size box, and elect "1.1" ratio.

If your question was not answered, have you checked other FAQs?
Have you checked the manuals?
If you need further assistance, please contact Brother customer service:
Related Models
MW-260, PT-18R, PT-1950, PT-2100, PT-2420PC, PT-2450DX, PT-2480, PT-2700, PT-3600, PT-9200DX, PT-9200PC, PT-9400, PT-9500PC, PT-9600, QL-1050, QL-1050N, QL-500, QL-500A, QL-550, QL-560, QL-650TD, RL-700S
Content Feedback
To help us improve our support, please provide your feedback below.


