PT-9600
FAQs & Troubleshooting |
How to use the Sequential Numbering function

The numbering function is used to make a series of sequential alpha/numeric labels.
Choose the item you wish to increment and choose the number of sequential labels to be printed.
-
Entering text
Click the Text Input button on the object dock.

A flashing cursor appears.
Type in "Information File_ _1".
"_" indicates places where a space is entered.

-
Aligning the text
Click to display the Text Properties.
(If the button already appears selected, this step is not necessary.)

Align the text along the horizontal centres.
Click on the Text Properties.

Align the text along the vertical centre (label width).
Click on the Expanded Text Properties.

If the Expanded Text Properties are not displayed, click
 in the lower right corner of the Text properties.
 -
Specifying a Numbering field
Click on the Draw toolbar.

Highlight "_1" at the end of the text "Information_File_ _1" in the layout window.

Click to display the Text Properties.
(If the button already appears selected, this step is not necessary.)

Click on the Text Properties.

The numbering indication (NUM) appears below the "1" in the label sample.

-
Printing
Click to display the Print Properties.
(If the button already appears selected, this step is not necessary.)

Click on the Print Properties.

(The name of the printer being used appears for "Printer Name". )
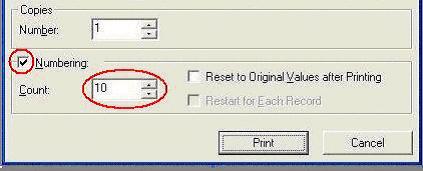
Click the "Numbering:" check box until a check appears, and then, in the "Count:" edit box, specify the number of labels to be printed while increasing the values in the Numbering field.
For example, to print labels from "_1" to "10", specify "10".

After specifying the desired settings, click to begin printing.
Content Feedback
To help us improve our support, please provide your feedback below.
