ES-2000
FAQs & Troubleshooting |
How do I correctly install a bobbin?
- Make sure the bobbin thread unrolls in the correct direction when installing the bobbin into the bobbin case.
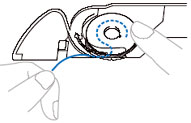
- Be sure to set a bobbin so that the thread unrolls in the correct direction.
If the thread unrolls in the wrong direction, the needle may break or the thread tension will be incorrect.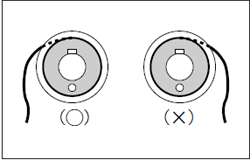
- Use a bobbin that has been correctly wound with thread.
Otherwise, the needle may break or the thread tension will be incorrect.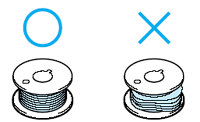
Wound evenly Wound poorly - Be sure to insert the thread through the tension-adjusting spring of the bobbin case.
In step 3 and 4 below, a hint for inserting thread through the tension-adjusting spring and how to check if it's properly inserted will be described.
 Tension-adjusting spring
 - When embroidering

surface of fabric
underside of fabricAs shown in the left pictures, only a bobbin thread appears on both sides of fabric if the thread is not inserted through the tension-adjusting spring. - When utility stitch sewing
Locks appear on the surface of fabric as the above illustration, if the thread is not inserted through the tension-adjusting spring.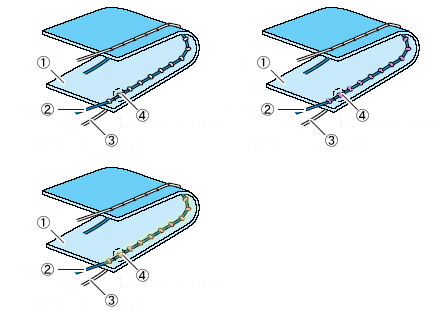
 Surface
  Upper thread
 Bobbin thread
 Locks appear on the surface of fabric
 - In case of a machine equipped with Quick-set bobbin (needle plate with a cutter for bobbin thread), lightly hold down a bobbin with your finger and cut the thread with the cutter when installing a bobbin into a bobbin case so that the thread can be inserted through the tension-adjusting spring securely.

 Cutter
 - If thread is inserted through the tension-adjusting spring securely, the bobbin thread passes over the bobbin when it is pulled up, as shown in the below illustration.
If the bobbin thread does not pass over the bobbin, the thread may not be inserted through the tension-adjusting spring. In this case, reinstall the bobbin.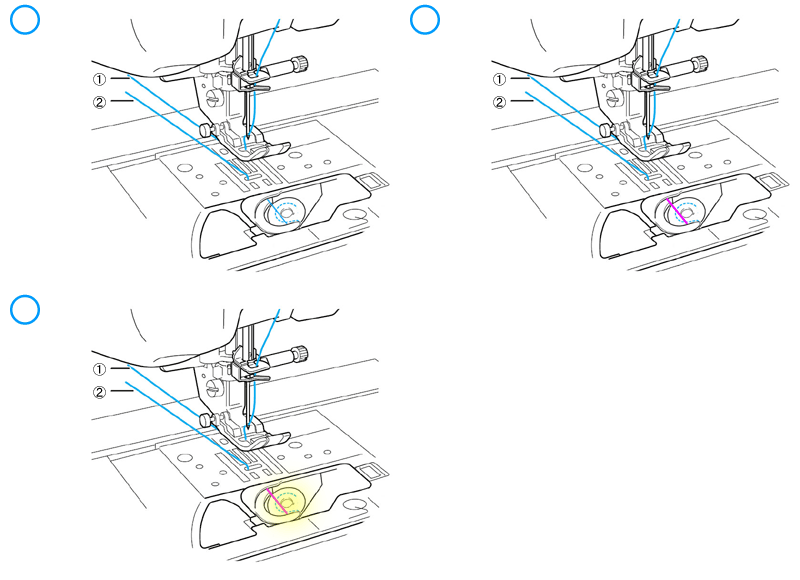
 Upper thread
 Bobbin thread
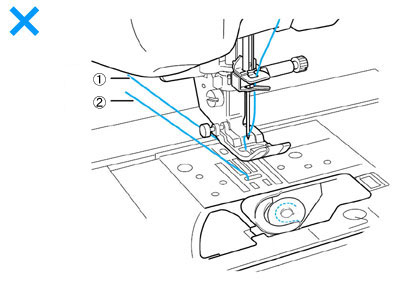
 Upper thread
 Bobbin thread
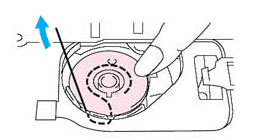
You will feel some resistance when pulling the thread toward the blue arrow direction, if the thread is securely inserted through the tension-adjusting spring.
However, you will be able to pull the thread easily without any resistance or friction, if thread is not inserted through the tension-adjusting spring.
Related Models
BC-2100/2300, BC-2500, BM-3500/2600, BM-3600/2700, CS-8060, CS-8120, ES-2000, FS140, FS180QC, FS200CE, FS210, FS250FE, FS250ME, Innov-is 10/10A, Innov-is 100, Innov-is 1200, Innov-is 1250, Innov-is 15, Innov-is 1500D/1500, Innov-is 150SE/ 150, Innov-is 20/20LE, Innov-is 200, Innov-is 2200, Innov-is 27SE, Innov-is 30, Innov-is 35, Innov-is 350SE, Innov-is 400, Innov-is 4000D/4000, Innov-is 50, Innov-is 5000, Innov-is 500D, Innov-is 55, Innov-is 550SE/ 550, Innov-is 55FE, Innov-is 600, Innov-is 700E, Innov-is 700EII, Innov-is 750E, Innov-is 900, Innov-is 90E, Innov-is 950, Innov-is 955, Innov-is 97E, Innov-is I, Innov-is Ie, JK4000, JK7000, NX-200, NX-2000, NX-400Q/400, NX-600, PE-180D, PE-190D, PE-300S, PE-400D, PS-53/55/57, QC-1000, STAR 110/130E, STAR 230E/240E, SuperGalaxie 3000/3000C/3000D/3100D, XL-2120/2220/2230, XL-2600/2610/2620, XL-3500/ 3510/3520, XL-3600, XL-6040, XL-6600, XR-65T, XR-6600
