MFC-J4335DW(XL)
FAQs & Troubleshooting |
How to use the PC-FAX.
-
PC-FAX sending
> PC-FAX sending Overview
> Configure PC-FAX (Windows)
> Send a Fax Using PC-FAX (Windows)
> Send a Fax Using AirPrint (macOS)
-
PC-FAX receiving (Windows only)
> PC-FAX receiving Overview
> Run the Brother PC-FAX Receive on Your Computer
> Set Up Your Computer for PC-FAX Receiving
> View Received PC-FAX Messages
> Use PC-Fax Receive to Transfer Received Faxes to Your Computer
PC-FAX sending
PC-FAX sending Overview
Reduce paper consumption and save time by using the Brother PC-FAX software (Windows) or AirPrint (macOS) to send faxes directly from your computer.
Configure PC-FAX (Windows)
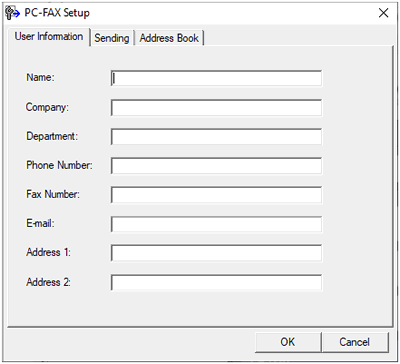
Before sending faxes using PC-FAX, personalise the send options in each tab of the PC-FAX Setup dialogue box.
-
Launch
 (Brother Utilities), and then click the drop-down list and select your model name (if not already selected).
 -
Click PC-FAX in the left navigation bar, and then click Setup Sending.
The PC-FAX Setup dialogue box appears.
-
Do one of the following:
-
Click the User Information tab, and then type your user information in the fields.
Each Microsoft account can have its own customised User Information screen for custom fax headers and cover pages.
- Click the Sending tab, and then type the number needed to access an outside line (if needed) in the Outside line access field. Select the Include header check box to include the header information.
- Click the Address Book tab, and then select the address book you want to use for PC-FAX from the Select Address Book drop-down list.
-
Click the User Information tab, and then type your user information in the fields.
- Click OK.
Send a Fax Using PC-FAX (Windows)
PC-FAX supports only black and white faxes. A black and white fax will be sent even if the original data is colour and the receiving fax machine supports colour faxes.
- Create a file in any application on your computer.
- Select the print command in your application.
-
Select Brother PC-FAX as your printer, and then complete your print operation.
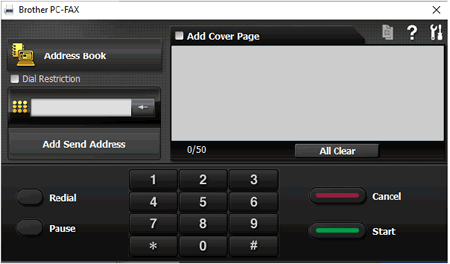
The Brother PC-FAX dialogue box appears.
-
Type a fax number using one of the following methods:
-
Click the numbers on the dial pad to type the number, and then click Add Send Address.
If you select the Dial Restriction check box, a confirmation dialogue box will appear for you to re-type the fax number using the keyboard. This feature helps to prevent transmissions to the wrong destination.
-
Click the Address Book button, and then select a member or group from the Address Book.
If you make a mistake, click All Clear to delete all entries.
-
Click the numbers on the dial pad to type the number, and then click Add Send Address.
-
To include a cover page, select the Add Cover Page check box. You can also click
 to create or edit a cover page.
 -
Click Start to send the fax.
- To cancel the fax, click Cancel.
- To redial a number, click Redial to show the last five fax numbers, select a number, and then click Start.
Send a Fax Using AirPrint (macOS)
- Make sure your machine is in the printer list on your Mac computer. Apple TextEdit is used in the example below.
- AirPrint supports only black and white fax documents.
- Make sure your machine is turned on.
- On your Mac computer, open the file that you want to send as a fax.
- Click the File menu, and then select Print.
- Click the Printer pop-up menu, and then select Brother [model name] - Fax.
- Type the fax recipient information.
- Click Fax.
PC-FAX receiving (Windows only)
PC-FAX receiving Overview
The Brother PC-FAX Receive software lets you view and store faxes on your computer. It is automatically installed when you install your machine's software and drivers and works on locally or network-connected machines.
When you turn off your computer, your machine will continue to receive and store faxes in your machine's memory. The machine's LCD will display the number of stored faxes received. When you start this application, the software will transfer all received faxes to your computer at once. You can enable the Backup Print option if you want the machine to print a copy of the fax before the fax is sent to your computer, or before the computer is switched off. You can configure the Backup Print settings from your machine.
PC-FAX Receive supports only black and white faxes.
(For Brother machines with colour fax function)
When you receive a colour fax, your machine prints the colour fax at your machine but does not send the fax to your computer.
Run the Brother PC-FAX Receive on Your Computer
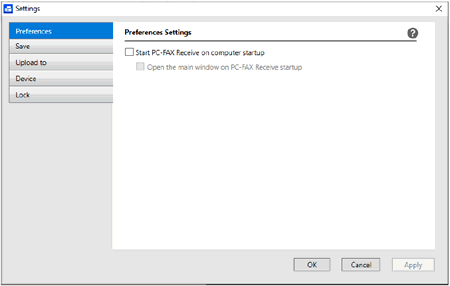
We recommend selecting the Start PC-FAX Receive on computer startup check box so that the software runs automatically and can transfer any faxes upon computer startup.
-
Launch
 (Brother Utilities), and then click the drop-down list and select your model name (if not already selected).
 - Click PC-FAX in the left navigation bar, and then click Receive.
-
Confirm the message and click Yes.
The PC-FAX Receive window appears. The (PC-FAX Receive) icon also appears in your computer task tray.
Set Up Your Computer for PC-FAX Receiving
-
Double-click the
 (PC-FAX Receive) icon in your computer task tray.
The PC-FAX Receive window appears. - Click Settings.
-
Configure these options as needed:
-
Preferences
Configure to start PC-FAX Receive automatically when you start Windows. -
Save
Configure the path to save PC-FAX files and select the received document format. -
Upload to
Configure the path to the server and select the option to upload automatically or manually (available only for Administrators). -
Device
Select the machine where you want to receive PC-FAX files. -
Lock (available only for Administrators)
Restrict users who do not have administrator privileges from configuring the settings options shown above.
-
Preferences
- Click OK.
View Received PC-FAX Messages
Receiving Status
| Icon | Indicated Status |
| Standby mode No unread messages |
|
| Receiving messages | |
| Messages received Unread messages |
-
Double-click the
 (PC-FAX Receive) icon in your computer task tray.
The PC-FAX Receive window appears.
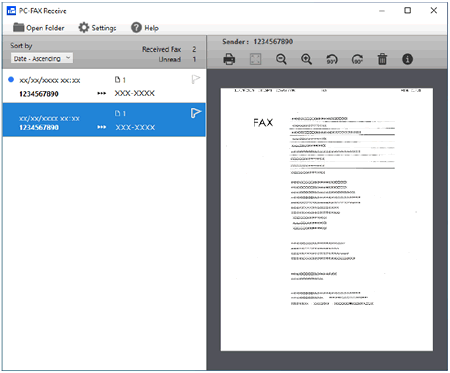
- Click any faxes in the list to view them.
-
When finished, close the window.
Even after closing the window, PC-FAX Receive is active and the
 (PC-FAX Receive) icon will remain in your computer task tray. To close PC-FAX Receive, click the icon in the computer task tray and click Close.
Use PC-Fax Receive to Transfer Received Faxes to Your Computer
Turn on the PC-Fax Receive feature to automatically store incoming faxes to your machine's memory, and then send them to your computer. Use your computer to view and store these faxes.
-
This feature is available only for black and white faxes.
(For Brother machines with colour fax function)
When you receive a colour fax, your machine prints the colour fax but does not send the fax to your computer. - Before you can set up PC-Fax Receive, you must install the Brother software and drivers on your computer. Make sure your computer is connected and turned on. You must have the PC-FAX Receiving software running on your computer.
Even if your computer is turned off, your machine will receive and store faxes in its memory. When you start your computer and the PC-FAX Receiving software runs, your machine transfers faxes to your computer automatically.
- Press Settings.
-
Press the Up or Down arrow key to select the following:
- Select Fax. Press OK.
- Select Setup Receive. Press OK.
- Select PC Fax Receive. Press OK.
-
Select On. Press OK.
The LCD displays the message Run the PC-Fax Receive program on your computer.. - Press the RIGHT arrow key.
- Select <USB> or the name of the destination computer you want to receive faxes if you are on a network. Press OK.
- Select Backup Print: On or Backup Print: Off. Press OK.
- Press Stop/Exit.
To change the destination computer, repeat these steps.
