DCP-J774DW
FAQs & Troubleshooting |
Scan a document using Brother iPrint&Scan. (Windows, macOS)
Follow the steps below to scan a document using Brother iPrint&Scan in Windows or macOS.
(Illustrations or setting items may vary depending on the version of the application and operating system.)
> Download and start Brother iPrint&Scan.
> Scan a document using Brother iPrint&Scan.
> Configure the scan button setting.
> Configure the scan settings.
> Register the scan settings that are commonly used.
Download and start Brother iPrint&Scan.
To use the Brother iPrint&Scan, you need to download the Brother iPrint&Scan. Follow the steps below to download and install.
Windows
Brother iPrint&Scan is only available for Windows 7 or later.
-
Download and install the Full Driver & Software Package.
> Click here to download the Full Driver & Software Package in the Downloads section.
(You do not need this step if you have already installed Full Driver.) -
Download and install Brother iPrint&Scan.
> Click here to download Brother iPrint&Scan in the Downloads section.
(You do not need this step if you have already installed Brother iPrint&Scan.) - When installation is complete, double click the Brother iPrint&Scan icon.
- If your Brother machine is not selected, click Select your Machine and follow the on-screen instructions to select your Brother machine.
macOS
Brother iPrint&Scan is only available for macOS v10.10 or later.
-
Download and install Brother iPrint&Scan.
> Click here to go to the Downloads section.If you want to scan using the scan button, install the iPrint&Scan Push Scan Tool.
> Click here to download the iPrint&Scan Push Scan Tool in the Downloads section.
- Click Go > Application and double click the iPrint&Scan icon.
- If your Brother machine is not selected, click Select your Machine and follow the on-screen instructions to select your Brother machine.
Scan a document using Brother iPrint&Scan.
You can scan a document using Brother iPrint&Scan and save the data in a specified file format and open from specified applications.
- Load the document.
-
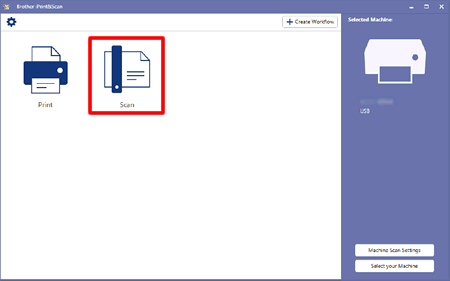
Click Scan.

-
Change document size, colour setting and resolution as required.
If you select high resolution, the scanned data will be high-quality but the file size will be larger and will take a longer time to scan.
If you want to change Brightness and Contrast, click All Settings and configure.
> Click here to see how to configure the scan settings. - Click Scan.
- Scanning will start. If you want to scan the next page, load the document and click Add Pages.
- After scanning all the pages, click Save to PC or Open in Application.
-
Configure the File Name, Save folder, File Type, Application Name etc.
If you click Settings, you can configure the details.
Configure the scan button setting.
You can configure the scan settings (destination folder, file type, target application etc.) when using the Scan button on your Brother machine.
-
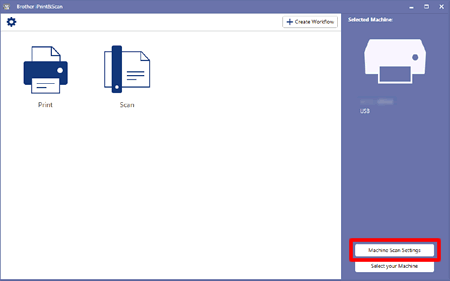
Click Machine Scan Settings. If a message is displayed, verify and go to the next step.

- Select the feature.
-
Change document size, colour setting and resolution.
If you select high resolution, the scanned data will be high-quality but the file size will be larger and take a longer time to scan.
You can change the file name, destination folder, file type, application etc. for every feature as below.
File
You can change the file name, destination folder, file type.
If you click Settings, you can configure these details.
OCR
Select the file type and your default word processing application.
If you click Settings, you can select the language.
Image
Select the file type and your default graphic application.
E-mail
Select the file type and your default mailer application. - Click OK and finish the settings.
Configure the scan settings.
If you have concerns of brightness or ghosting, you can correct these as below.
- Click Scan or Machine Scan Settings.
- If you click Machine Scan Settings, select the feature.
- Click All Settings.
-
The All Settings dialogue appears, you can configure these corrections.
Document Correction
You can correct ghosting and remove background colour etc.
Image Quality Correction
You can correct Brightness and Contrast etc. - Click OK and finish the settings.
Register the scan settings that are commonly used.
You can create scan settings you use most frequently by saving them as your Workflow.
Later you can scan using this Workflow instead of manually changing the settings.
-
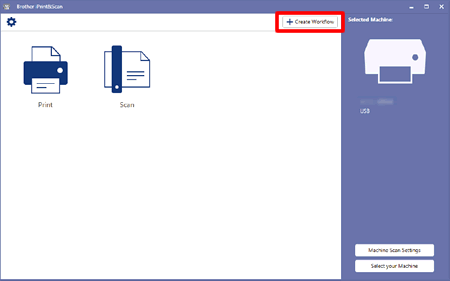
Click Create Workflow.
If a message is displayed, verify and click Create.

- Click Scan, select the features that you want to register in the Workflow. After that follow the on-screen instructions.
Related Models
ADS-1200, ADS-1700W, ADS-2200, ADS-2400N, ADS-2700W, ADS-2800W, ADS-3000N, ADS-3600W, DCP-J1100DW, DCP-J572DW, DCP-J772DW, DCP-J774DW, DCP-L2510D, DCP-L2530DW, DCP-L3510CDW, DCP-L3550CDW, DCP-L5500DN, DCP-L6600DW, DCP-L8410CDW, DS-640, DS-740D, DS-940DW, MFC-J1300DW, MFC-J491DW, MFC-J497DW, MFC-J5330DW, MFC-J5335DW, MFC-J5730DW, MFC-J5930DW, MFC-J5945DW, MFC-J6530DW, MFC-J6930DW, MFC-J6935DW, MFC-J6945DW, MFC-J6947DW, MFC-J890DW, MFC-J895DW, MFC-L2710DN, MFC-L2710DW, MFC-L2730DW, MFC-L2750DW, MFC-L3710CW, MFC-L3730CDN, MFC-L3750CDW, MFC-L3770CDW, MFC-L5700DN, MFC-L5750DW, MFC-L6800DW(T), MFC-L6900DW(T), MFC-L6950DW, MFC-L6970DW, MFC-L8690CDW, MFC-L8900CDW, MFC-L9570CDW(T), MFC-L9577CDW
