MFC-J5920DW
FAQs & Troubleshooting |
Change the scan settings of ControlCenter2 and your machine’s SCAN key (Mac)
You can change the scan settings (such as Resolution and File Type) used for scanning from ControlCenter2 or when using the SCAN key on your Brother machine:
- Change the scan settings of ControlCenter2
- Change the scan settings of your Brother machine's SCAN key
The illustrations may vary depending on the version of your operating system and your Brother machine.
1. Change the scan settings of ControlCenter2
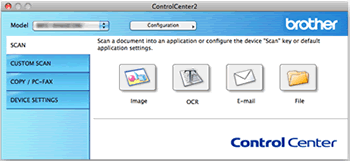
-
Scan to File
Scan a document to a previously specified folder.
-
Scan to E-mail
Scan a document to your default email application and send the scanned job as an attachment.
-
Scan to OCR (not available in all countries)
Scan a document and convert it into text. The text can be edited using a text editor.
-
Scan to Image
Scan an image directly into your graphics application for image editing.
1.1 Change settings for Scan to File
-
Click Configuration > Scan > File.
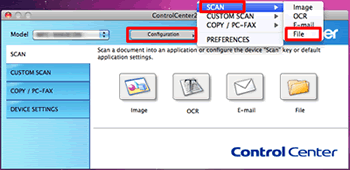
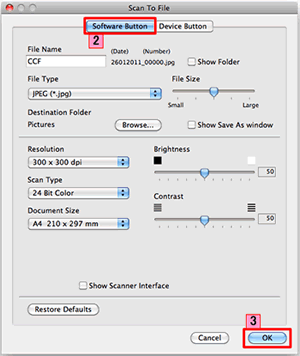
- The settings window for Scan to File appears. Select the Software Button tab.
- Configure the settings and click OK. For example:
- Set the prefix text used for the file name of the scanned data in the File Name box.
- Set the folder to save the scanned data in the Destination Folder.
1.2 Change settings for Scan to E-mail
-
Click Configuration > Scan > E-mail.
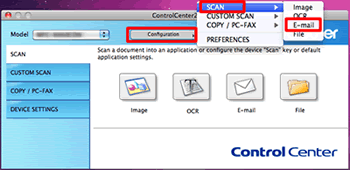
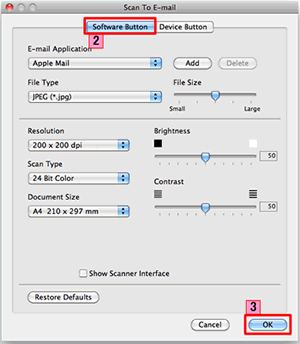
- The settings window for Scan to E-mail appears. Select the Software Button tab.
- Configure the settings and click OK. For example:
- Select the default email application from the E-mail Application pop-up menu.
- Select the attachment file format from the File Type pop-up menu.
1.3 Change settings for Scan to OCR
-
Click Configuration > Scan > OCR.
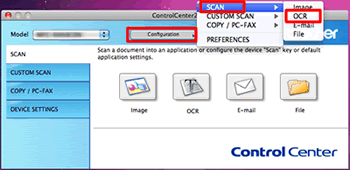
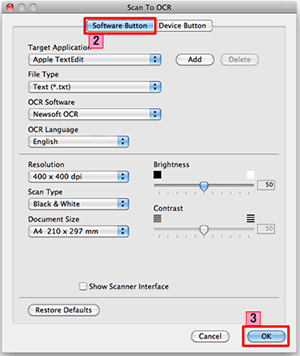
- The settings window for Scan to OCR appears. Select the Software Button tab.
- Configure the settings and click OK. For example:
- Select the text editor where the converted text data will appear from the Target Application pop-up menu.
-
Select the language you want to convert into from the OCR Language pop-up menu.
1.4 Change settings for Scan to Image
-
Click Configuration > Scan > Image.
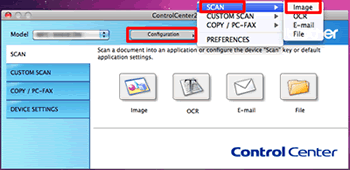
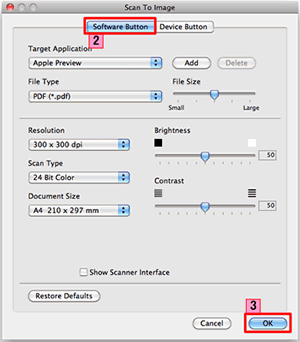
- The settings window for Scan to Image appears. Select the Software Button tab.
-
Configure the settings and click OK. For example, you can select the graphics application where the scanned image will appear from the Target Application pop-up menu.
2. Change the scan settings of your Brother machine's SCAN key
You can configure the scan settings of your Brother machine's SCAN key In ControlCenter2.
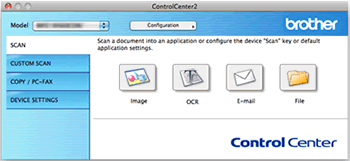
Scan options:
-
Scan to File
Scan a document to a previously specified folder.
-
Scan to E-mail
Scan a document to your default email application and send the scanned job as an attachment.
-
Scan to OCR (not available in all countries)
Scan a document and convert it into text. The text can be edited using a text editor.
-
Scan to Image
Scan an image directly into your graphics application for image editing.
2.1 Change settings for Scan to File
-
Click Configuration > Scan > File.
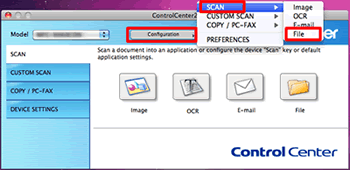
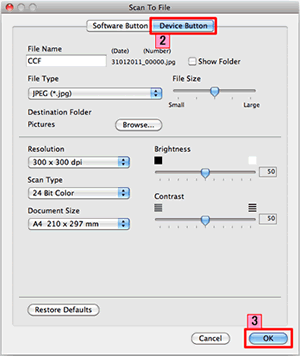
- The settings window for Scan to File appears. Select the Device Button tab.
- Configure the settings and click OK. For example:
- Set the prefix text used for the file name of the scanned data in the File Name box.
-
Set the folder to save the scanned data in the Destination Folder.
2.2 Change settings for Scan to E-mail
-
Click Configuration > Scan > E-mail.
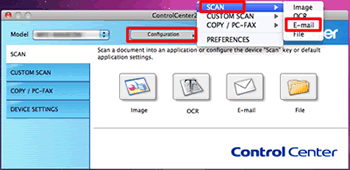
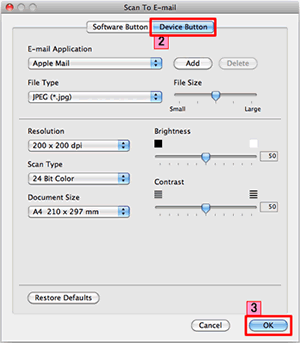
- The settings window for Scan to E-mail appear. Select the Device Button tab.
- Configure the settings and click OK. For example:
- Select the default email application from the E-mail Application pop-up menu.
- Select the attachment file format from the File Type pop-up menu.
2.3 Change settings for Scan to OCR
-
Click Configuration > Scan > OCR.
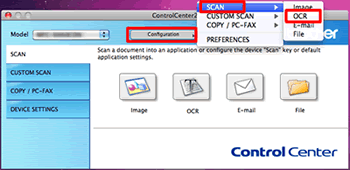
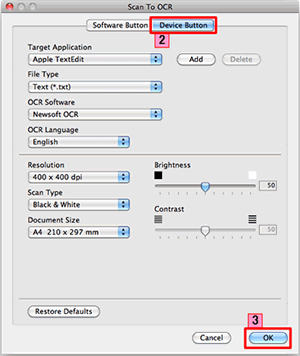
- The settings window for Scan to OCR will appear. Select the Device Button tab.
- Configure the settings and click OK. For example:
- Select the text editor where the converted text data will appear from the Target Application pop-up menu.
-
Select the language you want to convert into from the OCR Language pop-up menu.
2.4 Change settings for Scan to Image
-
Click Configuration > Scan > Image.
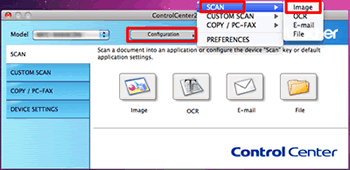
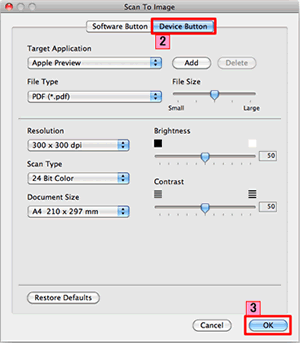
- The settings window for Scan to Image appears. Select the Device Button tab.
- Configure the settings and click OK. For example, select the graphics application where the scanned image will appear from the Target Application pop-up menu.
Related Models
ADS-1100W, ADS-1600W, DCP-1510, DCP-1512, DCP-1610W, DCP-1612W, DCP-7055, DCP-7055W, DCP-7060D, DCP-7065DN, DCP-7070DW, DCP-8110DN, DCP-8250DN, DCP-9015CDW, DCP-9020CDW, DCP-9055CDN, DCP-9270CDN, DCP-J132W, DCP-J140W, DCP-J152W, DCP-J4110DW, DCP-J4120DW, DCP-J525W, DCP-J552DW, DCP-J562DW, DCP-J725DW, DCP-J752DW, DCP-J785DW, DCP-J925DW, DCP-L2500D, DCP-L2520DW, DCP-L2540DN, DCP-L5500DN, DCP-L6600DW, DCP-L8400CDN, DCP-L8410CDW, DCP-L8450CDW, MFC-1810, MFC-1910W, MFC-7360N, MFC-7460DN, MFC-7860DW, MFC-8510DN, MFC-8520DN, MFC-8950DW, MFC-8950DWT, MFC-9140CDN, MFC-9330CDW, MFC-9340CDW, MFC-9460CDN, MFC-9465CDN, MFC-9970CDW, MFC-J430W, MFC-J4410DW, MFC-J4420DW, MFC-J4510DW, MFC-J4610DW, MFC-J4620DW, MFC-J4625DW, MFC-J470DW, MFC-J4710DW, MFC-J480DW, MFC-J5320DW, MFC-J5330DW, MFC-J5335DW, MFC-J5620DW, MFC-J5625DW, MFC-J5720DW, MFC-J5730DW, MFC-J5910DW, MFC-J5920DW, MFC-J5930DW, MFC-J625DW, MFC-J650DW, MFC-J6510DW, MFC-J6520DW, MFC-J6530DW, MFC-J6710DW, MFC-J6720DW, MFC-J680DW, MFC-J6910DW, MFC-J6920DW, MFC-J6925DW, MFC-J6930DW, MFC-J6935DW, MFC-J825DW, MFC-J870DW, MFC-J880DW, MFC-J985DW, MFC-L2700DN, MFC-L2700DW, MFC-L2720DW, MFC-L2740DW, MFC-L5700DN, MFC-L5750DW, MFC-L6800DW(T), MFC-L6900DW(T), MFC-L6950DW, MFC-L6970DW, MFC-L8650CDW, MFC-L8690CDW, MFC-L8850CDW, MFC-L8900CDW, MFC-L9550CDW(T), MFC-L9570CDW(T), MFC-L9577CDW
