MFC-J6925DW
FAQs & Troubleshooting |
Cannot Detect
Check the following points to resolve the issue:
-
Cause 1: If you are not using Genuine Brother ink, the machine may not detect the ink cartridge.
Brother multifunction machines are designed to work with ink of a particular specification and will work to a level of optimum performance and reliability when used with genuine Brother Original ink cartridges. Brother cannot guarantee this optimum performance and reliability if ink or ink cartridges of other specifications are used. Brother does not therefore recommend the use of cartridges other than genuine Brother Original cartridges or the refilling of used cartridges with ink from other sources. If damage is caused to the print head or other parts of this machine as a result of using incompatible products with this machine, any repairs required as a result may not be covered by the warranty.
> Click here for more information about Genuine Brother Supplies. -
Cause2: The ink cartridge model number is not compatible with your machine.
Verify the cartridge model number will work with your machine.
Visit the Basic User's Guide and Consumables & Accessories section on this web site to check what consumables are available for your machine and its ink cartridge model numbers.
> Click here to see the latest Basic User's Guide.
> Click here to see the Consumables & Accessories section.
-
Cause 3 : You installed a new ink cartridge too quickly and the machine did not detect it. Or, an ink cartridge is not installed properly.
Follow the steps below to verify the ink cartridge are installed correctly:
NOTE: Illustrations shown below are from a representative product and may differ from your Brother machine.
-
Open the ink cartridge cover door.
-
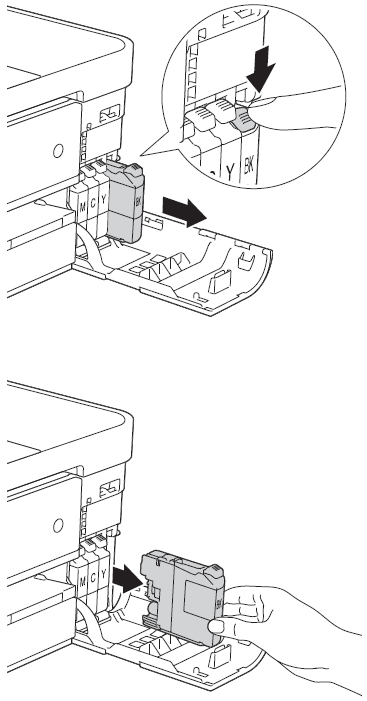
Press the lock release lever as shown to release the cartridge colour indicated on the machine's display. Remove the cartridge from the machine.

-
Check that the machine power is turned ON and install the ink cartridges. If the machine is powered-off, it cannot detect when the ink cartridges are installed.
-
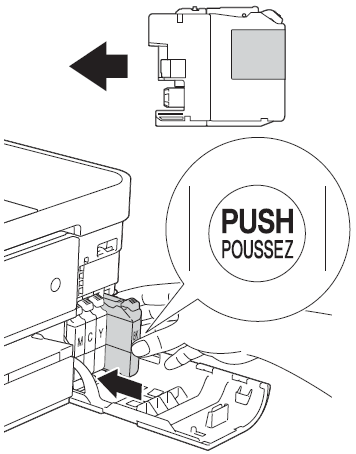
Each colour has its own correct position to match the colour of the cartridges with the colour of the levers. Reinstall the ink cartridges one at a time. Install the cartridge slowly, in the direction of the arrow on the label until it clicks into place. Continue with the next ink cartridge.

-
After all four cartridges are installed close the ink cartridge cover.
- The machine will automatically reset the ink dot counter. If you replace an ink cartridge, the machine's display may ask you to verify that it was a brand new one. For example, Did you change Black? For each new cartridge you installed, press Yes or 1 (Yes) to reset the ink dot counter for the colour. If the ink cartridge you installed is not a brand new one, be sure to press No or 2 (No).
-
If you mix the colours by installing an ink cartridge in the wrong position, the machine's display shows Wrong Ink Colour. Check which ink cartridges are not matched by colour to their ink cartridge positions and move them to their proper position.
- Once you open an ink cartridge, install it in the machine and use it up within six months of installation. Use unopened ink cartridges by the expiration date written on the cartridge package.
-
Open the ink cartridge cover door.
-
Cause 4: The new ink cartridge has an air bubble.
Slowly turn the ink cartridge so that the ink supply port is pointing downward, and then reinstall the cartridge.
