DCP-J4110DW
FAQs & Troubleshooting |
Is there any way to reduce ink consumption?
The following ways can help you reduce ink consumption.
The following way can help you reduce color ink consumption.
- Reducing the print resolution
Choosing Fast quality for printing reduces the print resolution. This can help you reduce ink consumption. However, please note that the printed result will not be as sharp.
- For Windows Users:
- Open Printing Preferences. (Click here to see the details of how to open Printing Preferences.)
- Click the Basic tab.
- Choose Fast in the Quality selection.
- Click Apply => OK.
- Open Printing Preferences. (Click here to see the details of how to open Printing Preferences.)
- For Mac OS X Users:
- Choose Print Settings from the print box.
- Choose Fast in the Quality selection.
- Choose Print Settings from the print box.
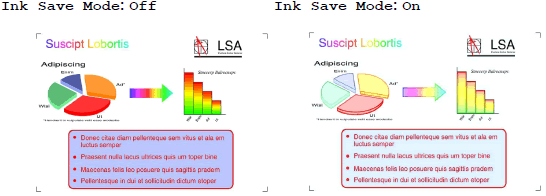
- Using Ink Save Mode
The machine prints the colors lighter and emphasizes the outlines of the images like the example shown below. The amount of ink that is saved varies depending on the type of documents that are printed.
- For Copying
- Load your document.
- Press
 (Copy).
- Enter the number of copies you want.
- Press Options.
- Press the Up or Down arrow key to display Advanced Settings.
- Press Advanced Settings.
- Press Ink Save Mode.
- Press OK.
- If you do not want to change any additional settings, press Black (Mono) Start or Color (Colour) Start.
- Book Copy, Thin Paper Copy, Page Layout and Remove Background are not available with Ink Save Mode.
- Ink Save Mode may make your printouts look different from your original document.
- Load your document.
- For PC printing (For Windows users only)
- Open Printing Preferences. (Click here to see the details of how to open Printing Preferences.)
- Click the Advanced tab and check the Ink Save Mode box.
- Click Apply => OK.
- Open Printing Preferences. (Click here to see the details of how to open Printing Preferences.)
- Printing the document only with Black ink
When you print black and white document data, the colour ink is wasted unnecessarily if you choose the color mode and the media type other than Plain Paper. When your documents include color information, even if documents appear in monochrome the document will be printed in color. In addition, when your documents include gray-colored contents the document may also be printed in color because of color processing reasons.
For more information please refer to the Related FAQs at the end of the page.
To choose Grayscale and Plain Paper, follow the steps below:
- For Windows Users:
- Open Printing Preferences. (Click here to see the details of how to open Printing Preferences.)
- Click the Basic tab.
- In the Media Type section, verify that Plain Paper is chosen.
- Click the Advanced tab.
- In the Color/Grayscale section, verify that Grayscale is chosen.
- Click Apply => OK.
- Open Printing Preferences. (Click here to see the details of how to open Printing Preferences.)
- For Mac OS X Users:
- Choose Print Settings from the print box.
- Choose Plain Paper in the Media Type.
- In the Color/Grayscale section, verify that Grayscale is chosen.
- Choose Print Settings from the print box.
If you are not having a print quality problem, please do not clean the print head.