HL-4200CN
FAQs & Troubleshooting |
How do I adjust the color registration?
Firstly print the color registration chart using the control panel.
-
Press the Menu button. The menu screen will appear.
"Menu 1:System" -
Press the lower arrow button once.
"Menu 2:Maintenance" -
Press the Form Feed/Set or the right arrow button once.
"2:Maintenance Init NVM" -
Press the lower arrow button 5 times.
"2.Maintenance ColorRegiCorrect" -
Press the Form Feed/Set or the right arrow button once.
"ColorRegiCorrect AUTO" -
Press the Form Feed/Set or the right arrow button once.
"Correction Chart Ready to Print" -
Press the Form Feed/Set button once.
The color registration adjustment chart starts printing.
When printing has finished, the print screen will reappear.
After the color registration chart has printed, do not turn off the printer until the printer motor has stopped running.

Secondly, determine the values
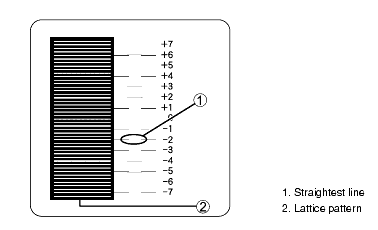
From the lines to the right of the Y (yellow), M (magenta), and C (cyan) pattern, find the values of the straightest lines.
You can also use the densest colors of the grid to find the straightest lines. The colors printed at the highest density are those next to the straightest lines.
If 0 is the value nearest the straightest line, you do not need to adjust the color registration. If the value is not 0', follow the steps below.
Enter values
Make adjustments by entering the values that you found in the Color Registration Chart using the control panel.
-
Follow Steps 1 through 5 on the previous page to display the color registration chart settings menu.
"ColorRegiCorrect Correction Chart". -
Press the the lower arrow button once.
"ColorRegiCorrect Enter Number". -
Press the Form Feed/Set or the right arrow button once.
"Enter Number Y=0 M=0 C=0" -
Press the upper or lower button until you reach the value displayed on the chart (for example, +3).
"Enter Number Y=+3 M=0 C=0" -
Press the right arrow button once to move the cursor.
-
Repeat Steps 4 and 5 to continue setting the color registration.
"Enter Number Y=+3 M=+1 C=+2" -
Press the Form Feed/Set button once.
"CorrectionChart Ready to Print". -
Press the Form Feed/Set button once.
The color registration chart will be printed with the new values.
When printing has finished, the print screen will reappear. -
Color registration adjustment is complete when the straightest lines for Y (yellow), M (magenta), and C (Cyan) are next to the '0' line.
