TD-4520DN
Usein kysytyt kysymykset ja vianmääritys |
How to set the Peeler
Movie: How to set the Peeler (except for TD-4420DN(FC)/4550DNWB(FC))
*The video clip is being streamed from YouTube.
> To attach the Label Peeler (except for TD-4420DN(FC)/4550DNWB(FC)):
> To change the Label Peeler Options (except for TD-4420DN(FC)/4550DNWB(FC)):
Attach the Label Peeler (except for TD-4420DN(FC)/4550DNWB(FC))
-
Make sure you disconnect the printer from the AC power outlet.
-
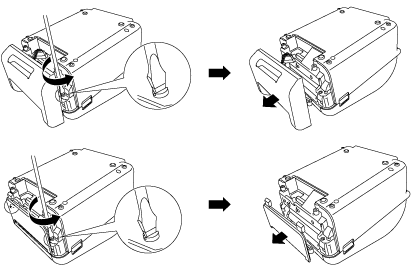
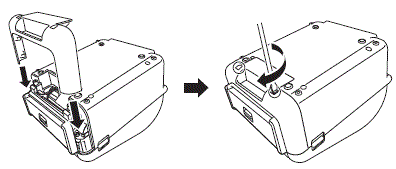
Place the printer upside down.
-
Remove the front cover base using a flathead screwdriver.

-
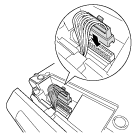
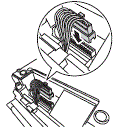
If the cutter is attached, remove the connector.
-
Remove the cutter or the front cover using a flathead screwdriver.
-
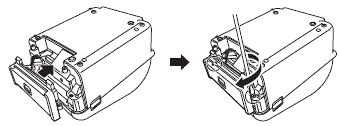
Attach the peeler using a flathead screwdriver.
-
Connect the connector of the peeler to the printer.
-
Reattach the front cover base using a flathead screwdriver.
Change the Label Peeler Options (except for TD-4420DN(FC)/4550DNWB(FC))
After attaching the peeler, set the printer driver peeler option.
-
Turn on the printer.
-
Open the printer preferences menu as follows:
Windows 11
Click Start > Settings > Bluetooth & devices > Printers & scanners.
Click the printer you want to set up, and then click Open print queue > Printer > Printing Preferences....
Windows 10 / Windows Server 2016 / Windows Server 2019:
Click Start > Settings > Devices > Printers & scanners.
Click the printer you want to set up, and then click Open queue > Printer > Printing Preferences.
Windows 8 / Windows 8.1 / Windows Server 2012 / Windows Server 2012 R2:
Click Control Panel in the Apps screen. Click Hardware and Sound > Devices and Printers.
Right-click the printer you want to set up, and then click the Printing preferences menu.
Windows 7 / Windows Server 2008 / Windows Server 2008 R2:
Click Start > Devices and Printers. Right-click the printer you want to set up, and then click the Printing preferences menu.
-
Check the Use Peeler Function check box.
- Click OK.
Sisältöpalaute
Auta meitä parantamaan tukea antamalla palautetta alla.