HL-S7000DN
FAQs & Troubleshooting |
Manual Feed
Manual was selected as the paper source when there was no paper in the MP tray.
The "Manual Feed" message appears when Manual is chosen as the default paper source in the printer driver and there is no paper in the MP tray.
Please follow one of the steps below to clear the error.
- If you want to print from the MP tray, go to CASE A: Print from the MP tray.
- If you do not want to print from the MP tray, go to CASE B: Print from the Paper Tray (Tray 1, Tray 2, Tray3 or Tray 4).
NOTE: Illustrations shown below are from a representative product and may differ from your Brother machine.
CASE A: Print from the MP tray.
- Check the paper size shown on the machine's display (hereinafter called LCD).
Make sure you use paper that meets Brother's recommended paper specifications.
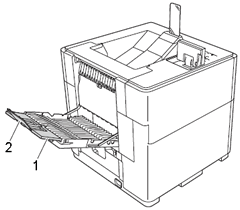
Click here to see the details of the recommended paper. - Open the MP tray and lower it gently.
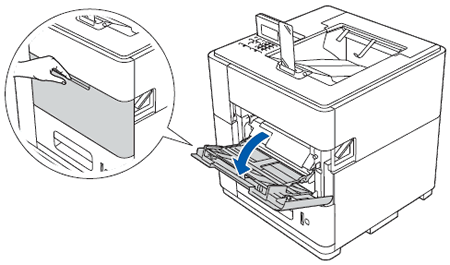
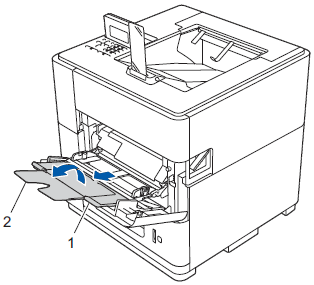
- Pull out the MP tray support (1) and unfold the flap (2).
For printing on thick paper or bond paper:
When you want to print on thick paper or bond paper, follow these steps:
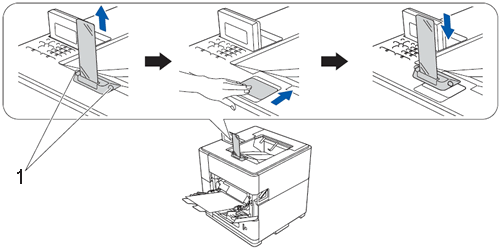
- Open the back cover (face-up output tray).
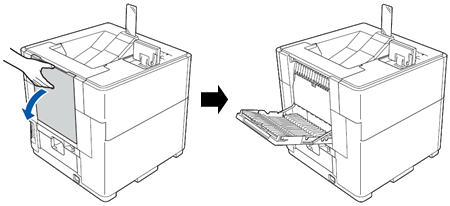
- Pull out the face-up output tray support (1) and unfold the flap (2).
- Open the back cover (face-up output tray).
- Place the same size of paper in the MP tray as is shown on the LCD and make sure:
- The paper stays under the maximum paper mark (1).
- The side to be printed on must be face up with the leading edge (top of the paper) in first.

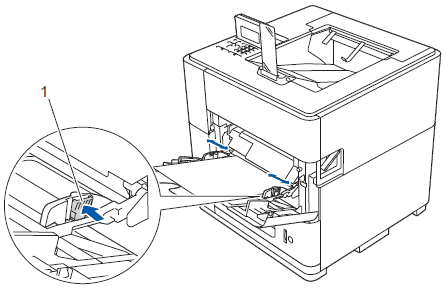
- While pressing the gray paper-guide release lever (1), slide the paper guide to fit the paper size.
For Legal or Folio size paper, you need to change the position of the output stopper. To move the stopper to the Legal position press the release buttons (1) on the base of the stopper and remove it. Then slide the cover towards the back of the machine as shown. Put the output stopper back on the machine in the area exposed by moving the cover.
- The document will be printed out. If the machine is paused, press Go.
If you want to change the paper source, go to STEP 2 in CASE B.
CASE B: Print from the Paper Tray
-
Cancel the Print Job.
Cancel the current job being printed:
If you press Cancel while printing, the machine will immediately stop printing and will then eject the paper. The machine's display (hereinafter called LCD) shows Cancel Printing as the job is being canceled.
Cancel all the received jobs:
To delete all jobs, hold down Cancel until the LCD shows Job Cancel (All) as the job(s) is being canceled.
- Make sure the paper is not set to the MP Tray.
- Do one of the following:
- If you want to change the tray temporarily for the next print only, go to OPTION 1.
- If you want to change the default paper source (tray) for all print jobs, go to OPTION 2.
OPTION 1: Changing the tray setting temporarily for the next print only
For Windows Users / For Macintosh users
For Windows Users:
NOTE: The steps and screens may differ depending on the operating system being used.
Windows PCL Printer Driver:- Choose Print menu from an application you are using.
(The steps to choose Print menu varies on an application you are using.) - Click on Properties.
- Click the Basic tab and choose Tray 1, Tray 2*1, Tray 3*1 or Tray 4*1 from the drop-down list for Paper Source.
*1) Available if this optional lower tray is installed.
- Click OK to send the print data to the machine.
For Macintosh users:
NOTE: The steps and screens may differ depending on the operating system being used.
Mac CUPS Printer Driver:- Open Print dialog. (Click here to see how to open Print dialog.)
- Choose Standard or Default Settings for Presets.
- Choose Print Settings from the print options pop-up menu.
- Choose Tray 1, Tray 2*1, Tray 3*1 or Tray 4*1 for Paper Source. Click Print.
*1) Available if this optional lower tray is installed.

OPTION 2: Changing the default tray for every print
For Windows Users/ For Macintosh users
For Windows Users:
NOTE: The steps and screens may differ depending on the operating system being used.
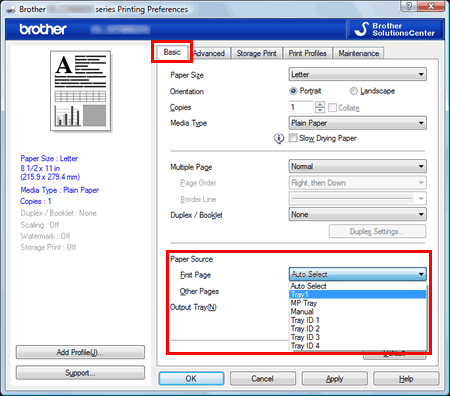
Windows PCL Printer Driver:- Open Printing Preferences. (Click here to see how to open Printing Preferences.)
- Click the Basic tab and choose Auto Select, Tray 1, Tray 2*1, Tray 3*1 or Tray 4*1 from the drop-down list for Paper Source. The Auto Select setting will automatically pull paper from any paper source (paper tray or MP tray) with a defined paper size that matches your document. If you want to use Tray 1, Tray 2*1, Tray 3*1 or Tray 4*1 as the default paper source, choose Tray 1, Tray 2*1, Tray 3*1 or Tray 4*1.
*1) Available if this optional lower tray is installed.

- Click Apply to save your setting. Then, click OK.
For Macintosh users:
NOTE: The steps and screens may differ depending on the operating system being used.
Mac CUPS Printer Driver:- Open Print dialog. (Click here to see how to open Print dialog.)
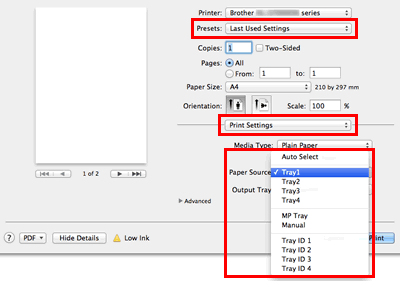
- Choose Last Used Settings for Presets.
- Choose Print Settings from the print options pop-up menu.
- Choose Auto Select, Tray 1, Tray 2*1, Tray 3*1 or Tray 4*1 for Paper Source. Click Print.
The Auto Select setting will automatically pull paper from any paper source (paper tray or MP tray) that has a defined paper size that matches your document. If you want to use Tray 1, Tray 2*1, Tray 3*1 or Tray 4*1 as the default paper source, choose Tray 1, Tray 2*1, Tray 3*1 or Tray 4*1.
*1) Available if this optional lower tray is installed.
- If you want to change the tray temporarily for the next print only, go to OPTION 1.