Innov-is 4000D/4000
FAQs & Troubleshooting |
How do I sew buttonholes?
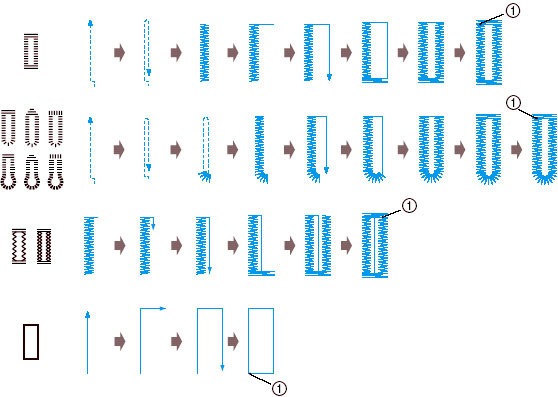
 Reinforcement stitching
Be sure to turn off the main power before replacing the pressor foot. Otherwise, injuries may occur if Start/Stop button is accidentally pressed and the machine starts sewing.
- Other factors, such as fabric thickness, stabilizer material, etc., also have an effect on the stitch, so you should always sew a few trial stitches before beginning your project.
- The names of parts of buttonhole foot "A", which isused for sewing buttonholes, are indicated below.
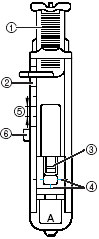
 Button guide plate
 Presser foot scale
 Pin
Pin Marks on buttonhole foot
 5 mm (3/16 inch)
 Bracket
- Use chalk to mark on the fabric the position and length of the buttonhole.
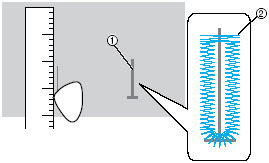
 Marks on fabric
 Buttonhole sewing
- Pull out the button guide plate of buttonhole foot "A", and then insert the button that will be put through the buttonhole.
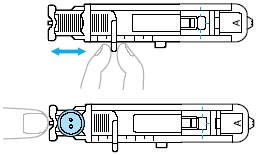
The size of the buttonhole is set.
- If the button does not fit in the button guide plate
Add together the diameter and thickness of the button, and then set the button guide plate to the calculated length. (The distance between the markings on the presser foot scale is 5 mm (3/16 inch).)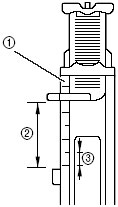
 Presser foot scale
 Length of buttonhole (diameter + thickness of button)
 5 mm (3/16 inch)
- Example:
For a button with a diameter of 15 mm (9/16 inch) and a thickness of 10 mm (3/8 inch), the button guide plate should be set to 25 mm (1inch) on the scale.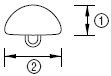
 10 mm (3/8 inch)
 15 mm (9/16 inch)
- Example:
- If the button does not fit in the button guide plate
- Attach buttonhole foot "A".
- Select a following stitch.


- Position the fabric with the front end of the buttonhole mark aligned with the red marks on the sides of the buttonhole foot, and then lower the presser foot lever.
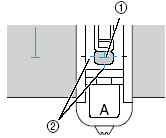
 Mark on fabric (front)
 Red marks on buttonhole foot
Pass the upper thread down through the hole in the presser foot.
- Do not lower the needle into fabric when aligning the marks. Desired results may not be achieved.
- When lowering the presser foot, do not push in the front of the presser foot.
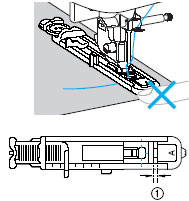
 Do not reduce the gap.
- Do not lower the needle into fabric when aligning the marks. Desired results may not be achieved.
- Pull down the buttonhole lever as far as possible.
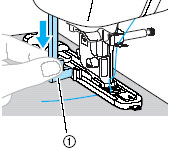
 Buttonhole lever
The buttonhole lever is positioned behind the bracket on the buttonhole foot.
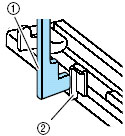
 Buttonhole lever
 Bracket
- Gently hold the end of the upper thread in your left hand, and then start sewing.
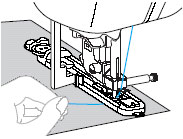
Once sewing is completed, the machine automatically sews reinforcement stitches, then stops.
- Raise the presser foot lever, remove the fabric, and then cut the threads.
- Raise the buttonhole lever to its original position.
- Insert a pin along the inside of one bar tack at the end of the buttonhole stitching to prevent the stitching from being cut.
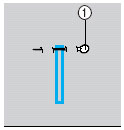
 Pin
Pin
- Use the seam ripper to cut towards the pin and open the buttonhole.
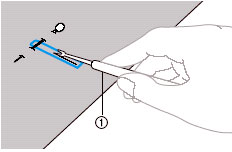
 Seam ripper
For keyhole buttonholes, use the eyelet punch to make a hole in the rounded end of the buttonhole, and then use the seam ripper to cut open the buttonhole.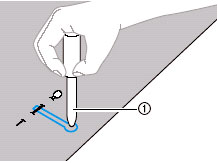
 Eyelet punch
- When using the eyelet punch, place thick paper or some other protective sheet under the fabric before punching the hole in the fabric.
- When opening the buttonhole with the seam ripper, do not place your hands in the cutting path, otherwise injuries may result if the seam ripper slips.
- Do not use the seam ripper in any other way than how it is intended.
- When using the eyelet punch, place thick paper or some other protective sheet under the fabric before punching the hole in the fabric.
Related Models
AS-40, BC-2100/2300, BC-2500, BM-3600/2700, Boutique 27/37, comfort 40E, comfort 60E, CS10, CS120WT, CS-6000/6000t, CS70, CS-80, CS-8060, CS-8120, CX70PE, DS-120, DS120s, DS-140, DS-160, Elite 95E, ES-2000, ES-2020, ES-2220, ES-2420, FS100WT, FS130QC, FS180QC, FS-20, FS210, FS250FE, FS-40, FS-40WT, FS60, FS60s, FS70WT, FS70WTs, Innov-is 10/10A, Innov-is 100, Innov-is 1200, Innov-is 1250, Innov-is 15, Innov-is 1500D/1500, Innov-is 150SE/ 150, Innov-is 20/20LE, Innov-is 200, Innov-is 2200, innov-is 25, Innov-is 250, Innov-is 27SE, Innov-is 30, Innov-is 300, Innov-is 35, Innov-is 350SE, Innov-is 400, Innov-is 4000D/4000, Innov-is 450, Innov-is 50, Innov-is 500, Innov-is 5000, Innov-is 500D, Innov-is 55, Innov-is 550SE/ 550, Innov-is 55FE, Innov-is 600, Innov-is 650, Innov-is 670, Innov-is 900, Innov-is 950, Innov-is 955, Innov-is I, Innov-is Ie, Innov-is V5, Innov-is V5 LE, Innov-is V7, Innov-is VQ2, Innov-is VQ4, JK4000, JK7000, JS100, JS-40E, JS-50CE, JS-50E, JS-60E, JS-70E, KD40, KE20, ML-55/65/75, ML-600, ML-750, ML-900, ModerN 210e, ModerN 40e, ModerN 50e, ModerN 60e, MS-4, MS40, MS-5, MS50, MS-6, MS60, NX-200, NX-2000, NX-400Q/400, NX-600, PE-300S, PE-400D, Prestige 100/200/300, Prestige 50, PS-3100/3700, PS-53/55/57, PX-100/200/300, PX-330, QC-1000, QS-480 Quilter's Edition, QS-960 Quilter's Edition, RS-15/20/25/30/35, RS-240/250/260, SM-340E, SM-360E, STAR 110/130E, STAR 230E/240E, STAR 35/45/55/65, STAR 50/60, Style 100Q, Style 80e, Style-40e, Style-50e, Style-60e, SuperGalaxie 3000/3000C/3000D/3100D, XL-3600, XL-5010/5020/5030, XL-5011/5012/5021/5031/5032, XL-5050/5060/5070, XL-5130/5232/5340, XL-5500, XL-5600, XL-5700, XL-6053/6063, XL-6600, XR-14/17/21, XR-65T, XR-6600