DCP-J925DW
FAQs & Troubleshooting |
Print both sides of paper or a booklet automatically (2-Sided/Duplex Printing)
When 2-sided(duplex) printing:
-
Borderless Printing is not available when 2-sided(duplex) printing.
-
If the paper is curled, straighten it and then put it back in the paper tray.
- Use regular paper or thin paper. DO NOT use bond paper.
To set the automatic 2-sided(duplex) or booklet print in the printer driver, follow the instructions listed below:
NOTE: Illustrations shown below are from a representative product and operating system, and may differ from your Brother machine and operating system.
Make sure you have installed the latest Full Driver & Software Package / Full Software Package.
> Click here to download Full Driver & Software Package / Full Software Package in the Downloads section.
-
You can either set the 2-sided(duplex)/booklet print for a single job, or set the driver for so that all subsequent print jobs are 2-sided(duplex)/booklet printed.
Single Job:-
Within the application you wish to print from choose the print option.
- Click PROPERTIES to open the Printing Preferences window. Continue to STEP 2.
The steps may vary depending on your application.All Jobs:-
Open Printing Preferences. (Click here to see the details of how to open Printing Preferences.)
- Continue to STEP 2.
-
Within the application you wish to print from choose the print option.
-
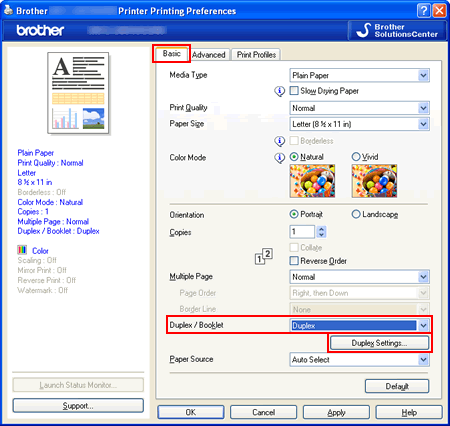
On the Basic Tab, make one of the following selections from the Duplex/Booklet dropdown box:
-
Duplex: When you want to print on both sides of the paper automatically, choose this item.
- Booklet: When you want to print as a booklet automatically, choose this item. To make the Booklet, fold the printed pages down the middle. When using the booklet printing function, please note that the paper size, orientation, source and other settings must remain unchanged for the whole document.
-
Duplex: When you want to print on both sides of the paper automatically, choose this item.
-
Click the DUPLEX SETTINGS button.
-
Depending on whether you chose Duplex or Booklet, you may adjust the following settings:
DUPLEX PRINTING:-
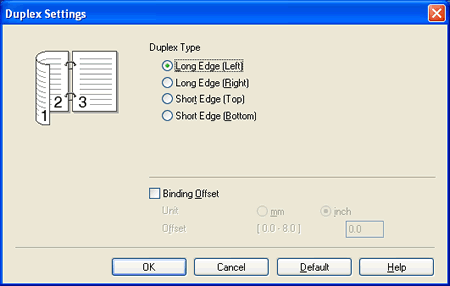
Duplex Type: There are four (4) types of 2-sided(duplex) binding directions available for each orientation - Portrait or Landscape.
- Binding Offset: If you check this option, you can also specify the offset for the binding in inches or millimeters.
BOOKLET PRINTING:-
Duplex Type: There are two (2) types of 2-sided(duplex) binding directions available for each orientation - Portrait or Landscape.
-
Booklet Printing Method: When Divide into Sets is chose: This option allows you to fold at the center of the smaller individual booklet sets without having to change the order of the page number. You can specify the number of sheets in each smaller booklet set, from 1 to 15. This option can help when folding the printed booklet that has a large number of pages.
- Binding Offset: If you check this option, you can also specify the offset for the binding in inches or millimeters.

-
Duplex Type: There are four (4) types of 2-sided(duplex) binding directions available for each orientation - Portrait or Landscape.
-
Click OK.
-
Some types of print media may need more drying time when using the 2-sided(duplex) feature. If you have problems with smudged 2-sided(duplex) prints or paper jams, you may configure the Advanced Duplex Settings:
-
Click on the Advanced tab.
-
Click Other Print Options.
-
Click Advanced Duplex Settings. You may choose one of the following settings:
-
Normal: Choose this option to print at normal speed, using a normal amount of ink.
-
Duplex 1 (Slower print speed): Choose this option to print at a slower speed, using a normal amount of ink. This option is not available for Ledger or A3 size paper.
- Duplex 2 (Slower print speed & less ink): Choose this option to print the same speed as Duplex 1, but using less ink.
-
Normal: Choose this option to print at normal speed, using a normal amount of ink.
- Click OK.
-
Click on the Advanced tab.
-
Click (APPLY) => OK.
-
If printing a Single Job, click OK or PRINT in the print dialog box to begin the print job.
If configuring for All Jobs, the driver is now configured and all subsequent print jobs will use the chose settings.
-
Within the application you wish to print from choose the print option.
-
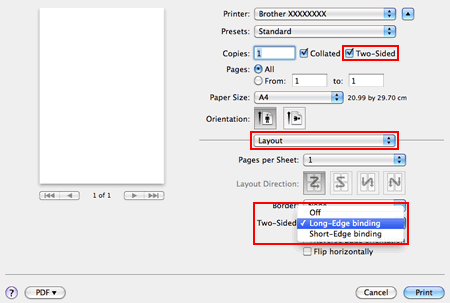
In the Print dialog box, to the right of Copies check on Two-Sided check box.
(Not available for Mac OS X 10.4)
-
From the Application dropdown, choose Layout.
-
Choose Long-edge binding or Short-edge binding in Two-Sided.
-
Some types of print media may need more drying time when using the 2-sided(duplex) feature. If you have problems with smudged 2-sided(duplex) prints or paper jams, you may configure the Advanced Duplex Settings:
-
From the Application dropdown, choose Print Settings.
-
Click Advanced.
-
Click Advanced Duplex Settings. You may choose one of the following settings from the dropdown menu:
-
Normal: Choose this option to print at normal speed, using a normal amount of ink.
-
Duplex 1 (Slower print speed): Choose this option to print at a slower speed, using a normal amount of ink. This option is not available for Ledger or A3 size paper.
- Duplex 2 (Slower print speed & less ink): Choose this option to print the same speed as Duplex 1, but using less ink.
-
Normal: Choose this option to print at normal speed, using a normal amount of ink.
-
From the Application dropdown, choose Print Settings.
-
To save this preference for future 2-Sided(Duplex) printing:
-
Choose Save As... or Save Current Settings as Preset... from the Presets dropdown box.
- Type a name for the Preset and click OK.
-
Choose Save As... or Save Current Settings as Preset... from the Presets dropdown box.
- Click PRINT. The document will print with the chose options.