DCP-J925DW
FAQs & Troubleshooting |
Copy an image from an existing disc label or photo onto a printable disc.
Your Brother machine can print directly onto printable disc media, including CD-R/RW, DVD-R/RW, or Blu-ray Disc™.
There are four ways to print onto a printable disc:
- To print by copying, click here.
- To print from a memory card or USB Flash memory drive, refer to the solution: "Print an image from a memory card or USB Flash memory drive onto a printable disc."
- To print from a Windows computer, refer to the solution: "Print an image from my Windows computer onto a printable disc."
- To print from a Macintosh, refer to the solution: "Print an image from my Macintosh onto a printable disc."
Printing by copying
To copy an image of an existing disc label or square document, such as a photo, onto a printable disc, follow these steps:
- Make sure the Automatic Document Feeder (ADF) is empty.
- You can copy 12 cm disc label images.
- Press the LEFT OR RIGHT ARROW key to display Disc. (This step might be skipped in some models.)
- Press Disc on the screen.
You can also begin the print procedure by opening the Disc Guide.
- Do one of the following:
- If you want to copy a disc labe image, press Copy from disc.
- If you want to copy a document, press Copy from photo.
- If you want to copy a disc labe image, press Copy from disc.
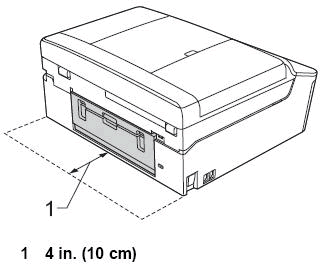
- Make sure there is more than 4 in.(10cm) of free space behind machine.
- Press OK.
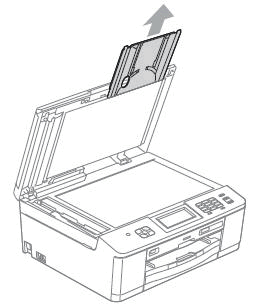
- Open the scanner cover and remove the Disc Tray.
- Press OK.
- The LCD asks you to set the internal and external diameter in the next screen.
- Press OK.
- Press the UP OR DOWN ARROW key to set the outside and inside diameter or the disc's printable area.
Refer to the printable disc's package for the outside and inside deameter measurements.
- Press OK.
- Place the disc or image you want to copy on the center of the flat scanner glass.

If the disc or image is not on the center of the flat scanner glass, the printed image will run off the disc.
- Press OK.
- Press the Color (Colour) Start.
- The machine starts scanning the image. The printing preview will appear on the LCD.
- Make sure the image you want to print is within the frame on the LCD.
- Only the area within the frame will be printed.
- Press + or - to change the image size.
- Press the UP, DOWN, LEFT, and RIGHT ARROW key on the LCD to move the image.
- Do one of the following:
- If you want to do a test print on paper, go to STEP 16.
- If you want to print the disc, follow these steps:
- Press OK.
- Go to STEP21.
- Press OK.
- Press TestPrint.
- If the Disc Guide is open, close it before performing the test print.
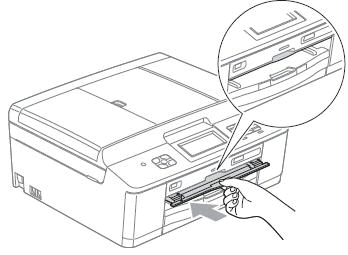
- If a disc is in the Disc Tray, remove the disc.
- Make sure Letter or A4 size paper is set in the paper tray.
You can only use Letter or A4 size paper for a test print.
- Press the Color (Colour) Start.
- The machine will print the test image.
- Do one of the following:
- If the test print is acceptable, follow these steps:
- Press OK.
- Go to STEP21.
- If the test print is not acceptable, go back to STEP16.
- Press OK.
- Enter the number of copies you want to make.
- You can press the number box directly, then press the numbers on the screen or press + or -.
- Do one of the following:
- If you do not want to change the print settings, go to STEP25.
- If you want to change the print settings, press Print Setting.
- Choose your printable disc type.
- If you chose Printable Disc, go to STEP24.
- If you chose Glossy Disc, go to STEP25.
- Press Normal or Slow Drying.
- Use Slow Drying if the print is smudged.
- Press Print Disc.
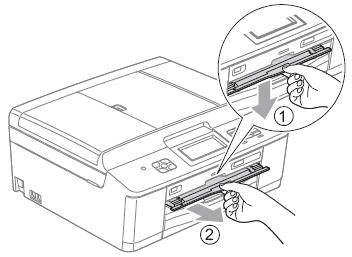
- Push and pull down the Disc Guide to open it.
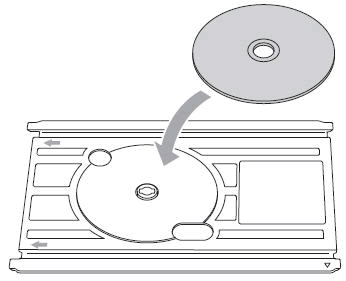
- Place a disc on the Disc Tray.
- Make sure to place the disc printed surface face up on the Disc Tray.
- Make sure there is do dirt on the Disc Tray.
- Insert the Disc Tray into the Disc Guide.
- Make sure to line up the triangular mark on the Disc Tray with the one on the Disc Guide.
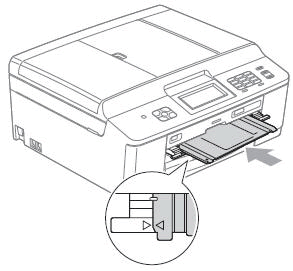
Do not push the Disc Tray all the way into the Disc Guide. If you push the Disc Tray past the point where the triangular marks are aligned, it will get stuck inside the machine.
- Press OK.
- Press Color (Colour) Start.
- If you are only printing one disc, the "finished" message will appear on the LCD.
- Press OK.
- If you are only printing one disc, go to STEP32.
- If you are printing more than one disc, follow these steps:
- Remove the Disc Tray from the Disc Guide.
- Remove the printed disc from the Disc Tray.
- Put a new disc on the Disc Tray.
- Press OK.
- Press Color (Colour) Start.
The machine starts printing the next disc.
Repeat STEP a thorough e for each additional disc you want to print.
When you are finished printing, go to STEP32.
If the printed image runs off the edge of the disc, you may need to adjust the disc print position.
- Remove the Disc Tray from the Disc Guide.
- Remove the Disc Tray from the Disc Guide.
- Remove the disc from the Disc Tray.
- Close the Disc Guide.
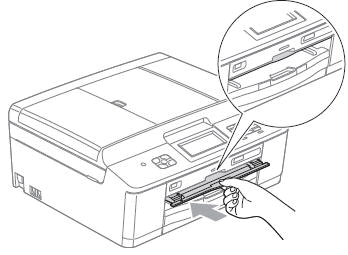
- Replace the Disc Tray in the scanner cover.
