Innov-is NV2750D
FAQs & Troubleshooting |
Outline of viewing and functions for keys on the utility stitch screen and the decorative stitch screen
Touch a key with your finger to select the stitch pattern, to select a machine function, or to select an operation indicated on the key. The screen below appears when you touch ![]() on the operation panel.
on the operation panel.
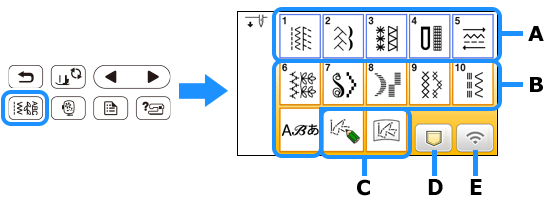 |
| (A) Utility stitch (B) Character/Decorative stitch (C) MY CUSTOM STITCH (D) Pattern retrieve key (E) Wireless LAN key |
| ■Utility stitch screen | ■Utility stitch editing screen | |
 |
 |
 |
| ■Character/Decorative stitch screen |
■Character/Decorative stitch editing |
|
 |
 |
 |
Some editing functions cannot be used with certain stitch patterns.
Only the functions for the displayed keys are available when a stitch pattern is selected.
| No. | Display | Key Name | Explanation | ||||||||||||||||
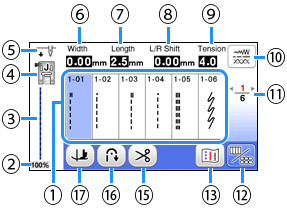
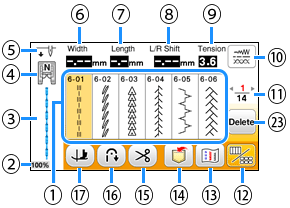
| (1) | – | Stitches | Touch the key for the stitch you want to sew. | ||||||||||||||||
| (2) | Stitch pattern display size | Shows the approximate size of the stitch pattern selected.
|
|||||||||||||||||
| (3) | – | Stitch preview | Shows a preview of the selected stitch. | ||||||||||||||||
| (4) | Presser foot |
Shows presser foot to be used. Before sewing, install the presser foot indicated here.
* The symbols for certain presser feet, such as zipper foot "I" and the quilting foot, may not appear in the screen. |
|||||||||||||||||
| (5) | Needle position setting |
Shows single or twin needle mode setting, and the needle stop position.
|
|||||||||||||||||
| (6) | Stitch width | Shows the stitch width of the currently selected stitch pattern. | |||||||||||||||||
| (7) | Stitch length | Shows the stitch length of the currently selected stitch pattern. | |||||||||||||||||
| (8) | L/R Shift | Shows the distance of left/right shift from the original position. | |||||||||||||||||
| (9) | Thread tension | Shows the automatic thread tension setting for the currently selected stitch pattern. | |||||||||||||||||
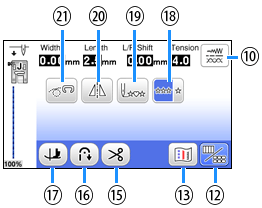
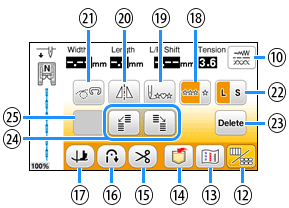
| (10) | Manual adjustment key | Touch this key to display the adjustment screen of the stitch width, stitch length , "L/R Shift" and thread tension. | |||||||||||||||||
| (11) | Page display | Shows additional pages that can be displayed. | |||||||||||||||||
| (12) | Edit/stitch switching key | Touch this key to toggle between the stitch editing screen and the stitch screen. | |||||||||||||||||
| (13) | Image key | Shows a preview of the sewn image. Touch |
|||||||||||||||||
| (14) | Memory key | Touch this key to save combined stitch patterns. | |||||||||||||||||
| (15) | Automatic thread cutting key | Touch this key to set the automatic thread cutting function. | |||||||||||||||||
| (16) | Automatic reverse/reinforcement key | Touch this key to use the automatic reverse/reinforcement stitch function. | |||||||||||||||||
| (17) | Pivot key | Touch this key to select the pivot function. | |||||||||||||||||
| (18) |  |
Single/repeat sewing key | Touch this key to choose single stitch pattern or continuous stitch patterns. Depending on the selected stitch, this key may be disabled. To finish a complete motif while sewing the stitch pattern continuously, you can touch The machine will automatically stop when the motif is finished. |
||||||||||||||||
| (19) | Back to beginning key | When sewing is stopped, touch this key to return to the beginning of the stitch pattern. | |||||||||||||||||
| (20) | Mirror image key | After selecting the stitch pattern, use this key to create a horizontal mirror image of the stitch pattern. | |||||||||||||||||
| (21) | Free motion mode key | Touch this key to enter free motion sewing mode. | |||||||||||||||||
| (22) | Size selection key | Use this key to select the size of the decorative stitch pattern or character stitch pattern (large, small). | |||||||||||||||||
| (23) | Delete key | Touch this key to delete the selected stitch pattern. When you make a mistake in combining stitch patterns, use this key to delete stitch patterns. | |||||||||||||||||
| (24) |  |
Step stitch keys | Use these keys to make step stitch patterns. | ||||||||||||||||
| (25) | Some of the following keys will appear, depending on the selected stitch pattern. | ||||||||||||||||||
| Elongation key | When 7 mm satin stitch patterns
|
||||||||||||||||||
| Thread density key | After selecting the satin stitch pattern
If the stitches bunch when thread density is changed to |
||||||||||||||||||
| Character spacing key | Touch this key to change the spacing of character stitch patterns. Spacing changes are valid not only while entering characters but also before and after the entering of characters. |
||||||||||||||||||

