CM600
FAQs & Troubleshooting |
Not all of the material to be cut is cut. Some areas remain uncut.
Case1 : A blade appropriate for the material being cut is not used.
Case2 : The blade extension from the blade holder is too little.
Case3 : The mat’s adhesive strength has decreased, or the material is not secured.
Case4 : The blade is worn.
Case5 : The material is incompatible with this machine.
Case6 : The cutting pressure (“Cut Pressure”) is incorrect.
Case7 : Dust or lint has accumulated in the holder.
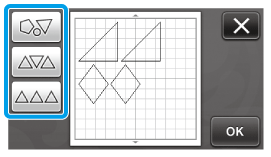
Case8 : The spacing between arranged patterns is too small.
Case11 : An iron-on fabric appliqué contact sheet is not firmly attached to a fabric.
----- Case1 -----
Use a blade appropriate for the material being cut.
>> For details, see “Mat and Cutting Blade Combinations”.
----- Case2 -----
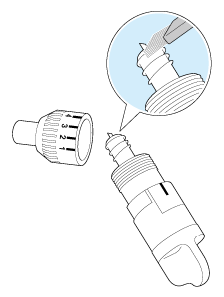
Remove the holder from the carriage, and then adjust the blade extension.
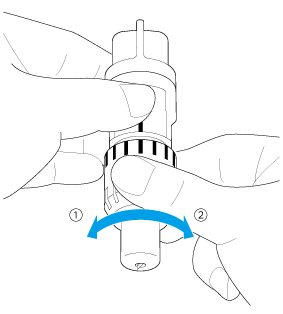
 Turn to the left to decrease the blade extension.
 Turn to the right to increase the blade extension.
>> For details, see “Adjusting the Blade Extension”.
----- Case3 -----
Replace the mat with a new one.
The cutting mats used by this machine have been redeveloped with a different design, type, function, etc.
For details, refer to “Important information about Mat”.
----- Case4 -----
Replace the blade with a new one.
>> For details, see “Replacement Criteria”.
----- Case5 -----
Replace the material with one compatible with this machine.
>> For details, see “Preparation of Craft Paper / Fabric”.
----- Case6 -----
Adjust the setting for “Cut Pressure” in the settings screen.

>> For details, see “Adjusting the Blade Extension”.
>> For details, see “Settings for Specific Functions”.
----- Case7 -----
Clean the holder.
>> For details, see “Cleaning the Holder”.
----- Case8 -----
Rearrange the patterns to slightly separate them. Set the number to “3” or higher in the “Pattern Interval” setting, and then rearrange the patterns or perform the auto layout function.

>> For details, see “Settings for Specific Functions”.
----- Case9 -----
Attach a high tack adhesive fabric support sheet to a mat or affix an iron-on fabric appliqué contact sheet to a fabric before cutting it.
>> For details, see “Attaching & Peeling Off the Material”.
----- Case10 -----
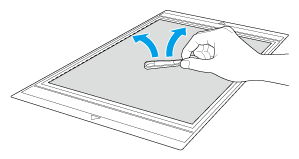
Firmly attach the fabric to the mat pressing the handle of the included spatula across the surface of the fabric.
----- Case11 -----
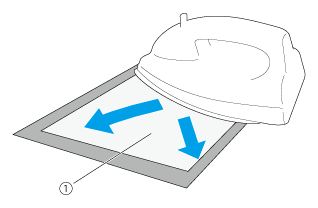
Iron the entire contact sheet to affix it firmly to the wrong side of the fabric.
 Backing
>> For details, see “Attaching & Peeling Off the Material”.