MFC-7360N
FAQs & Troubleshooting |
The left side of the document will not print when I make a copy from the scanner glass.
This issue may be caused by incorrect settings.
Please try the steps below to solve the issue.
- Check if the paper you want to use for printing copies is in the paper tray you are printing from.
You can use Manual Feed Slot or Tray 1.
- Check if the appropriate paper size for the paper tray you are printing from is chosen in Paper Size setting.
- On the control panel of the machine, press MENU and choose General Setup => Paper => Paper Size.
- Press OK.
- Press the UP OR DOWN ARROW key to choose the paper size for the paper tray you are printing from.
You can choose A4, Letter, Legal*, Executive, A5 L, A6, B5, B6, Folio*.
* The availability of different paper sizes varies depending on the region and country. - Press OK.
- Press STOP/EXIT.
- Do one of the following:
- If you are making a reduced or enlarged size copy from the scanner glass, go to STEP 3.
- If you are making a regular size copy from the scanner glass, go to STEP 4.
- Check if the setting for a reduced or enlarged size copy is set properly.
For models with FAX functions:
- On the control panel of the machine, press COPY.
- On the control panel of the machine, press Enlarge/ Reduce.
- Press the UP OR DOWN ARROW key to choose the reduction or increase ratio.
- Press OK.
If you choose Custom (25-400%), enter the reduction radio by using the dial pad. Press OK.
E.g. To enter 80%, press 8 0.
For models without FAX functions:
- On the control panel, press OPTIONS.
- Press the UP OR DOWN ARROW key to choose Enlarge/ Reduce.
- Press OK.
- Press the UP OR DOWN ARROW key to choose the reduction or increase ratio.
- Press OK.
If you choose Custom (25-400%), press UP OR DOWN ARROW key to choose the reduction ratio. Press OK.
- Make another copy.
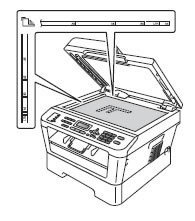
- Lift the document cover.
- Using the document guidelines on the left and top, place the document in the upper left hand corner with the document face down on the scanner glass.
NOTE: Illustrations shown below are from a representative product and may differ from your Brother machine.

- Close the document cover.
- For models with FAX functions:
Use the dial pad to enter the number of copies (Up to 99).
For models without FAX functions:
Press the UP OR DOWN ARROW key to enter the number of copies.
- Press START.
Content Feedback
To help us improve our support, please provide your feedback below.
