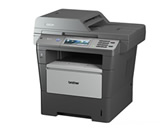
DCP-8250DN
FAQs & Troubleshooting |
Replace Drum
Please follow the steps below to replace the drum unit.
The Brother machine has separate consumables the toner cartridge and the drum unit. Verify you replace only the drum unit and not the toner cartridge. Click here to see the detail of the difference between the toner cartridge and the drum unit.
NOTE: Illustrations shown below are from representative product and may differ from your Brother machine.
- While removing the drum unit, handle it carefully because it may contain toner. If toner scatters on your hands or clothes, immediately wipe or wash it off with cold water.
- Every time you replace the drum unit, clean the inside of the machine.
- Wait to unpack the new drum unit immediately before you put it in the machine. Exposure to direct sunlight or room light may damage the drum unit.
- Leave the machine turned on for 10 minutes for the internal fan to cool the extremely hot parts inside the machine.
-
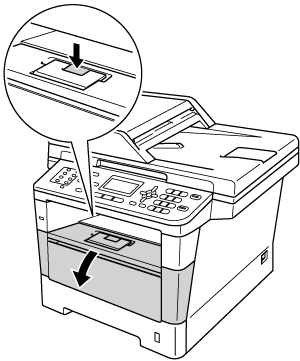
Press the front cover release button and then open the front cover.
-
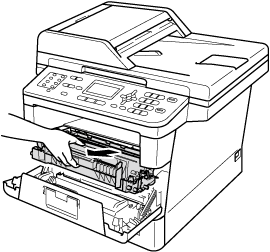
Take out the drum unit and toner cartridge assembly.
-
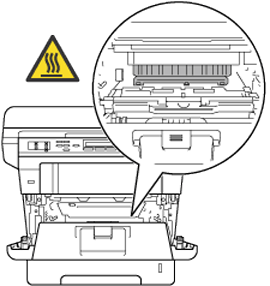
After you have just used the machine, some internal parts of the machine will be extremely hot. Wait for the machine to cool down before you touch the internal parts of the machine.
- We recommend that you place the drum unit and toner cartridge assembly on a clean, flat surface with a piece of disposable paper underneath it in case you accidentally spill or scatter toner.
-
To prevent damage to the machine from static electricity, DO NOT touch the electrodes shown in the illustration.
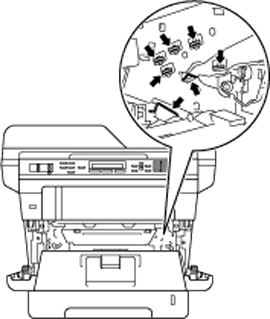
-
Push down the green lock lever and take the toner cartridge out of the drum unit.
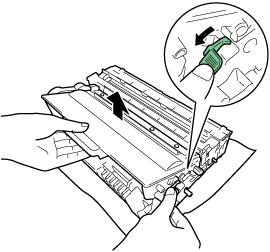
- DO NOT put a toner cartridge or a toner cartridge and drum unit assembly into a fire. It could explode, resulting in injuries.
-
DO NOT use flammable substances, any type of spray, or an organic solvent/liquid containing alcohol or ammonia to clean the inside or outside of the product. Doing so could cause a fire or electrical shock. Instead, use only a dry, lint-free cloth.

- Handle the toner cartridge carefully. If toner scatters on your hands or clothes, immediately wipe or wash it off with cold water.
-
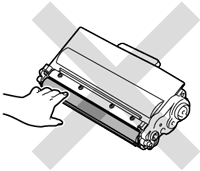
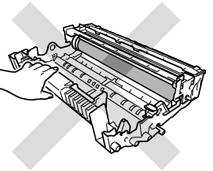
To avoid print quality problems, DO NOT touch the shaded parts shown in the illustrations.
<Toner cartridge>
<Drum unit>
- We recommend that you place the toner cartridge on a clean, flat, level, stable surface with a sheet of disposable paper or cloth underneath it in case you accidentally spill or scatter toner.
- Be sure to seal up the used drum unit tightly in a suitable bag so that toner powder does not spill out of the drum unit.
- Go to http://www.brother.com/original/index.html for instructions on how to return your used consumable items to the Brother collection program. If you choose not to return your used consumable, please discard the used consumable according to local regulations, keeping it separate from domestic waste. If you have questions, call your local waste disposal office.
- Unpack the new drum unit.
-
Put the toner cartridge firmly into the new drum unit until you hear it lock into place. If you put the cartridge in correctly, the green lock lever will lift automatically.
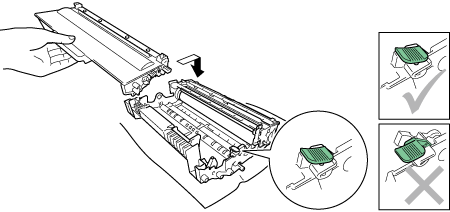
Make sure that you put in the toner cartridge correctly or it may separate from the drum unit.
-
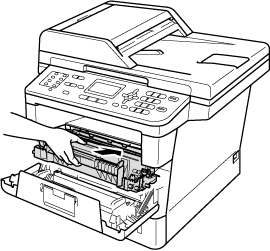
Put the drum unit and toner cartridge assembly back into the machine.
Do not close the front cover of the machine. (For touchscreen models, close the front cover of the machine.)
- Reset the drum counter.
Do not reset the drum counter when you only replace the toner cartridge.
* If your Brother machine has a touchscreen, please follow the steps under "For touchscreen models" below.
- With the front cover still open, press Clear.
- To confirm you are installing a new drum, press 1.
- When the LCD shows Accepted, close the front cover of the machine.
- Press Stop/Exit to interrupt the error temporarily.
- Press Menu.
- Press the Up or Down arrow key to display Machine Info..
Press Machine Info..- Press Reset Menu.
- Press Drum.
- The machine will display Reset Drum?.
Press Yes.- Press Stop/Exit.
