MFC-J4710DW
FAQ & Fehlerbehebung |
Ink is still wet after printing on Glossy Paper and even after ink dries, smudge appears.
To resolve this issue ensure that the Media Type setting in the printer driver or the Paper Type setting in the machine's menu matches the type of paper you are using.
Even if you use non-Brother Glossy Paper and choose Other Photo Paper or Other Glossy for the settings, still this issue may occur. In that case choose Brother BP71 Photo Paper for your settings.
[NOTE] Proper paper handling after page has been printed:
- After the photo has finished printing, remove the photo immediately from the machine and place on flat surface to dry for 24 hours. Do not allow additional printed documents lay on top of photo while in machines paper output tray.
- Do not place anything on top of photo until after 24 hours. This can cause the picture not to dry properly.
- Do not place photo in a photo album or a picture frame until after 24 hours. This can cause the picture not to dry properly.
Click the link below for your case and follow the steps to confirm or change the setting:
- Printing from the computer
- Printing from a memory card or USB Flash memory drive (PhotoCapture Center™)
(Windows)
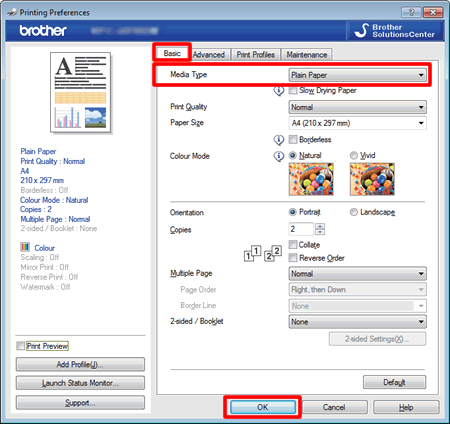
- Open Printing Preference. (Click here to see how to open Printing Preferences.)
- Open Basic tab.
- Choose Photo Paper (Brother BP71 Photo Paper/ Other Photo Paper) for the Media Type.

- Click OK.
Mac OS X
- Open Print dialog. (Click here to see how to open Print dialog.)
- Choose Print Settings in the Print dialog box.

- Click on the drop down menu next to Media Type.
- Choose Photo Paper (Brother BP71 Photo Paper/ Other Photo Paper).

Printing from a memory card or USB Flash memory drive (PhotoCapture Center™):
- Open the media slot cover.
- Put the memory card or USB Flash memory driver in the correct slot.
- Press Photo.
- Swipe left or right to display View Photos.
- Press View Photos.
- Press OK.
- Swipe left or right, or press the Left or Right arrow to display each photo. When the photo you want is displayed, press it and then press OK.
- Press OK.
- Press Print Settings.
- Swipe up or down, or press the Up or Down arrow to display Paper Type.
- Press Paper Type.
- Press Photo Paper (Brother BP71/ Other Photo Glossy).
- Press
 (Back) or OK.
- Press Start to print.
