HL-J6000DW
FAQ & Fehlerbehebung |
Check the Print Alignment from Your Brother Machine
If your printed text becomes blurred or images become faded after transporting the machine, adjust the print alignment.
Before adjusting the print alignment, make a print quality check first by pressing  .
.
- Press
 .
. - Press [Next].
- Press [Yes] after a confirmation message if a print quality check has been completed appears on the LCD.
- Select the paper size to print the Alignment Check Sheet on.
- Press [Basic alignment] or [Advanced alignment].
- Load specified size paper in the tray, and then press [Start].The machine prints the Alignment Check Sheet.

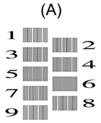
- For the (A) pattern, press
 or
or  to display the number of the test print with the fewest visible vertical stripes (1-9), and then press it (in the example above, row number 6 is the best choice). Press [OK].
 Repeat this step for the rest of the patterns.

When the print alignment is not adjusted correctly, text looks blurry or crooked, like this:

After the print alignment is adjusted correctly, text looks like this:

- Press
 .
.
Rückmeldung zum Inhalt
Helfen Sie uns dabei, unseren Support zu verbessern und geben Sie uns unten Ihre Rückmeldung.
