MFC-9330CDW
FAQ & Fehlerbehebung |
Scan a document and save the scanned image to a folder on a local or network hard disk (For Windows)
You can scan a document and save the scanned image to a preferred folder using ControlCenter4. Click the link below for the ControlCenter4 user interface you are using to see more details.
NOTE: Illustrations shown below are from a representative product and operating system and may differ from your Brother machine and operating system.
Home Mode
- Load your document.
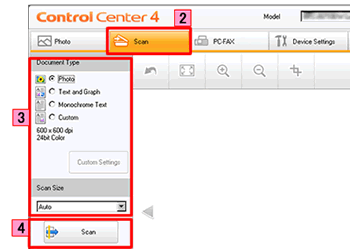
- Click the Scan tab.
- Choose the Document Type and Scan Size.
-
Click Scan.
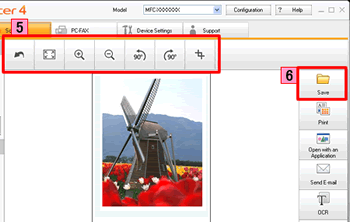
- The scanned image will be displayed in the image viewer. Confirm and edit (if necessary) the scanned image.
-
Click Save.
-
The Save dialog will appear. Configure the settings, and click OK. The image will be saved in the folder you have chosen in the settings window.
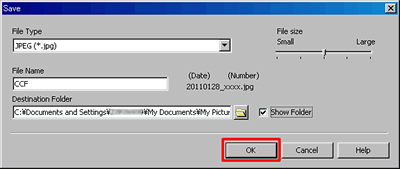
File Type:
Choose the file type for the scanned image from the File Type drop-down list. The following file types are available:
*Note: The available file types vary depending on your Brother machine and operating system.- Windows Bitmap (*.bmp)
- JPEG (*.jpg)
- TIFF (*.tif)
- TIFF Multi-Page (*.tif)
- Portable Network Graphics (*.png)
- PDF (*.pdf)
- High Compression PDF (*.pdf)
- Secure PDF (*.pdf)
- Searchable PDF (*.pdf)
- XML Paper Specification (*.xps)
- Microsoft Office Word (*.docx)
-
Microsoft Office PowerPoint (*.pptx)
Note:- The XML Paper Specification is available for Windows Vista or later, or when using applications which support XML Paper Specification files.
- If you set the file type to JPEG, PDF or Secure PDF, you can configure File size.
- If you set the file type to TIFF or TIFF Multi-Page, you can choose "Uncompressed" or "Compressed".
- Searchable PDF is a file format that includes a text data layered over the scanned image. This layer allows you to search the text on the image data. The OCR language setting must be set to match the search language that you want to use for the searchable PDF.
- To choose Searchable PDF, you must install Nuance PaperPort™ or Presto! PageManager installed on your computer. The Nuance PaperPort™ or Presto! PageManager software is supplied on the CD with your Brother machine.
File Name:
Configure the prefix text used for the file name of the scanned image in the File Name box.
Destination Folder:
Set the folder to save the scanned image in the Destination Folder box.
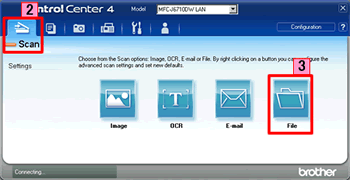
Advanced Mode
- Load your document.
- Click the Scan tab.
-
Click File.
-
The Scan Settings dialog box appears. You can configure the scan settings in this dialog box. If you want to preview and configure the scanned image, check PreScan box.

- Click Scan. The image will be saved in the folder you have chosen.
Relevante Modelle
DCP-9017CDW, DCP-9020CDW, DCP-9022CDW, DCP-J100, DCP-J132W, DCP-J152W, DCP-J172W, DCP-J4110DW, DCP-J552DW, DCP-J752DW, MFC-9140CDN, MFC-9142CDN, MFC-9330CDW, MFC-9332CDW, MFC-9340CDW, MFC-9342CDW, MFC-J200, MFC-J2310, MFC-J245, MFC-J2510, MFC-J4410DW, MFC-J4510DW, MFC-J4610DW, MFC-J470DW, MFC-J4710DW, MFC-J650DW, MFC-J870DW