MFC-250C
FAQ & Fehlerbehebung |
Locate files scanned with ControlCenter3 (For Windows)
The ControlCenter is used to interface the "Scan to" action keys on the Brother machine with the computer. When you use the Scan to File button, the scanned file is automatically saved in the default Destination Folder. To view the default Destination folder:
-
Open ControlCenter.
(Windows 2000/ Windows XP/ Windows Vista/ Windows 7)
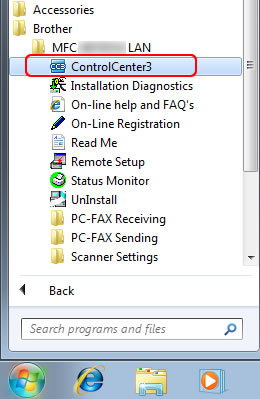
Click Start => (All) Programs => Brother => [model name] => ControlCenter. The ControlCenter window will open.
(Windows 8 or later)-
(Windows 8)
On the Start screen, click . If
. If  is not on the Start screen, right-click somewhere on an empty spot, and then click, All Apps from the bar.
(Windows 10)
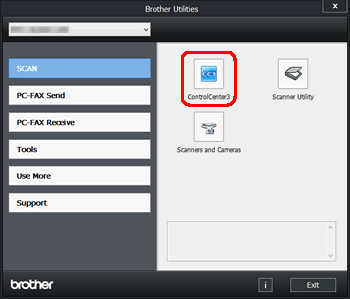
Click (Start) => (All apps =>) Brother.
 - Click Brother Utilities.
- Choose your model name from the pulldown list.
- Click ControlCenter.
-
(Windows 8)
-
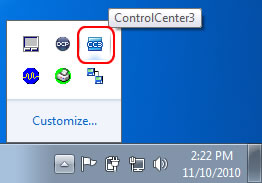
If the program window doesn't open completely, click on the CC3 icon in the task tray.
-
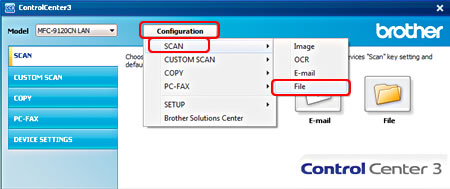
Click the Configuration button then choose Scan => File. The "Scan to File" configuration screen will appear.
-
Click the Device Button Tab for scanning from the Brother machine's SCAN key or the Software Button Tab for scanning from within the ControlCenter software application.

-
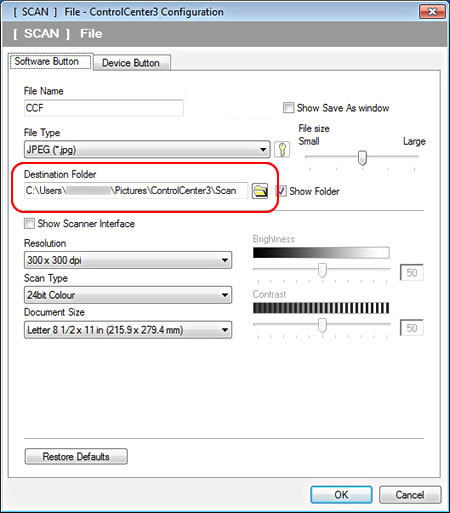
The Destination Folder field will display the default destination for all files scanned with the Scan to File button. You will need to open this folder to view scanned documents.
-
To change the default Destination Folder browse to the location you want to save your files and click OK. All subsequent scans using the Scan to File button will be saved in this location.
Relevante Modelle
DCP-130C, DCP-135C, DCP-145C, DCP-150C, DCP-165C, DCP-167C, DCP-185C, DCP-195C, DCP-330C, DCP-350C, DCP-365CN, DCP-373CW, DCP-375CW, DCP-377CW, DCP-383C, DCP-385C, DCP-387C, DCP-395CN, DCP-540CN, DCP-560CN, DCP-585CW, DCP-6690CW, DCP-7030, DCP-7040, DCP-7045N, DCP-750CW, DCP-770CW, DCP-8070D, DCP-8085DN, DCP-9010CN, DCP-9040CN, DCP-9042CDN, DCP-9045CDN, DCP-J125, DCP-J315W, DCP-J515W, DCP-J715W, MFC-235C, MFC-240C, MFC-250C, MFC-255CW, MFC-260C, MFC-290C, MFC-295CN, MFC-297C, MFC-3360C, MFC-440CN, MFC-465CN, MFC-490CW, MFC-5460CN, MFC-5490CN, MFC-5860CN, MFC-5890CN, MFC-5895CW, MFC-6490CW, MFC-660CN, MFC-680CN, MFC-6890CDW, MFC-7320, MFC-7440N, MFC-7840W, MFC-790CW, MFC-795CW, MFC-8370DN, MFC-8380DN, MFC-845CW, MFC-885CW, MFC-8880DN, MFC-8890DW, MFC-9120CN, MFC-9320CW, MFC-9440CN, MFC-9450CDN, MFC-9840CDW, MFC-990CW, MFC-J220, MFC-J265W, MFC-J410, MFC-J415W, MFC-J615W