HL-2600CN
FAQ & Fehlerbehebung |
How do I replace the Paper Discharger?
Follow the steps below;
- Press the Power button to turn the printer Off.
- Open the Rear Access Cover.
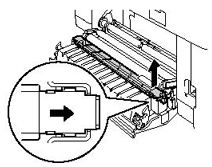
- Remove the Paper Discharger from the Transfer Unit by lightly pressing it down and then sliding it to the right to release it from the catches. Hold the right handside of the Discharging Unit and lift it up to remove it.
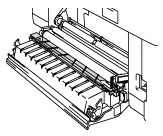
- Clean the area where the new Paper Discharger is to be installed with a cotton cloth.
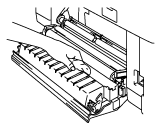
- Install the new Paper Discharger into the Transfer Unit in the reverse order that you removed it.
- Plug the printer into the AC outlet.
- Press the Power button to turn on the printer.
- Press any of theMenu button (+, –, Set or Back) to take the printer Off Line.
- Press + or – until "RESET MENU" appears.
- Press Set to proceed to the next menu level, and then press + or – until "PARTS LIFE" appears.
- Press Set, and then press + until "120K KIT" appears.
- Press Set, and then press Go. The printer is now in the READY state.
Rückmeldung zum Inhalt
Helfen Sie uns dabei, unseren Support zu verbessern und geben Sie uns unten Ihre Rückmeldung.