PJ-773
FAQ et Diagnostic |
I created a template using P-touch Editor and transferred it to my printer. But the print result is different from what I see on the P-touch Editor screen.
When printing templates created using P-touch Editor, or transferring them to your printer, if the font type, font size or font color (QL-810W/820NWB only) are different from what appears on the P-touch Editor screen, check the following points and edit the template in P-touch Editor.
![]() When there is "dynamically changing" data, such as the date and time
When there is "dynamically changing" data, such as the date and time
When there is only one object, and it does not include "dynamically changing" data such as the date and time
Convert the data to an image with the following steps:
-
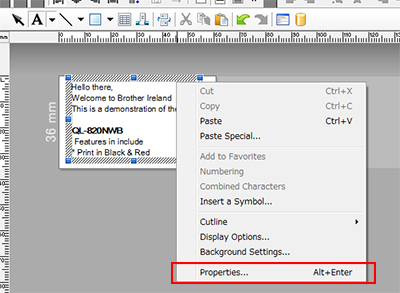
While selecting the object, right-click and select [Properties].
-
Select [Text Cannot be Edited] in the [Expanded] tab, and then click [OK].
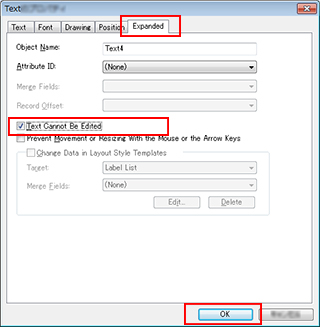
If you select [Text Cannot be Edited], the object is converted to an image (as you can see in the P-touch Editor screen), and transferred to your printer so you can print it as previewed.
-
Click [File] - [Transfer Template] - [Preview].
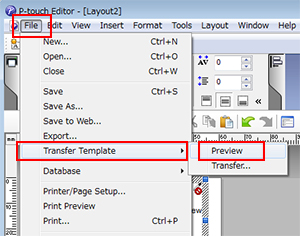
- If the preview result is OK, transfer the template to your printer.
When there are multiple objects, and they do not include "dynamically changing" data such as the date and time
Convert the data to an image by grouping the objects:
- Select all objects.
-
Right-click and select [Group] - [Group].
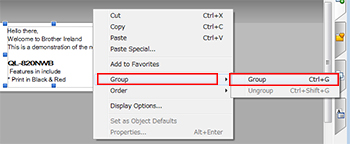
- Click [File] - [Transfer Template] - [Preview].
- If the preview result is OK, transfer the template to your printer.
When there is "dynamically changing" data, such as the date and time
Convert the data to an image by grouping the objects:
- Create "dynamically changing" data as a separate object.
- Select all objects except the one created in step 1.
-
Right-click and select [Group] - [Group].

-
Click [File] - [Transfer Template] - [Preview].

-
If the preview result is OK, transfer the template to your printer.
For QL-810W/820NWB users:
Create an object in a single color (either black or red) for "dynamically changing" data. (Create objects separately for each color.)
Si vous n'avez pas obtenu de réponse satisfaisante à votre question, avez-vous vérifié d'autres FAQ?
Modèles apparentés
MW-145BT, PJ-623, PJ-663, PJ-722, PJ-723, PJ-762, PJ-763, PJ-763MFi, PJ-773, PJ-822, PJ-823, PJ-862, PJ-863, PJ-883, PT-D800W, PT-E550W, PT-E560BT, PT-P900W/P900Wc, PT-P950NW, QL-1050, QL-1060N, QL-1100/1100c, QL-1110NWB/1110NWBc, QL-650TD, QL-720NW, QL-810W/810Wc, QL-820NWB/820NWBc, RJ-2030, RJ-2050, RJ-2140, RJ-2150, RJ-3050, RJ-3150, RJ-3230B, RJ-3250WB, RJ-4030, RJ-4040, RJ-4230B, RJ-4250WB, TD-2020/2020A, TD-2120N, TD-2125N, TD-2125NWB, TD-2130N, TD-2135N, TD-2135NWB, TD-4000, TD-4100N, TD-4210D, TD-4410D, TD-4420DN/4420DN(FC), TD-4520DN, TD-4550DNWB / 4550DNWB(FC)
