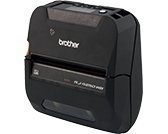
RJ-4250WB
FAQ & Fehlerbehebung |
How to charge the rechargeable Li-ion battery
Before using the rechargeable Li-ion battery (PA-BT-006), use one of the following methods to charge it.
- Print speed varies with the available battery power.
- For RJ-4230B-L / RJ-4250WB-L: Be sure to remove the insulated sheet before charging the battery.
- Recharging the Battery Using the AC Adapter (Optional: PA-AD-600A / PA-AD-600)
- Recharging the Battery Using the Car Adapter (Optional: (PA-CD-600CG)
- Recharging the Battery Using the Battery Charger (Optional: PA-BC-003)
- Recharging the Battery Using the Active Docking Station / Charging Cradle (Optional: PA-CR-002)
| LED indicator | Status |
| Battery is charging. | |
|
(when power is turned off)
(when power is turned on) |
Battery is fully charged.
Disconnect the AC adapter or car adapter from the battery’s DC connector. |
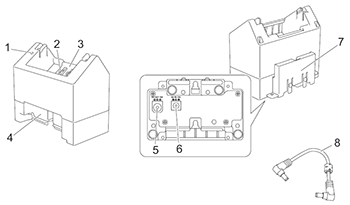
Recharging the Battery Using the Battery Charger (Optional: PA-BC-003)
 |
|
The AC adapter (PA-AD-600A), which is sold separately, is required for charging.
To charge the rechargeable Li-ion battery, use the charger together with the AC adapter (PA-AD-600A).
The charger (PA-BC-003) cannot recharge the battery alone.
-
Connect the AC adapter to the charger’s DC connector IN, and then connect the AC power cord to the AC adapter.
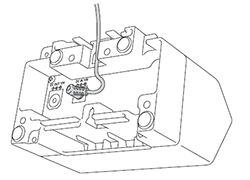
Insert the AC adapter through the opening in the battery charger as shown in the illustration.
Install the AC adapter so the battery charger does not press on it. - Connect the AC power cord to a nearby AC power outlet.
-
Align the charging terminals of the charger and the battery, and then insert the battery.
The indicator lights in orange when the battery is charging. -
The charge indicator will turn off when charging is complete.
You can then remove the battery.
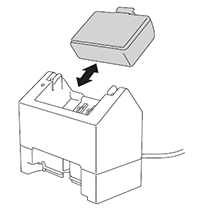
Recharging the Battery Using the Active Docking Station / Charging Cradle (Optional: PA-CR-002)
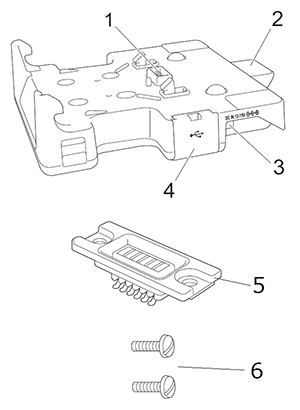 |
|
-
The AC adapter (PA-AD-600A, sold separately) can be used for providing power from an AC wall outlet to the docking station / charging cradle and charging the battery if installed.
The Active Docking Station / Charging Cradle (PA-CR-002) cannot recharge the battery alone. - The docking station / charging cradle can be used without a battery as a power supply.
- Do not turn on the printer and the docking station / charging cradle simultaneously.
- Sequential printing and the mass storage mode are not supported when the docking station / charging cradle is used to print.
- It is recommended to change the setting of the printer driver to [After one page of data is received] in [Other] tab when printing from the docking station / charging cradle.
-
Connect the AC adapter to the docking station / charging cradle’s DC connector IN, and then connect the AC power cord to the AC adapter.
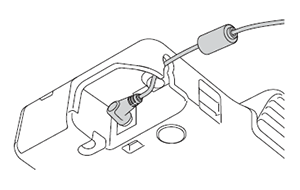
- Connect the AC power cord to a nearby AC power outlet.
-
Remove the docking station / charging cradle terminal cover, and use the included screws you removed to install the docking station / charging cradle terminal attachment.
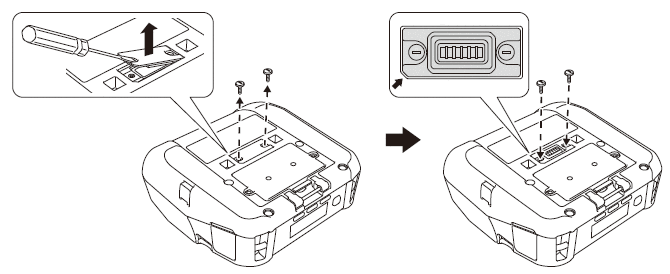
Install the docking station / charging cradle terminal attachment. Make sure the notched corner is aligned correctly.
-
Align the docking station terminals / charging cradle terminals of the docking station / charging cradle and the printer, and then press the printer down and onto the docking station / charging cradle until the latches lock it firmly in place.
The printer’s battery indicator lights in orange when charging.
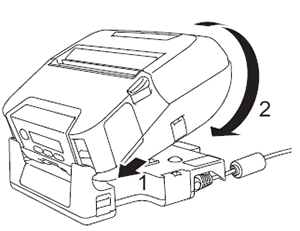
- The printer’s battery indicator will turn off when charging is complete.
Printer Removal
Push the eject button on the back of the docking station / charging cradle and lift the printer and remove it from the docking station / charging cradle.
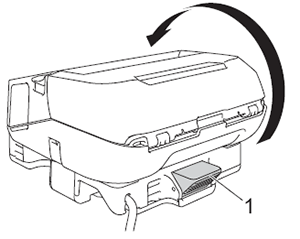
1 Eject button
Lock the Eject Button
The eject button can be locked by inserting a cotter pin (or similar) through the hole as illustrated below.
It is recommended to use a Low Carbon Steel Extended Prong Retaining Cotter Pin: Length: 1.97 in. (50 mm), Pin Diameter: 0.08 in. (2 mm).
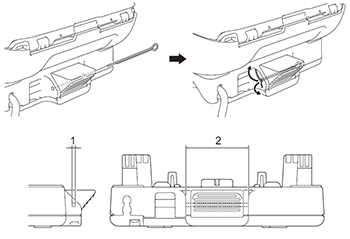
1 Diameter: 0.09 in. (2.3 mm)
2 Length: 1.62 in. (41.2 mm)
Contact Brother for the cotter pin.
