PT-P900W/P900Wc
FAQ & Fehlerbehebung |
Using P-touch Template Settings
P-touch template mode provides operations for inserting data into text and barcode objects in a downloaded template from a barcode scanner (optional: PA-BR-001) or other devices connected to the printer.
- P-touch template mode is also compatible with other input devices like a scale, testing machine, controller or a programmable logic device.
- For more information on P-touch Template, download the P-touch Template Manual / Command Reference (English only) from the [Manuals] section of this website.
To use the P-touch Template Settings, please follow the steps below:
-
Open the Printer Setting Tool.
Refer to "Using the Printer Setting Tool (for Windows)".
-
Select P-touch Template Settings.
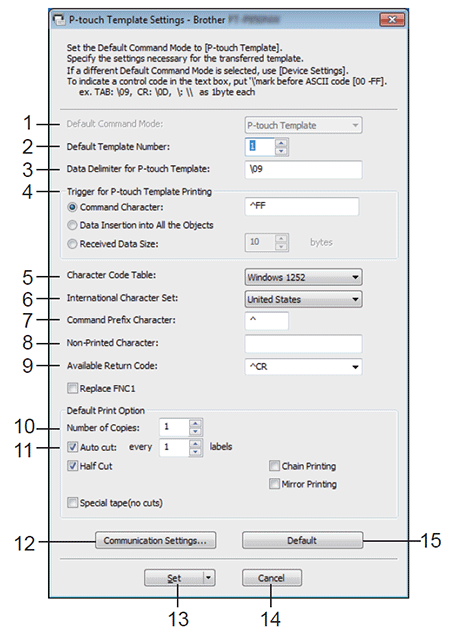
The P-touch Template Settings window appears.
-
Specify or change the settings.
See below for detailed information.
P-touch Template Settings Dialog Box

-
Default Command Mode
Specifies the P-touch Template mode as the default mode.
To change the mode, use the Device Settings.
-
Default Template Number
Specifies a template number to select as default when the printer is turned on.
However, if a template is not to be transferred to the printer, do not specify a template number.
-
Data Delimiter for P-touch Template
A symbol used to indicate the boundaries between groups of data in a file. Between 1 and 20 characters can be specified.
-
Trigger for P-touch Template Printing
You can specify a trigger to begin printing from a number of options.
[Command Character]: Printing starts when the command character specified here is received.
[Data Insertion into All the Objects]: Printing starts when the delimiter for the last object is received.
[Received Data Size]: Printing starts when the number of characters specified here is received. However, delimiters are not counted in the number of characters.
-
Character Code Table
Select one of the following character code sets:
Available settings: [Windows 1251], [Windows 1252], [Windows 1250 Eastern Europe], [Brother standard]
-
International Character Set
Lists character sets for specific countries.
Available settings: [United States], [France], [Germany], [Britain], [Denmark], [Sweden], [Italy], [Spain], [Japan], [Norway], [Denmark II], [Spain II], [Latin America], [Korea], [Legal]
The following 12 codes are switched depending on the country selected from the list above: 23h 24h 40h 5Bh 5Ch 5Dh 5Eh 60h 7Bh 7Ch 7Dh 7Eh
For more information on P-touch Template, download the P-touch Template Manual / Command Reference (English only) from the [Manuals] section of this website.
-
Command Prefix Character
Specifies the prefix character code, which identifies commands used in P-touch Template mode.
-
Non-Printed Character
Characters specified here are not printed when data is received. Specify 1 to 20 characters.
-
Available Return Code
The line feed code is used when feeding data to indicate that the following data should be moved to the next line in a text object. One of the following four line feed codes can be selected, or 1 to 20 characters can be specified as the line feed code.
Available settings: [^CR], [\0D\0A], [\0A], [\0D]
-
Number of Copies
Sets the number of copies. A number between 1 and 99 can be specified.
-
Cut option
Specifies whether to cut the labels automatically and how many labels to print before cutting them. A number between 1 and 99 can be specified.
You can also select other cutting options.
-
Communication Settings
Specifies the communication settings.
-
Set
Applies the settings to the printer.
To save the specified settings in a command file, select [Save in Command File] from the drop-down list.
The saved command file can be used with the mass storage mode to apply the settings to a printer.
-
Cancel
Cancels the settings and closes the dialog box. The settings will remain unchanged.
-
Default
Returns to factory settings.
Rückmeldung zum Inhalt
Helfen Sie uns dabei, unseren Support zu verbessern und geben Sie uns unten Ihre Rückmeldung.
