DCP-540CN
FAQ et Diagnostic |
How do I clear the message "No Paper Fed" from the display?
The message "No Paper Fed"may appear on the display if the Brother machine is out of paper, the Photo Bypass Tray is not set correctly, the paper is not loaded properly in the paper tray or the jam clear cover located in the back of the machine, is not installed properly, or if the white PE Actuator is missing or isn't properly connected.
In Canada, the photo bypass tray is called the photo paper tray.
To resolve this issue, please follow the steps listed below:
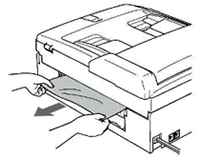
- Turn the unit around and remove the Jam Clear Cover from the back of the machine by grasping it at the center and pulling it straight away from the rear of the machine.

- Look for any paper scraps, jammed paper or foreign objects in the rear of the unit. If anything is found, remove it.
Be careful not to touch the feed roller.
 |
 |
|
|
- Remove the Paper Tray from the machine.
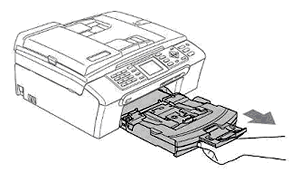
- Look inside the machine, where the paper tray was installed and locate the white PE Actuator.

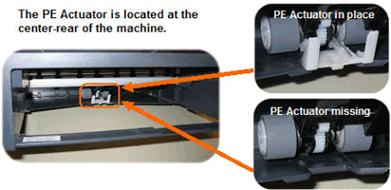
The PE Actuator looks like a 2 prong fork or tuning fork and is located near the rear center of the machine where the paper tray slides in. It is located between the 2 gray rollers.- If the white PE Actuator is in place, continue to STEP 5.
- If the White PE Actuator is missing, go to the section titled "PE Actuator".
- Fan the stack of paper well to avoid paper jams and miss-feeds.

- The paper must be uniformly stacked (same size, type and weight)
- Do not use paper that has been damaged, curled, wrinkled, irregularly shaped, extremely shiny, highly textured, or paper that was previously printed by a printer.
- Be sure to follow the paper specifications and paper tray capacity information listed below:
- Plain Copy Paper (17lb to 32lb) = Up to 100 sheets of letter size or 50 sheets of legal-size
- Ink Jet Paper (17lb to 53lb) = Up to 20 sheets
- Glossy Paper (up to 58lb) = Up to 20 sheets
- Be careful NOT to overfill the tray. Doing so may cause miss-feeds or paper jams and could damage your machine.
- Gently insert the paper into the paper tray. The paper must be completely flat in the paper tray or feed problems may occur.
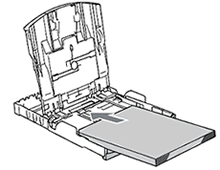
- Adjust the blue Paper Side Guides, located on either side of the tray, to fit the width of the paper.
- The paper side guides should barely make contact with the papers edges.
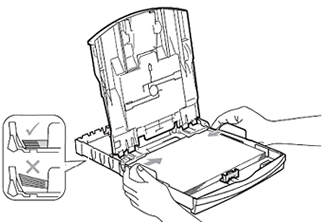
- Be careful not to push the paper in too far. It may lift at the back of the tray and cause feed problems.
- The paper side guides should barely make contact with the papers edges.
- Adjust the blue Paper Length Guide (located in the front-center of the tray) to fit the paper size you are using; if you are using Letter size paper, the pointer should be aligned with LTR.

- Close the paper tray cover.
Make sure the photo tray is in the correct position for normal printing.
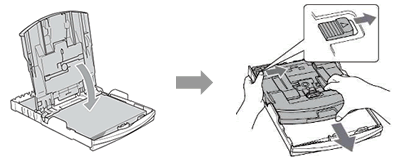
- Identify the position of the photo bypass tray.
- If the Photo Bypass Tray is in the Normal Printing Position continue on to STEP 14.
- If the Photo Bypass Tray is in the Photo Printing Position move it to the Normal Printing Position by pressing the photo bypass tray release button (1) with your left thumb and pull the photo bypass tray forward (2) until it clicks.
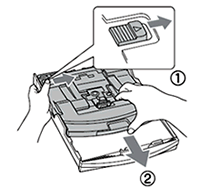
- Again, turn the unit around and check if there are paper jams.
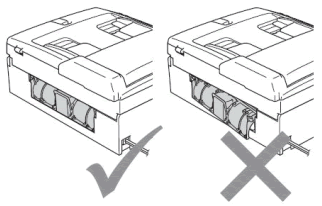
- After making sure there are no paper jams, reinstall the Jam Clear Cover. Make sure the rear cover is completely on. When installed it should be flush with the back of the machine.
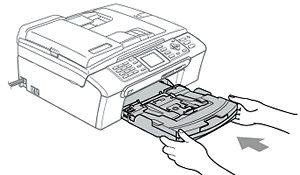
- Reinstall the paper tray by slowly pushing the tray all the way in, you should hear a slight snap or click once the tray is seated properly.
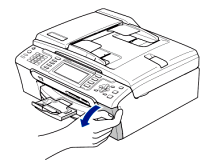
- Briefly open the ink cartridge cover (located at the right, front of the machine) until the LCD displays "Cover Open", then close the cover. This will reset the machine.
- Test the machine by printing the Print Quality Check Sheet (PQCS).
- Press Ink.
- Press the up or down arrow key to choose Test Print and press OK.
- Press the up or down arrow key to choose Print Quality and press OK.
- Press Black Start.
- The PQCS should begin printing.
- If the page prints correctly and ejects completely from the machine the problem is resolved.
Press 1 and Stop to return to the standby mode. - If the page prints and ejects but the print quality is not good, follow the prompts on the LCD to clean the print head and reprint the PQCS.
For further instruction on improving Print Quality refer to the FAQ "How can I improve poor print quality?". - If a different message is displayed on the LCD refer to the necessary FAQ for the message being displayed.
- If the message "No Paper Fed"continues to appear on the display please contact Brother Customer Service from "Contact Us".
- If the page prints correctly and ejects completely from the machine the problem is resolved.
There are 2 reasons why the PE Actuator may have been dislodged.
- If the machine multi-feeds due to an overfilled paper tray, when removing the tray, the multiple sheets of paper reduces the space between the back of the tray and the PE Actuator, possibly causing it to dislodge.
- If the machine incurs a paper jam, when removing the jammed paper it may get stuck on the PE Actuator and when pulling the paper, this could dislodge the PE Actuator.
If the PE Actuator has been dislodged or damaged please contact Brother Customer Service from "Contact Us".
Remarques sur le contenu
Pour nous aider à améliorer notre soutien, veuillez nous faire part de vos commentaires ci-dessous.
