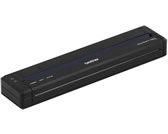
PJ-723
FAQs & Troubleshooting |
Using the Printer Setting Tool (for Mac)
Using the "Printer Setting Tool", you can specify the printer's communication settings and device settings from a Mac. Not only can you change the device settings for one printer, but you can also apply the same settings to multiple printers.
- The "Printer Setting Tool" is installed at the same time as other software such as the printer driver. For more information, see "Installing the software".
- Make sure the AC adapter is connected to an AC power outlet, the car adapter is connected to a DC power outlet, or the fully-charged battery is installed.
- Make sure the printer driver has been installed and is functional.
- Connect this printer to a computer with a USB cable. With this tool, settings cannot be specified using Bluetooth® or Wi-Fi®.
- Connect the printer you want to configure to the computer.
-
Click [Macintosh HD] - [Applications] - [Brother] - [Printer Setting Tool] - [Printer Setting Tool.app].
The [Printer Setting Tool] window appears. -
Check that the printer you want to configure appears beside [Printer]. If a different printer appears, select the printer you want from the drop-down list.
If only one printer is connected, it is unnecessary to make a selection since only that printer will appear.
- Select a setting tab, and then specify or change the settings.
- Click [Apply Settings to the Printer] in the setting tab to apply the settings to the printer.
-
Click [Exit] to finish specifying settings.
Use the "Printer Setting Tool" to configure the printer only when the printer is in standby. The printer may malfunction if you attempt to configure it while it is handling a job.
For information on items in the Printer Setting Tool window, refer to the following links:
- Settings Dialog Box
- Paper Settings Tab
- Print Settings Tab
- Printer Settings Tab
- Bluetooth Settings Tab (PJ-762/PJ-763/PJ-763MFi Only)
- Wireless LAN Tab (PJ-773 Only)
-
Applying Setting Changes to Multiple Printers
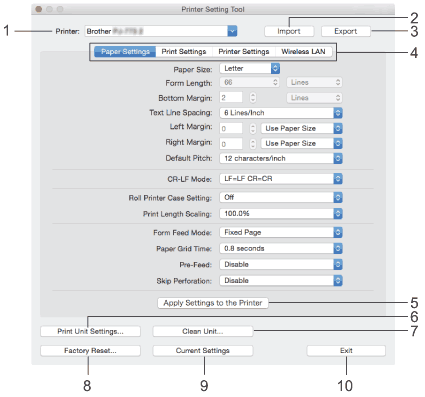
-
Printer
Lists the connected printers. -
Import
Imports settings from a file. -
Export
Saves the current settings in a file. -
Setting Tabs
Contain settings that may be specified or changed. -
Apply Settings to the Printer
Applies the settings to the printer. -
Print Unit Settings
Prints a report containing firmware version, paper size, and configuration information, as shown below.
The Bluetooth settings (PJ-762/PJ-763/PJ-763MFi only) or Wi-Fi settings (PJ-773 only) are printed on this page.
<Print image>

-
Clean Unit
Cleans the platen roller of the printer by feeding the dedicated cleaning sheet. See How do I clean the platen roller? -
Factory Reset
Resets all of the printer settings to the factory settings. -
Current Settings
Retrieves the settings from the currently connected printer and displays them in the dialog box. -
Exit
Exits the Printer Setting Tool.
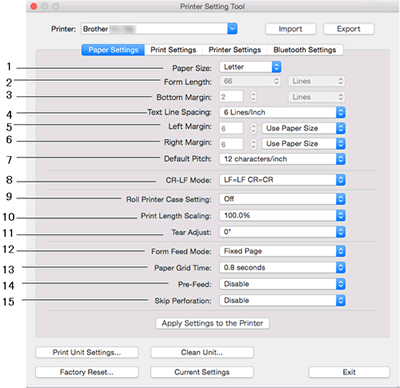
-
Paper Size
Specifies the default paper size.
Available settings: [Letter], [Legal], [A4], [Custom] -
Form Length
This parameter can be set only when [Paper Size] is set to [Custom].
Form length is determined by specifying the number of lines per page, or the length in inches of each page.
The available settings differ depending on the selected [Text Line Spacing] settings.Text Line Spacing
Lines
Inches
[6 Lines/Inch]
6-127
1.00-21.16
[8 Lines/Inch (0.125")] or [8 Lines/Inch (0.12")]
8-127
1.00-15.87
-
Bottom Margin
The setting specified for this parameter takes effect only when [Paper Size] is set to [Custom].
The height of the bottom margin is expressed in lines of text.
The available settings differ depending on the selected [Text Line Spacing] setting.Text Line Spacing
Lines
[6 Lines/Inch]
3-126
[8 Lines/Inch (0.125")] or [8 Lines/Inch (0.12")]
4-126
-
Text Line Spacing
Specifies the height of each line of text.
Available settings: [6 Lines/Inch], [8 Lines/Inch (0.125")], [8 Lines/Inch (0.12")] -
Left Margin
Specifies the left margin.
Available settings: [Use Paper Size], [Columns] -
Right Margin
Specifies the right margin.
Available settings: [Use Paper Size], [Columns] -
Default Pitch
Specifies character width.
Available settings: [10 characters/inch], [12 characters/inch], [15 characters/inch], [Proportional] -
CR-LF Mode
Specifies how the printer responds when LF (line feed) and CR (carriage return) commands (ASCII characters 10 and 13) are received.
Available settings: [LF=LF CR=CR], [LF=CR+LF CR=CR+LF] -
Roll Printer Case Setting
Specifies the setting for using the optional roll printer case. If [On] is selected, you can adjust the feed value or amount of paper retraction for the roll printer case.
Available settings: [On], [On (Without Anti Curl)], [On (Short Feed)], [Off] -
Print Length Scaling
Specifies the reduction or enlargement ratio for printing.
Available settings: 95% - 105% (in increments of 0.5%) -
Tear Adjust
Adjust the tear bar tear off position for paper media.
Available settings: [+0.08"], [+0.06"], [+0.04"], [+0.02"], [0"], [-0.02"], [-0.04"], [-0.06"], [-0.08"]
([+2.0 mm], [+1.5 mm], [+1.0 mm], [+0.5 mm], [0 mm], [-0.5 mm], [-1.0 mm], [-1.5 mm], [-2.0 mm]) -
Form Feed Mode
Specifies how the printer responds to form feed commands received from any source.
Available settings: [No Feed], [Fixed Page], [End of Page], [End of Page Retract] -
Paper Grip Time
Specifies the delay before the printer grabs the paper.
Available settings: [0.5 seconds], [0.8 seconds], [1.2 seconds] -
Pre-Feed
If [Enable] is selected, the printer ejects a short length of paper when the printer turns on. When using perforated roll paper or roll paper that is pre-printed, we recommend setting this parameter to [Disable].
Available settings: [Enable], [Disable] -
Skip Perforation
Leaves a one-inch (25.4 mm) margin at the top and bottom of the paper. Use it when printing on perforated roll paper so that the printer does not print on the perforation.
Available settings: [Enable], [Disable]
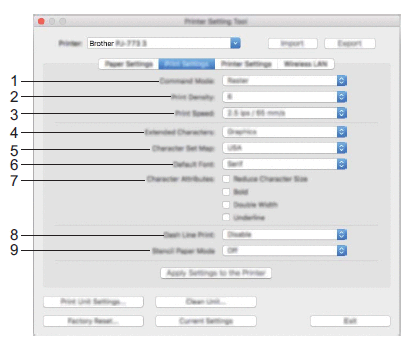
-
Command Mode
Specifies the printer’s command format.
Available settings: [Raster], [ESC/P Legacy], [ESC/P Brother], [P-touch Template] -
Print Density
Specifies the printing density.
Available settings: 0-10 -
Print Speed
Specifies the printing speed in inches or millimeters per second.
Available settings: [1.1 ips / 27 mm/s], [1.6 ips / 41 mm/s], [1.9 ips / 48 mm/s], [2.5 ips / 65 mm/s] -
Extended Characters
Specifies which characters are used when printing ASCII characters 128 to 255.
Available settings: [Italic], [Graphics] -
Character Set Map
Specifies which character set is used, allowing you to print special characters appropriate for the language selected.
Available settings: [USA], [France], [Germany], [United Kingdom], [Denmark I], [Sweden], [Italy], [Spain I], [Japan], [Norway], [Denmark II], [Spain II], [Latin America], [Korea], [Legal] -
Default Font
Specifies which built-in font is used.
Available settings: [Serif], [Sans Serif] -
Character Attributes
Specifies the attributes used for printed text.
Available settings: [Reduce Character Size], [Bold], [Double Width], [Underline] -
Dash Line Print
Prints dash lines between pages, useful when printing on roll paper. Set [Form Feed Mode] to [Fixed Page], and then select [Enable]. Note that dash lines are printed on the paper; they are not punched into the paper.
Available settings: [Enable], [Disable] -
Stencil Paper Mode
Available settings: [ON], [OFF]
-
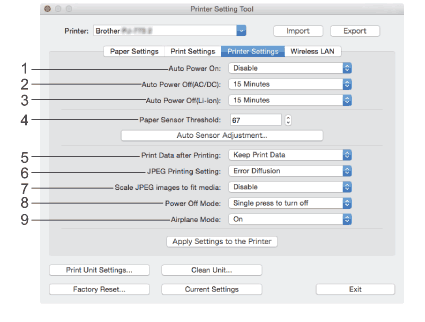
Auto Power On
Specifies how the printer responds when connected to an AC or DC power outlet or when the battery is installed.
Available settings: [Disable], [Enable], [Enable (No Main Button)] -
Auto Power Off (AC/DC)
Specifies the amount of time that passes before the printer turns off automatically when connected to an AC or DC power outlet.
Available settings: [None], 1/2/3/4/5/6/7/8/9/10/15/20/25/30/40/50/60/90/120 minutes -
Auto Power Off (Li-ion)
Specifies the amount of time that passes before the printer turns off automatically when powered by the battery.
Available settings: [None], 1/2/3/4/5/6/7/8/9/10/15/20/25/30/40/50/60/90/120 minutes -
Paper Sensor Threshold
Specifies the threshold of the paper detection sensor.
Available settings: 0-255 -
Print Data after Printing
Allows to erase print data after it is printed.
Available settings: [Erase All Print Data], [Keep Print Data] -
JPEG Printing Setting
Specifies the JPEG print settings.
Available settings: [Simple Binary], [Error Diffusion] -
Scale JPEG images to fit media
Allows enlarging or reducing a JPEG image to fit the paper size.
Available settings: [Enable], [Disable] -
Power Off Mode
Choose how you want to turn off the printer.
Available settings: [Single press to turn off], [Double press to turn off] -
Airplane Mode
Allows disabling the (Bluetooth) or
  (Wi-Fi) button. This function is useful when you use the printer in a place where signal transmissions are not allowed.
Available settings: [On], [Off]
Bluetooth Settings Tab (PJ-762/PJ-763/PJ-763MFi Only)
-
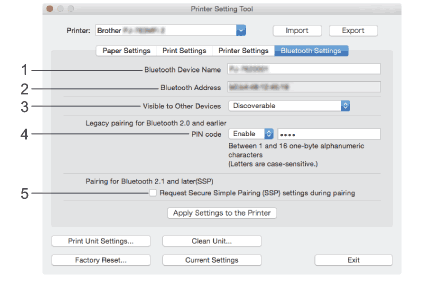
Bluetooth Device Name
Allows to enter the Bluetooth device name. -
Bluetooth Address
Displays the acquired Bluetooth address. -
Visible to Other Devices
Allows the printer to be "discovered" by other Bluetooth devices.
Available settings: [Discoverable], [Not Discoverable] -
PIN code
Enables or disables the PIN code used when pairing with computers or mobile devices. -
Request Secure Simple Pairing (SSP) settings during pairing
If this check box is selected, pairing can be performed using the printer buttons for devices that are compliant with Bluetooth 2.1 or later.
Wireless LAN Tab (PJ-773 Only)
-
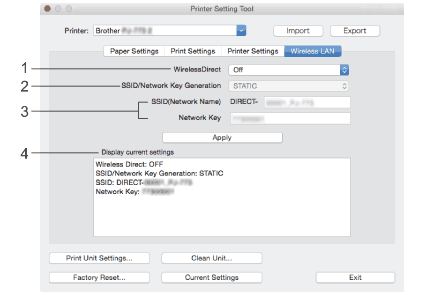
WirelessDirect
Turns the Wireless Direct function on or off. -
SSID/Network Key Generation
Select [AUTO] or [STATIC]. -
SSID (Network Name)/Network Key
Specifies the SSID (3 to 25 ASCII characters) and the network key you want to use in the Wireless Direct mode.
You can only specify a setting when [STATIC] is selected as [SSID/Network Key Generation]. -
Display current settings
Displays the current settings for Wireless Direct. Click the [Current Settings] button to update the displayed settings with the most recent information.
Applying Setting Changes to Multiple Printers
- After applying settings to the first printer, disconnect the printer from the computer, and then connect the second printer to the computer.
- Select the newly connected printer from the [Printer] drop-down list.
-
Click the [Apply Settings to the Printer] button.
The same settings that were applied to the first printer are applied to the second printer. - Repeat steps 1 – 3 for all the printers whose settings you wish to change.
To save the current settings in a file, click [Export].
The same settings can be applied to another printer by clicking [Import], then selecting the exported settings file.
