PT-P750W
FAQs & Troubleshooting |
Creating a label using P-touch Editor Lite
To create a label using P-touch Editor Lite, follow the steps below:
-
Turn on the P-touch labeler (1), then press and hold down the Editor Lite button until the green Editor Lite lamp lights up (2).

-
Connect the USB cable to the computer and P-touch labeler.

If you are connecting the P-touch labeler via a USB hub, it may not be detected correctly.
-
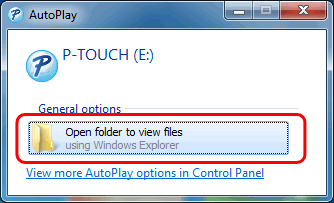
When the printer is connected to your computer, the following windows open.
For Windows 8 or later:
Double-click "PTLITExx.EXE (xx=Version)" to start P-touch Editor Lite.

For Windows 7:
Click [Open folder to view files].

The following window opens.
Double-click "PTLITExx.EXE (xx=Version)" to start P-touch Editor Lite.

For Windows Vista - Updated Windows AutoPlay functionality:
Double-click "PTLITExx.EXE (xx=Version)" to start P-touch Editor Lite.

For Windows Vista:
Select [P-touch Editor Lite] and click [OK].

For macOS 10.14/10.13/ 10.12/ Mac OS X 10.11/ 10.10/ 10.9/ 10.8/ 10.7.5:
Double-click [PT-P750W] on the desktop and the [P-touch Editor Lite] application icon.

- It will take longer than usual when connecting the printer to your computer for the first time. If the software does not start automatically when you connect the printer, refer to "P-touch Editor Lite pop-up dialog box does not appear when connecting the printer to my computer.".
- For more information about P-touch Editor Lite, click here.
Content Feedback
To help us improve our support, please provide your feedback below.
