MFC-9130CW
FAQs & Troubleshooting |
Configure and use the Scan to FTP feature
The Scan to FTP feature allows you to scan a black and white or color document directly to an FTP server on your local network or on the Internet. The details required to use Scan to FTP can be entered by using the Web Based Management to pre-configure and store the details in an FTP profile.
Click the link for steps:
Scan to FTP is available only after FTP profiles have been configured.
I. To configure the FTP profiles for the Scan to FTP feature:
- Print the network configuration report to obtain the IP address of the Brother machine. (Click here to see how to print the Network Configuration List.)
-
Open web-based management on a computer connected to the same network as your Brother machine. To use web-based management, open a web browser (such as Internet Explorer) and enter in the IP address of the Brother machine from the Network Configuration List. (Ex: http://[IP address of your machine])
If you have previously set a password, type it, and then press .
. - Click the Scan tab.
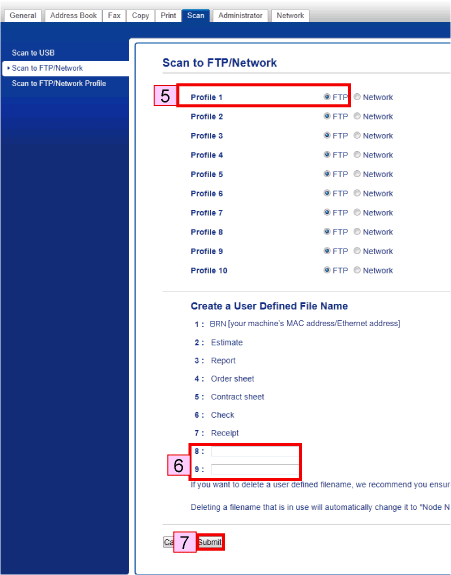
- Select the Scan to FTP/Network menu.
- Select the FTP option for the profile you want to use for Scan to FTP.
-
Under Create a User Defined File Name, you may enter a file name to be used as the prefix for scanned documents. You can store two user defined File Names in addition to the seven preset File Names.
A maximum of 15 characters can be entered. -
Once all changes have been made, click Submit.

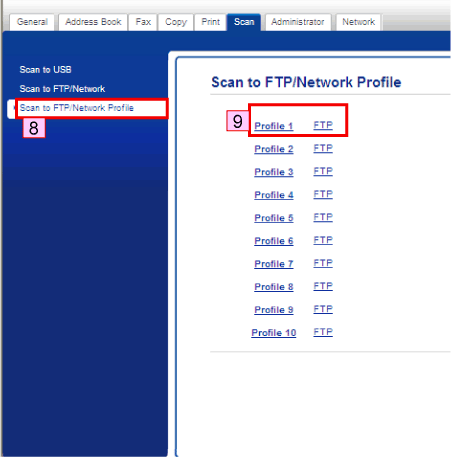
- Click Scan to FTP/Network Profile.
-
Click the Profile Name you want to configure and change the Scan to FTP settings.

-
Enter in the following information:

Profile Name:
Enter the name that you want to use for the profile of the FTP server. You will see this name on the Brother machine when using the Scan to FTP feature. (Up to 15 characters)
Host Address:
Enter the Host Address (Up to 64 characters), which is the domain name of the FTP server you want to connect to, or the IP address of the FTP server. (ex: ftp.example.com or 192.23.56.189)
Username:
Enter the username that has been registered with the FTP server for the machine. (Up to 32 characters)
Password/Retype Password:
Enter the password that has been registered with the FTP server for the machine. (Up to 32 characters)
Store Directory:
Enter the destination folder where your document will be stored on the FTP server. Make sure you enter a forward slash before the directory path /. (ex: /brother/abc) (Up to 60 characters)
File Name:
Select the file name you want to use as a prefix to the scanned document. It helps you identify the scanned document. You can choose from seven preset and two user defined File Names. The file name that will be used for your document will be the file name you chose plus the last 6 digits of the flatbed/ADF scanner counter plus the file extension. (ex: Estimate098765.pdf). You can also manually enter a file name up to 15 characters.
Quality:
Select the scan quality. If you choose the User Select option, the machine will prompt users to select a setting each time they use the scan profile.
File Type:
Select the file type you want to use for the scanned document. If you choose the User Select option, the machine will prompt users to select a setting each time they use the scan profile. If you choose Secure PDF, the machine will ask you to enter a 4-digit password using the numbers 1-9 before it starts scanning.
Glass Scan Size:
Select your document size. This is necessary to make sure the scanned file is the correct size. If you choose the User Select option, the machine will prompt users to select a setting each time they use the scan profile.
File Size:
Select your file size. If you choose the User Select option, the machine will prompt users to select a setting each time they use the scan profile.
Remove Background Color:
Select the level. You can use this function to remove the background color of documents to make the scanned data more legible.
Passive Mode:
Set passive mode OFF or ON depending on your FTP server and network firewall configuration. By default this setting is ON.
Port Number:
Enter the port number used to access the FTP server. By default the port is 21 but you may modify it if your server uses a different port. - Once you have entered in the settings click Submit.
II. To use the Scan to FTP feature:
- Load your document.
-
Press
 (Scan).
 -
Swipe left or right to display
 (to FTP).
 -
Press
 (to FTP).
 - Press OK.
- Press the Up or Down arrow key to display the FTP profiles, and then press the profile you want to use. If the profile is not complete, you will be prompted to enter the missing information.
-
Press Start to start scanning. The machine's display shows Connecting. When the connection to the FTP server is successful the machine will start the scanning process.
Content Feedback
To help us improve our support, please provide your feedback below.
