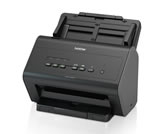
ADS-2400N
FAQs & Troubleshooting |
Duplex (two-sided) scan
For instructions on how to 2-sided (duplex) scan, click on the link below for your scanning method:
- Using ControlCenter4 (Windows Only)
- Using ControlCenter2 (macOS 10.14 or earlier Only)
- Using the Scan key
Using ControlCenter4 (Windows Only)
A. ControlCenter4 Home Mode Users
B. ControlCenter4 Advanced Mode Users
NOTE: Illustrations shown below are from a representative product and may differ from your Brother machine.
A. ControlCenter4 Home Mode Users:
- Place a document to be scanned in the ADF (Automatic Document Feeder).
-
Open the ControlCenter4.
(Windows 7, Windows 10, and Windows 11)
Do one of the following to open the ControlCenter4.-
Click
 or
or  (Start) > (All Programs or All apps >) Brother > Brother Utilities
and then go to STEP 3. -
Right-click on the ControlCenter4 icon
 located in the Task Tray and left-click on Open.
and then go to STEP 5.
(Windows 8 or 8.1)
-
On the Start screen, click
 .
.
If is not on the Start screen, right-click somewhere on an empty spot, and then click, All Apps from the bar.
 - Click Brother Utilities.
-
Click
- Select your model name from the pulldown list.
-
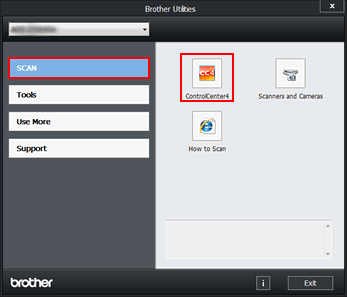
Select SCAN and then click ControlCenter4.
-
While on the Scan Tab, select Custom and click Custom Settings.
-
Place a check in the box for 2-sided Scanning. You will then be able to select one of the following binding options:
- Long-edge binding
-
Short-edge binding
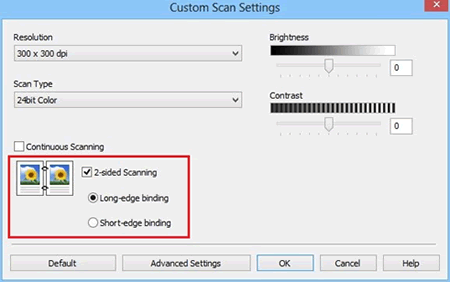
- Click OK.
- Press Scan. The document will now scan.
B. ControlCenter4 Advanced Mode Users:
- Place a document to be scanned in the ADF (Automatic Document Feeder).
-
Open the ControlCenter4.
(Windows 7, Windows 10, and Windows 11)Do one of the following to open the ControlCenter4.
-
Click
 or
or  (Start) > (All Programs or All apps >) Brother > Brother Utilities
and then go to STEP 3. -
Right-click on the ControlCenter4 icon
 located in the Task Tray and left-click on Open.
and then go to STEP 5.
(Windows 8 or 8.1)
-
On the Start screen, click
 .
.
If is not on the Start screen, right-click somewhere on an empty spot, and then click, All Apps from the bar.
 - Click Brother Utilities.
-
Click
- Select your model name from the pulldown list.
-
Select SCAN and then click ControlCenter4.

-
Click on Configuration > Button Settings > Scan > select your desired Scan Type.
-
Place a check in the box for 2-sided Scanning. You will then be able to select one of the following binding options:
- Long-edge binding
-
Short-edge binding
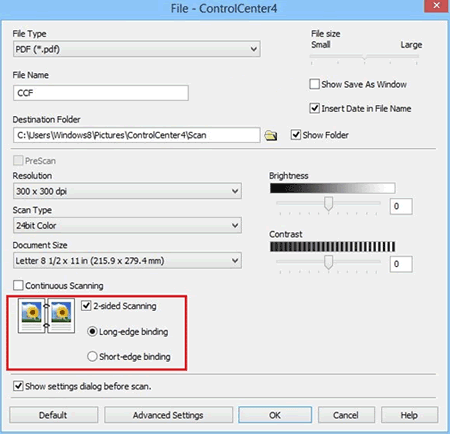
- Click OK.
- Click Scan that you configured and then click Scan. The document will now scan.
Using ControlCenter2 (macOS 10.14 or earlier only)
- Place a document to be scanned in the ADF (Automatic Document Feeder).
-
Open the ControlCenter2.
To open the ControlCenter2 application, click Go from the Finder bar, Applications > Brother > ControlCenter. Double click the ControlCenter.
The ControlCenter will open and an icon will be placed in the dock. - Click on Configuration > Scan > select your desired Scan Type.
-
Place a check in the box for 2-sided Scanning. You will then be able to select one of the following binding options:
- Long-edge binding
-
Short-edge binding
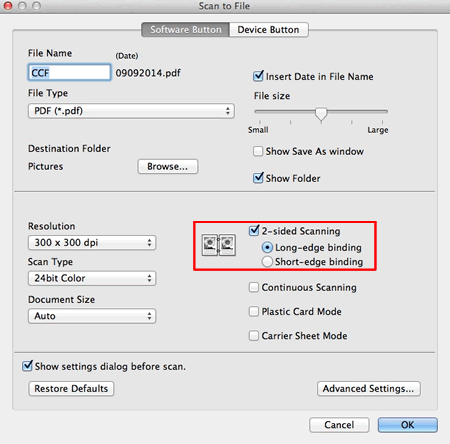
- Click OK. All subsequent scans will use this setting.
- Click Scan that you configured and then click Start Scanning. The document will now scan.
Using the Scan key
You can configure the Scan-to settings from your computer using ControlCenter4 or ControlCenter2.
-
Open the ControlCenter4 or ControlCenter2.
-
ControlCenter4: Brother Utilities supported models
-
Open Brother Utilities.
-
Windows 7, Windows 10, and Windows 11
Click or
or  (Start) > (All Programs or All apps >) Brother > Brother Utilities.
 -
Windows 8
On the Start screen, click .
.
If is not on the Start screen, right-click somewhere on an empty spot, and then click, All Apps from the bar.
Click Brother Utilities.
-
Windows 7, Windows 10, and Windows 11
- Select Scan.
- Click ControlCenter4.
-
Open Brother Utilities.
-
ControlCenter4: Brother Utilities unsupported models
Click (Start) > All Programs > Brother > [model name] > ControlCenter4.
-
ControlCenter2
To open the ControlCenter2 application, click Go from the Finder bar, Applications > Brother > ControlCenter. Double click the ControlCenter.
The ControlCenter will open and an icon will be placed in the dock.
-
ControlCenter4: Brother Utilities supported models
-
Click the Device Settings tab, and then click the Scan to PC Settings button.
The Remote Setup window appears.
<Windows> (The example below uses Home Mode)

<Macintosh>

-
Select a Scan-to action you want to assign (Image, OCR, E-mail, or File) from the pop-up menu.

- Click OK to close the Remote Setup window.
- Follow the steps above STEP 5~7 of ControlCenter4 Home Mode Users or ControlCenter4 Advanced Mode Users, or STEP 3~5 of Using ControlCenter2 (Macintosh only).
- Load your document.
-
Press Scan to PC.
The machine scans the document.
- Place a document to be scanned in the ADF (Automatic Document Feeder).
- Follow the steps above STEP 1~7 of ControlCenter4 Home Mode Users or ControlCenter4 Advanced Mode Users, or STEP 1~5 of Using ControlCenter2 (Macintosh only).
-
Press
 or
or  to display Scan 1.
 - Press to PC.
- Swipe Left or Right to display the Scan-to action you want to do (to OCR, to File, to Image or to E-mail).
- Press the Scan-to action you want to do and then OK.
-
Press
 or
or  to display the destination computer you want to save on.
Press the destination computer.
-
Press Start.
The machine starts the scanning process.
