MFC-9460CDN
FAQs & Troubleshooting |
Carry out calibration to improve the color density
The output density for each color may vary depending on the environment the machine is in, such as temperature and humidity. Calibration helps you to improve the color density.
Follow the steps listed below to carry out calibration. (If your Brother machine has a touchscreen, please follow the steps under "For touchscreen models" below.)
*If you print by using the Macintosh CUPS printer driver, you need to perform the calibration from the status monitor. Click here to see the details of how to perform the calibration from the status monitor.
- Press Menu.
- Press the Up or Down Arrow key to to choose Printer and press OK.
- Press the Up or Down Arrow key to to choose Calibration and press OK.
- Press the Up or Down Arrow key to to choose Calibrate and press OK.
- Press 1 to choose Yes.
- The machine will display Completed.
- Press Stop/Exit.
<For touchscreen models>
- Press Menu on the LCD screen.
- Press the Up or Down Arrow key to to display Printer. Press Printer.
- Press the Up or Down Arrow key to to display Calibration. Press Calibration.
- The machine will display Check Calibration?. Press Yes.
- The machine will display Completed.
- Press Stop/Exit.
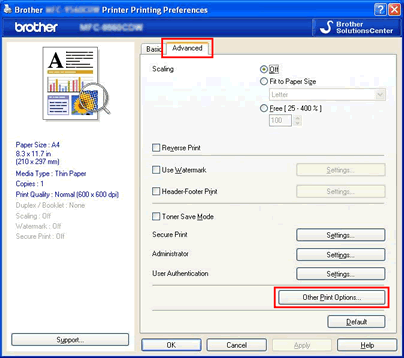
If you print using the Windows printer driver and you still have a print quality issue, please check the settings in the Printing Preferences dialog box.
- Access the Printing Preferences dialog box.
- Click the Advanced tab and click Other Print Options....

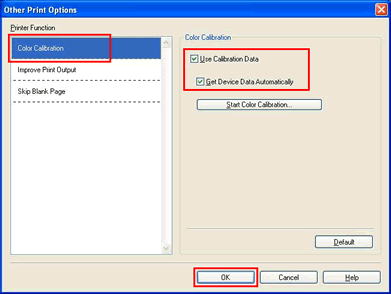
- Choose Color Calibration in the Printer Function, and make sure that both the Use Calibration Data check box and the Get Device Data Automatically check box are checked.

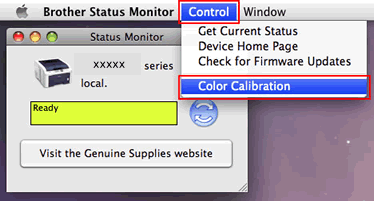
Calibration from the status monitor (if you print by using the Macintosh CUPS printer driver):
Follow the steps listed below to carry out calibration from the status monitor.
- For Mac OS X 10.4 users:
Run the Printer Setup Utility (from the Go menu, choose Applications => Utilities), then choose your Brother machine. Click the Utility.
For Mac OS X 10.5 users:
Run the System Preferences, choose Print & Fax, then choose your Brother machine. Click the Open Print Queue... button, then click Utility.
For Mac OS X 10.6 or greater users:
Run the System Preferences, choose Print & Fax, Print & Scan or Printers & Scanners, then choose your Brother machine. Click the Open Print Queue... button, then click Printer Setup or Settings. Choose the Utility tab then click Open Printer Utility.
- Now the status monitor is turned on.
- Go to the menu bar, click Control => Color Calibration.

- Color Calibration dialogue appears. Read the message and click OK. The machine starts color calibration and then the printer driver attempt to get the calibration data from the machine.
