MFC-J200
Perguntas frequentes e Solução de problemas |
Baixa qualidade de impressão
Follow the instructions that apply to your problem.
-
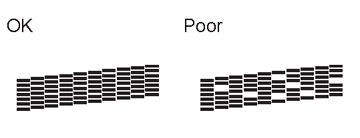
If your printed pages have a horizontal line in the text or graphics (as shown in the illustration below) or blank text, some of the nozzles may be clogged and need to be cleaned. Go to Section 1 for instructions on how to print the Print Quality Check sheet and clean the clogged print head.

-
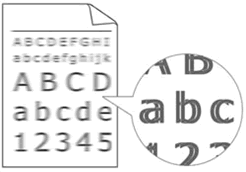
If your printed pages have text that become blurred or images that become faded (as shown in the illustration below), you may need to adjust the print alignment. Go to Section 2 for instructions on how to print the Alignment Check sheet and adjust the print alignment.
- If other print quality problems occur, go to Section 1 for instructions on how to print the Print Quality Check sheet and clean the clogged print head.
Section 1: Checking the print quality and cleaning the print head
*If your Brother machine has a touchscreen, please click here and follow the steps under "For Touchscreen models".
-
Pressione Menu.
-
Press the Up or Down arrow key or the dial pad to choose Ink and press OK.
-
Press the Up or Down arrow key or the dial pad to choose Test Print and press OK.
-
Press the Up or Down arrow key or the dial pad to choose Print Quality and press OK.
-
Press Color (Colour) Start. The machine will start printing the Print Quality Check sheet.
-
Verifique a qualidade dos quatro blocos coloridos na folha.
-
The LCD will ask you if the print quality is OK.
Do one of the following based on the print quality of the check sheet:-
Se todas as linhas estiverem claras e visíveis, pressione 1(Sim) para finalizar a verificação de qualidade e vá para o passo. Vá para a etapa ..
- If you can see missing short lines as shown below, choose No and go to STEP 8.
-
Se todas as linhas estiverem claras e visíveis, pressione 1(Sim) para finalizar a verificação de qualidade e vá para o passo. Vá para a etapa ..
-
The LCD will ask you if the print quality is OK for Black and each of the three colors. Choose Yes or No depending on the print quality of each color.
-
The LCD will ask you if you want to start cleaning. Choose Yes. The machine will start cleaning the necessary print head.
-
After the cleaning is finished, press Color (Colour) Start. The machine will start printing another Print Quality Check sheet.
-
Verifique a qualidade dos quatro blocos coloridos na folha.
-
The LCD will ask you if the print quality is OK.
Do one of the following based on the print quality of the check sheet:-
Se todas as linhas estiverem claras e visíveis, pressione 1(Sim) para finalizar a verificação de qualidade e vá para o passo. Vá para a etapa ..
-
If the print quality continues to be poor and you have tried to clean the print head less than five times, choose No and return to STEP 6 to repeat the print head cleaning. You should complete the Print Quality Check sheet and print head cleaning process up to five times.
- If the print quality continues to be poor and you have tried cleaning the print head up to five times, press Stop/Exit and contact Brother Customer Service from "Contact Us".
-
Se todas as linhas estiverem claras e visíveis, pressione 1(Sim) para finalizar a verificação de qualidade e vá para o passo. Vá para a etapa ..
-
Press
 (Settings).
If
 is on the Touchscreen, you can press it, and then Vá para a etapa ..
 -
Press the Up or Down arrow key to display General Setup.
-
Configuração geral
-
Press the Up or Down arrow key to display Ink.
-
Press Ink.
-
Press the Up or Down arrow key to display Test Print.
-
Press Test Print.
-
Qualidade da impressão
-
Press Start. The machine will start printing the Print Quality Check sheet.
-
Verifique a qualidade dos quatro blocos coloridos na folha.
-
The LCD will ask you if the print quality is OK.
Do one of the following based on the print quality of the check sheet:-
Se todas as linhas estiverem claras e visíveis, pressione 1(Sim) para finalizar a verificação de qualidade e vá para o passo. Vá para a etapa ..
- If you can see missing short lines as shown below, press No and go to STEP 12.

-
Se todas as linhas estiverem claras e visíveis, pressione 1(Sim) para finalizar a verificação de qualidade e vá para o passo. Vá para a etapa ..
-
The LCD will ask you if the print quality is OK for Black and each of the three colors. Press Yes or No depending on the print quality of each color.
-
The LCD will ask you if you want to start cleaning. Pressione Sim. The machine will start cleaning the necessary print head.
-
After the cleaning is finished, press Start. The machine will start printing another Print Quality Check sheet.
-
Once it prints out, check the quality of the check sheet.
-
The LCD will ask you if the print quality is OK.
Do one of the following based on the print quality of the check sheet.-
Se todas as linhas estiverem claras e visíveis, pressione 1(Sim) para finalizar a verificação de qualidade e vá para o passo. Vá para a etapa ..
-
If the print quality continues to be poor and you have tried to clean the print head less than five times, press No and return to STEP 10. You should complete the Print Quality check and print head cleaning process up to five times.
-
If the print quality continues to be poor and you have tried cleaning the print head up to five times, press
 (Home) and contact Brother Customer Service from "Contact Us".
-
Se todas as linhas estiverem claras e visíveis, pressione 1(Sim) para finalizar a verificação de qualidade e vá para o passo. Vá para a etapa ..
Section 2: Checking the Print Alignment
*If your Brother machine has a touchscreen, click here and follow the steps under "For Touchscreen models".
-
Pressione Menu.
-
Press the Up or Down arrow key or the dial pad to choose Ink and press OK.
-
Press the Up or Down arrow key or the dial pad to choose Test Print and press OK.
-
Press the Up or Down arrow key or the dial pad to choose Alignment and press OK.
-
Press Black (Mono) or Color (Colour) Start. The machine will start printing the Alignment Check sheet.
-
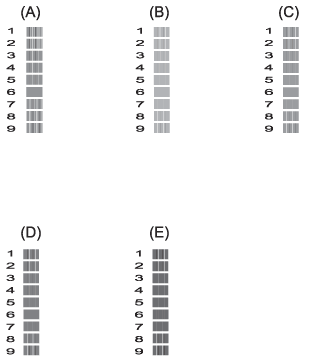
For the "A" pattern, enter the number of the test print that has the least visible vertical stripes (1-9).
Repeat this step for the B, C, D and E patterns.
In the example number 6 is the best choice for A, B, C, D and E.
- Pressione Parar/Sair.
-
Press (Settings).
If
is on the Touchscreen, you can press it, and then Vá para a etapa .. -
Press the Up or Down arrow key to display General Setup.
-
Configuração geral
-
Press the Up or Down arrow key to display Ink.
-
Press Ink.
-
Press the Up or Down arrow key to display Test Print.
-
Press Test Print.
-
Press Alignment.
-
Press Start. The machine will start printing the Alignment Check sheet.

-
For the "A" pattern, press the number of the test print that has the least visible vertical stripes (1-9), and then press it.
Repeat this step for the B, C, D and E patterns.
In the example number 6 is the best choice for A, B, C, D and E.
-
Press
 (Home).
If the print quality continues to be poor, go to Section 1 to clean the print head.
Brother strongly recommends that customers use only genuine Brother ink for best results. Using non-Brother supplies may affect the hardware performance, print quality and machine reliability since the ink formulation in genuine Brother ink cartridges prevent smearing and clogging of the print head. Nossa garantia não cobre quaisquer problemas causados pela utilização não autorizada de tinta e/ou cartuchos de outras marcas.
> Click here for more information about Genuine Brother Supplies.