QL-810W/810Wc
Veelgestelde vragen en probleemoplossing |
How do I import Microsoft Outlook contacts information into the P-touch Address Book?

Please follow the steps below:
-
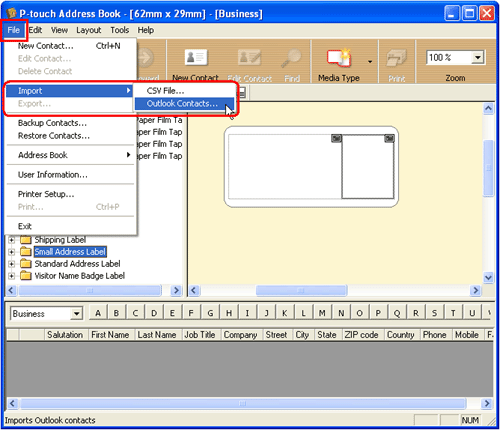
Click [File] - [Import] - [Outlook Contacts...].
-
The "Fields to Import" dialog box will appear. Click the [OK] button. If you need to change the way the fields are assigned from Outlook to Address Book, click
 and select the field to be assigned.

-
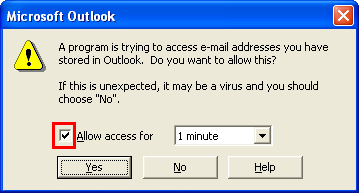
The following warning message may appear when the [OK] button is clicked. Select the check box, and click [Yes].
-
The information will be imported from Outlook contacts into Address Book. Click the check box next to the record to be printed. You can also change the layout using the "layout style selection view".

-
Click
 to print all the marked records.
- In the "Fields to Import" dialog box, the "CSV/Outlook Fields" are based on the currently selected Address Book. For more details, go to [P-touch Address Book Help] - [Function Explanation] - [Import] - [Importing Microsoft Outlook Contacts].
-
If you click on [File] - [Print...] instead of
 , the Print dialog box will appear, and you can choose the print option. Refer to the table below:
Print Range Data of Printing Subject All Records Prints all records. Current Contact Prints the currently displayed contact. Marked Contact(s) Prints the contacts where the check box is selected in the Record View. Contact Range Prints the record range designated in "From" and "To".
Feedback
Geef hieronder uw feedback. Aan de hand daarvan kunnen wij onze ondersteuning verder verbeteren.