TJ-4021TNR
Veelgestelde vragen en probleemoplossing |
How to calibrate the RFID
For optimal calibration results, perform Media Calibration before RFID Calibration. Make sure you correctly install both the ribbon and the label roll.
-
Perform Media Auto Calibration.
Using the Touchscreen:- Load the RFID media into the printer.
- (Thermal transfer only) Load the ribbon into the printer.
-
Tap the Menu icon
 .
. -
Tap the Sensor icon
 .
. -
Tap Auto Calibration, select the media type, and then tap
 to start the media calibration.

You can download the BPM from the [Downloads] section of this website.
- Load the RFID media into the printer.
- (Thermal transfer only) Load the ribbon into the printer.
- Connect the USB cable between the computer and the printer.
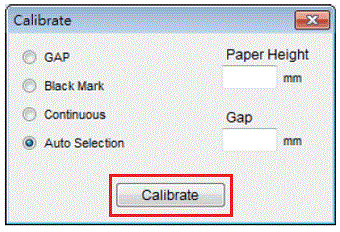
- Start the BPM.
- Select the printer in the list, and then click the Printer Function button.
-
Click Calibrate.

- Click Printer Configuration and make sure that the paper width and height in the FBPL tab are set correctly.
Send the AUTODETECT command using the BPM or Comm Tool.
You can download the tools from the [Downloads] section of this website.For more information, see the FBPL Command Reference in the [Manuals] section of this website.
-
Check that the RFID antenna is set at the center of the RFID chip or the antenna loop on the tag.
-
Start RFID Calibration.
Using the Touchscreen:- Go to the RFID menu.
-
Tap Menu
 > Interface
  > RFID > Tag Calibration > Do RFID Calibrate, and then tap
  .
.

Send the AUTODETECT command using the BPM or Comm Tool.
You can download the tools from the [Downloads] section of this website.For more information, see the FBPL Command Reference in the [Manuals] section of this website.
-
When the calibration is complete, the green screen appears. When it is not successful, the red screen is displayed.
Depending on the tag type and tag length, the calibration can take several minutes.
-
If the calibration failed, tap
 or
or  to clear the error. In some cases, it may be due to an incompatibility between the tag and the reader. After the calibration is complete, tap
  or
or  to continue and save the RFID calibration values.
Feedback
Geef hieronder uw feedback. Aan de hand daarvan kunnen wij onze ondersteuning verder verbeteren.
