HL-3045CN
FAQs & Troubleshooting |
Install extra memory
Follow the instructions below to install additional memory.
- Turn off the printer power switch, and then unplug the printer.
Always turn off the printer power switch before installing or removing the SO-DIMM.
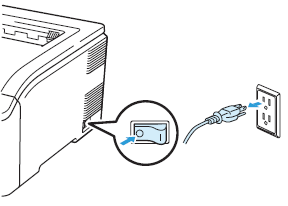
- Disconnect the interface cable from the printer.
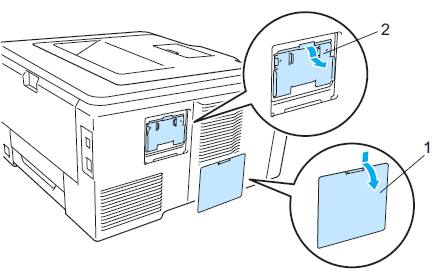
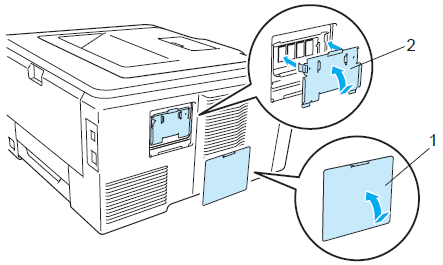
- Remove the plastic (1) and then the metal (2) SO-DIMM covers.
- Unpack the SO-DIMM and hold it by its edges.
To prevent damage to the printer from static electricity, DO NOT touch the memory chips or the board surface.
- Hold the SO-DIMM by the edges and align the notches in the SO-DIMM with the protrusions in the slot.
Insert the SO-DIMM diagonally (1), then tilt it toward the interface board until it clicks into place (2).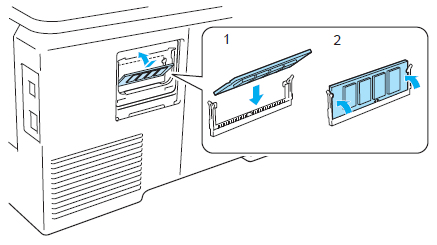
- Put the metal (2) and then the plastic (1) SO-DIMM covers back on.
- Reconnect the interface cable to your printer.
- Plug the printer back in, and then turn on the power switch.
- Print the Printer Settings page and check the current memory size.
If the current memory size is greater than the standard memory size, the SO-DIMM is installed properly.
The current memory size is written next to RAM Size at the top of the Printer Settings page.
Click here to see the details of how to print the Printer Settings page.
Content Feedback
To help us improve our support, please provide your feedback below.