HL-2600CN
FAQs & Troubleshooting |
How do I use the Brother Analysis Tool software?
Brother printers that use the optional HD-6G/HD-EX or Compact Flash memory can record job accounting information. This job accounting information can be viewed using a standard web browser or loaded into the Brother Analysis Tool software which can analyze the costs of your network connected Brother printers. There are three steps to using this feature.
Step 1: Formatting the Printer Hard Disc and Enabling the Job Log Feature
Having installed the optional HD-6G/HD-EX or Compact Flash memory into the printer, you must ensure that the printer is configured to save job data. If you do not configure this option, job data will not be recorded and it will be impossible to analyze printing costs. However, before you do that, make sure that the HD-6G/HD-EX or Compact Flash memory is formatted.
Formatting the HD-6G/HD-EX or Compact Flash Memory
- Press the '+' or '-' keys until you see 'SETUP' on the LCD.
- When 'SETUP' is displayed, press the 'SET' button.
- Press the '+' or '-' keys until you see 'DELETE STORAGE' on the LCD panel.
- Press the 'SET' button
- Press the '+' or '-' keys until you see 'FORMAT (CF)' or 'XXXXX' if you are using the HD-6G/HD-EX
- Press the 'SET' button twice to format the memory.
- Press the 'Go' button to put the printer back on line.
Enabling the Job Log Feature
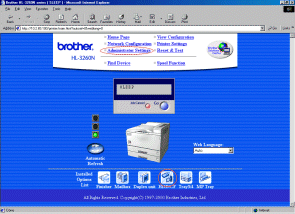
Having formatted the HD-6G/EX/Compact Flash memory, now you must ensure that the printer is configured to record the job accounting data. To do this, launch your web browser and connect to the printer. The printer homepage should display an icon indicating that the HDD or Compact Flash memory is installed. If you do not see any icon, make sure that you have formatted the HDD/Compact Flash memory.
- From the printer homepage, select the 'Administrator Settings' option.
- Enter the print server password (consult your system administrator or print server user guide if you do not know it).
- Select the 'Log Configuration' tab as show below:
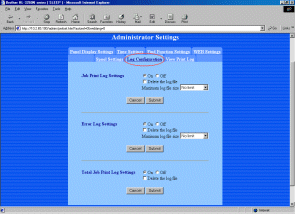
- Ensure that the 'Job PrintLog Settings' option is set to 'No Limit' or specify the maximum size of the job log file. You can also optionally specify the 'Error Log Settings' option and 'Total Job Print Log Settings' option.
- When you have specified the correct values, click the 'Submit' button to save the settings.
The printer is now configured to store job accounting data to the optionally install HDD or Compact Flash memory.
Step 2: Retrieving the Job Accouting information using a web browser
Having formatted the printer hard disc and enabled the job accouting option, you must now retrieve the data from the printer hard disc. To do this, launch your web browser and connect to the printer. The printer homepage should display an icon indicating that the HDD or Compact Flash memory is installed. If you do not see an icon, make sure that you format the HDD/Compact Flash memory.

- From the printer homepage, select the 'Administrator Settings' option.
- Enter the print server password (consult your system administrator or print server user guide if you do not know it).
-
Select the 'View Print Log' option and then click the 'CSV (all)' option.
You MUST specify the 'CSV (all)' option if you wish to use the Brother Analysis Tool software.
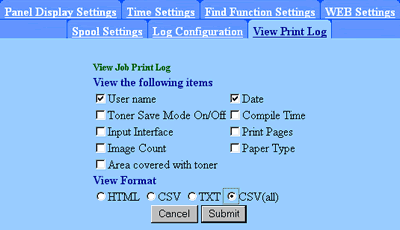
- Click the 'Submit' button.
By selecting the 'CSV (all)' option the printer will extract all data from the printer log and allow you to save it to your hard disc as a CSV file. This file can then be loaded into the Brother Analysis Tool software for later analysis. Click here for more information on loading the CSV file into the Brother Analysis Tool software.
Viewing the Information in other formats
If you select the 'HTML' option, you can view the job accouting information as formatted HTML. You can also view the information as a text file (TXT) or as a CSV file.
Step 3: Analyzing the print data using the Brother Analysis Tool Software
Having extracted the job accounting data to your PC hard disc, you are now able to load that data into the Brother Analysis Tool software for analysis. To learn how to do this, refer to the following:
- Launch the Brother Analysis Tool software and select the File | Open Log File option. Specify the name of the file you created in step 1 and click the 'Open' button.
- The Log file will load into the Analysis Tool software and the information will then be displayed in a similar manner to the way it was displayed when you extracted it from the printers HDD/Compact Flash memory.
- There are now several options you can select the analyze the data. For example, if you wish to see the largest job submitted to the printer, click the View | View Summary Information option, this will then display details about the largest print job submitted to the printer.
Calculating the Cost Per Copy
If you wish to analyze the printing cost, select the User Settings | Configure option and then select the 'Costing' tab. Specify the currency you will use along with the model of printer. You must then enter the costs for the consumables available for that printer.
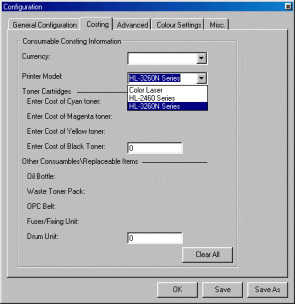
When you have entered the consumable costs, click 'OK' and the Brother Analysis Tool software will calculate the printing costs for all documents submitted to the printer. The data will be displayed in the 'Cost of Print Job' column which you can see by scrolling to the far right of the data in the main view.